Let’s jump right in! In the previous article, we went through a theoretical overview of PipeWire. Our goal will now be to install and configure a minimal Linux-based system that runs PipeWire in order to output audio to an ALSA sink. The hardware for this demo will be a SAMA5D3 Xplained board and a generic USB sound card (a Logitech USB Headset H340 in our case, as reported by /sys/bus/usb/devices/MAJOR-MINOR/product).
We won’t bother with the bootloader setup (in our case U-Boot) as this is out of scope of our topic; if needed, Bootlin has training sessions for embedded Linux system development for which the training materials are freely available.
We will rely on Buildroot for the root filesystem, and compile our Linux kernel outside Buildroot for ease of development. In the chronological order, here are the steps we’ll follow:
- Download Buildroot and configure it. This step will provide us with two things: a cross-compiling toolchain and a root filesystem. We will use a pre-compiled toolchain as compiling a GCC toolchain is a slow process.
- Download, configure and build the kernel. This will require small tweaks to ensure the right drivers are compiled-in. We will rely upon the Buildroot-provided toolchain, which will make allow our project to be self-contained and reduce the number of dependencies installed system-wide. This also leads to a more reproducible routine.
- Boot our board; this requires a kernel image and a root filesystem. We’ll rely upon U-Boot’s TFTP support to retrieve the kernel image and Linux’s NFS support for root filesystems to allow for quick changes.
- Iterate on 1, 2 and 3 as needed! We might want to change kernel options or add packages to our root filesystem.
Feel free to skip the steps that are not required for you if you plan to follow along, this probably assumes some small configuration changes here and there on your side.
Buildroot: toolchain & root filesystem
Let’s start with Buildroot:
$ export WORK_DIR=PATH/TO/WORKING/DIRECTORY/
$ cd $WORK_DIR

# Download and extract Buildroot
$ export BR2_VERSION=2022.02
$ wget "https://buildroot.org/downloads/buildroot-$BR2_VERSION.tar.gz"
$ tar xf buildroot-$BR2_VERSION.tar.gz
$ mv buildroot-$BR2_VERSION buildroot

# Hop into the config menu
$ cd buildroot
$ make menuconfig
# nconfig, xconfig and gconfig are also available options
It’s config time! We’ll use a pre-compiled glibc-based toolchain.
- In “Target options”:
- “Target architecture” should be “ARM (little endian)” (
BR2_armsymbol); - “Target architecture variant” should be “cortex-A5” (
BR2_cortex_a5); - “Enable VFP extension support” should be true (
BR2_ARM_ENABLE_VFP);
- “Target architecture” should be “ARM (little endian)” (
- In “Toolchain”:
- “Toolchain type” should be “External toolchain” (
BR2_TOOLCHAIN_EXTERNAL); - “Toolchain” should be “Bootlin toolchains” (
BR2_TOOLCHAIN_EXTERNAL_BOOTLIN); - “Bootlin toolchain variant” should be “armv7-eabihf glibc stable 2021.11-1” (
BR2_TOOLCHAIN_EXTERNAL_BOOTLIN_ARMV7_EABIHF_GLIBC_STABLE); - “Copy gdb server to the target” can be set to true, this might come in useful in such experiments (
BR2_TOOLCHAIN_EXTERNAL_GDB_SERVER_COPY).
- “Toolchain type” should be “External toolchain” (
- In “Build options”, various options could be modified based on preferences: “build packages with debugging symbols”, “build packages with runtime debugging info”, “strip target binaries” and “gcc optimization level”.
- In “System configuration”, the root password can be defined (
BR2_TARGET_GENERIC_ROOT_PASSWDsymbol). Changing this from the default empty password will allow us to login using SSH. - In “Target packages”, we’ll list them using symbol names as that is easier to search:
BR2_PACKAGE_ALSA_UTILSwith itsAPLAYoption, to enable testing devices directly using ALSA;BR2_PACKAGE_DROPBEARto enable the Dropbear SSH server, its client option can be disabled;BR2_PACKAGE_PIPEWIRE, today’s topic.
From this article’s introduction, we know that we still need a session manager to go along with PipeWire. Both pipewire-media-session and WirePlumber are packaged by Buildroot but we’ll stick with WirePlumber as its the recommended option. At the place it should appear in the menuconfig is a message that tells us that we are missing dependencies:
*** wireplumber needs a toolchain w/ wchar, threads and Lua >= 5.3 ***
If in doubt of what causes this message to appear as it lists multiple dependencies, we can find the exact culprit by searching for the BR2_PACKAGE_WIREPLUMBER symbol in menuconfig, which tells us on which symbols WirePlumber depends on:
Symbol: BR2_PACKAGE_WIREPLUMBER [=n]
Type  : bool
Prompt: wireplumber
  Location:
    -> Target packages
      -> Libraries
      (1)     -> Graphics
  Defined at package/wireplumber/Config.in:1
  Depends on: BR2_PACKAGE_PIPEWIRE [=y] &&
    (BR2_PACKAGE_LUA_5_3 [=n] || BR2_PACKAGE_LUA_5_4 [=n]) &&
    BR2_USE_WCHAR [=y] && BR2_TOOLCHAIN_HAS_THREADS [=y] &&
    BR2_USE_MMU [=y]
  Selects: BR2_PACKAGE_LIBGLIB2 [=n]
The depends on entry tells us the boolean expression that needs to be fullfilled for BR2_PACKAGE_WIREPLUMBER to be available. Next to each symbol name is its current value in square brackets.
Note: this process could have been done manually, by looking for the WirePlumber symbol definition in buildroot/package/wireplumber/Config.in and grepping our current .config, seeing what was missing.
The conclusion is that we are missing Lua, which is the scripting used throughout WirePlumber. Enabling BR2_PACKAGE_LUA makes the BR2_PACKAGE_WIREPLUMBER option available, which we enable.
In the Buildroot version we selected, the WirePlumber package lists PACKAGE_DBUS as an unconditional dependency in the WIREPLUMBER_DEPENDENCIES variable, in package/wireplumber/wireplumber.mk. However, WirePlumber can be built fine without it and we therefore need to remove it manually to build successfully our image. This has been fixed for upcoming Buildroot versions.
As often in Buildroot, packages have optional features that get enabled if dependencies are detected. make menuconfig won’t tell us about those, the best way is to browse the package/$PKG/$PKG.mk files for $PKG that interests us and see what gets conditionnally enabled. By visiting PipeWire’s and WirePlumber’s makefiles, we can see that we might want to enable:
BR2_PACKAGE_DBUSfor various D-Bus-related features which we have explored in the first article; this allows building the SPA D-Bus support plugin relied upon by both PipeWire and WirePlumber, which explains why WirePlumber doesn’t directly depend upon D-Bus;BR2_PACKAGE_HAS_UDEVto support detection of events on ALSA, V4L2 and libcamera devices;BR2_PACKAGE_SYSTEMDfor systemd unit files to get generated and systemd-journald support (logging purposes);BR2_PACKAGE_ALSA_LIBfor ALSA devices support (which also requiresBR2_PACKAGE_ALSA_LIB_{SEQ,UCM}andBR2_PACKAGE_HAS_UDEV);BR2_PACKAGE_AVAHI_LIBAVAHI_CLIENTfor network discovery in various PipeWire modules: search for theavahi_depsymbol in PipeWire’smeson.buildfiles for the list;BR2_PACKAGE_NCURSES_WCHARto build thepw-topmonitoring tool;BR2_PACKAGE_LIBSNDFILEto build thepw-cattool (equivalent of alsa-tools’aplay);- and a few others.
One option that needs discussion is the BR2_PACKAGE_HAS_UDEV. It is required to have the -Dalsa=enabled option at PipeWire’s configure step. As can be seen in PipeWire’s spa/meson.build, this option enforces that ALSA support gets built:
alsa_dep = dependency('alsa', required: get_option('alsa'))
This line seems to indicate that to have ALSA support, we could simply add ALSA as a dependency and rely on the fact that the build system will find it. However, later on in the same Meson build file, we notice:
libudev_dep = dependency(
    'libudev',
    required: alsa_dep.found() or
        get_option('udev').enabled() or
        get_option('v4l2').enabled())
This line means that if the ALSA dependency is found, the libudev dependency is required which would lead to a failing build if we don’t have udev support.
As we expect ALSA support, we’ll make sure BR2_PACKAGE_HAS_UDEV is enabled. To find out what provides this config entry, the easiest way is a search through Buildroot for the select BR2_PACKAGE_HAS_UDEV string, which returns two results:
$ grep -sR "select BR2_PACKAGE_HAS_UDEV" .
./package/eudev/Config.in:      select BR2_PACKAGE_HAS_UDEV
./package/systemd/Config.in:    select BR2_PACKAGE_HAS_UDEV
We’ll stick with eudev and avoid importing the whole of systemd in our root filesystem. To do so, we tell Buildroot to use eudev for /dev management in the “System configuration” submenu (the BR2_ROOTFS_DEVICE_CREATION_DYNAMIC_EUDEV symbol, which automatically selects BR2_PACKAGE_EUDEV).
In turn, PipeWire’s build configuration automatically enables some options if specific dependencies are found. That is why the package/pipewire/pipewire.mk file has sections such as:
ifeq ($(BR2_PACKAGE_NCURSES_WCHAR),y)
PIPEWIRE_DEPENDENCIES += ncurses
endif
Then, in PipeWire’s meson.build, we see ncurses_dep = dependency('ncursesw', required : false) and in src/tools/meson.build:
if ncurses_dep.found()
  executable('pw-top',
    'pw-top.c',
    install: true,
    dependencies : [pipewire_dep, ncurses_dep],
  )
endif
That means pw-top will get built if ncursesw is found; for ncurses the trailing w means wide.
In our specific case, two tools that get conditionally built interest us: pw-top and pw-cat (and its aliases pw-play, pw-record, etc.). The first one will help us monitor the state of active nodes (their busy time, time quantum, etc.) and the second one is capable of playing an audio file by creating a PipeWire source node; it’s the equivalent of aplay, arecord, aplaymidi and arecordmidi. We therefore enable BR2_PACKAGE_NCURSES, BR2_PACKAGE_NCURSES_WCHAR and BR2_PACKAGE_LIBSNDFILE.
One last thing: let’s include an audio test file in our root filesystem image, for easy testing later on. We’ll create a root filesystem overlay directory for this:
$ cd $WORK_DIR
# Create an overlay directory with a .WAV example file
$ mkdir -p overlay/root
# This file is available under a CC BY 3.0 license, see:
# https://en.wikipedia.org/wiki/File:Crescendo_example.ogg
$ wget -O example.ogg \
    "https://upload.wikimedia.org/wikipedia/en/6/68/Crescendo_example.ogg"
# aplay only supports the .voc, .wav, .raw or .au formats
$ ffmpeg -i example.ogg overlay/root/example.wav
$ rm example.ogg

# Set BR2_ROOTFS_OVERLAY to "../overlay"
# This can be done through menuconfig as well
$ sed -i 's/BR2_ROOTFS_OVERLAY=""/BR2_ROOTFS_OVERLAY="..\\/overlay"/' \
    buildroot/.config
We now have a Buildroot configuration that includes BusyBox for primitive needs, Dropbear as an SSH server, PipeWire and its associated session manager WirePlumber, with automatic /dev management and tools that will help us in our tests (aplay and pw-play for outputting audio and pw-top to get an overview on PipeWire’s state). WirePlumber comes with a tool called wpctl that gets unconditionally built. make can be run in Buildroot’s folder so that both the cross-compiling toolchain and the root filesystem get generated and put into Buildroot’s output folder; see the manual for more information about Buildroot’s output/ directory. The toolchain’s GCC and binutils programs in particular can be accessed in output/host/bin/, all prefixed with arm-linux-.
Linux kernel
As we now have an available toolchain, we can go ahead by fetching, configuring and compiling the kernel:
# Download and extract the Linux kernel
$ export LINUX_VERSION=5.17.1
$ wget "https://cdn.kernel.org/pub/linux/kernel/v5.x/linux-$LINUX_VERSION.tar.xz"
$ tar xf linux-$LINUX_VERSION.tar.xz
$ mv linux-$LINUX_VERSION linux
If we compile the kernel as such, it wouldn’t know what our target architecture is and what toolchain to use (it would use what can be found in our $PATH environment variable, which is most probably not right). We therefore need to inform it using three environment variables:
- Update the
$PATHto add access to the recently-acquired toolchain, the one available in Buildroot’soutput/host/bin/; - Set the
$ARCHto the target’s architecture, that isarmin our case; - Set
$CROSS_COMPILEto the prefix on our binutils tools,arm-linux-in our scenario.
To avoid forgetting those every time we interact with the kernel’s build system, we’ll use a small script that throws us into a shell with the right variables:
#!/bin/sh
# Make sure $WORK_DIR is absolute
export WORK_DIR=$(dirname $(realpath $0))
export PATH="$WORK_DIR/buildroot/output/host/bin:$PATH"
export ARCH=arm
export CROSS_COMPILE=arm-linux-
This script will be called kernel.sh from now on.
We can now configure our kernel, using the SAMA5 defconfig as groundwork:
$ source kernel.sh
$ cd linux

$ make sama5_defconfig
$ make menuconfig
- In “General setup”:
- Set “Kernel compression mode” to “LZO” (optional,
CONFIG_KERNEL_LZOsymbol); - Set “Preemption model” to “Preemptible kernel” for a-bit-better latencies (optional,
CONFIG_PREEMPTsymbol); if low-latency audio is necessary the PREEMPT_RT patch is probably the first step, along with many other configuration tweaks; Bootlin’s PREEMPT_RT training might be of use;
- Set “Kernel compression mode” to “LZO” (optional,
- Enable the
CONFIG_SND_USB_AUDIOoption, for support of USB sound cards in ALSA.
It’s time for compilation using make, without forgetting the -jN option to allow N simultaneous jobs.
Booting our board
We can now boot the kernel on our SAMA5D3 Xplained board. On the host side, that requires prepping a TFTP server with both the kernel image and the device tree binary as well as a NFS server (using the Linux kernel NFS server) for the root filesystem:
# Export the kernel image and device tree binary to the TFTP's
# root folder
$ sudo cp \
    linux/arch/arm/boot/{zImage,dts/at91-sama5d3_xplained.dtb} \
    /var/lib/tftpboot

# Create the root filesystem folder
$ mkdir rootfs
# Extract it from Buildroot's output
$ tar xf buildroot/output/images/rootfs.tar -C rootfs
# Allow read/write access to IP 192.168.0.100
$ echo "$WORK_DIR/rootfs 192.168.0.100(rw,no_root_squash,no_subtree_check)" \
    | sudo tee -a /etc/exports
# Tell the NFS server about our changes to /etc/exports
$ sudo exportfs -a
Do not forget to configure your host’s network interface to use a static IP and routing table, with a command such as the following:
nmcli con add type ethernet ifname $DEVICE_NAME ip4 192.168.0.1/24
On the target side, we configure U-Boot’s network stack, boot command and boot arguments.
# Connect to the board using a serial adapter
$ picocom -b 115200 /dev/ttyUSB0

# In U-Boot's command line interface:

=> env default -a
=> env set ipaddr 192.168.0.100
=> env set serverip 192.168.0.1
=> env set ethaddr 00:01:02:03:04:05
=> env set bootcmd "tftp 0x21000000 zImage ;
        tftp 0x22000000 at91-sama5d3_xplained.dtb ;
        bootz 0x21000000 - 0x22000000"
=> # $WORK_DIR has to be substituted manually
=> env set bootargs "console=ttyS0 root=/dev/nfs
        nfsroot=192.168.0.1:$WORK_DIR/rootfs,nfsvers=3,tcp
        ip=192.168.0.100:::::eth0 rw"
=> env save
=> boot
Outputting audio
That leads to a successful kernel boot! Once connected through SSH we can start outputting sound, first using ALSA directly:
# The password comes from BR2_TARGET_GENERIC_ROOT_PASSWD
$ ssh root@192.168.0.100

$ aplay -l
**** List of PLAYBACK Hardware Devices ****
card 0: H340 [Logitech USB Headset H340], device 0: USB Audio [USB Audio]
  Subdevices: 1/1
  Subdevice #0: subdevice #0

$ cd /root
$ aplay example.wav
Playing WAVE 'example.wav' : Signed 16 bit Little Endian, Rate 44100 Hz, Mono
It’s time to start fiddling with PipeWire. The current Buildroot packaging for PipeWire and WirePlumber do not provide scripts for starting using the BusyBox init system’s scripts; it provides service and socket systemd units if that is what is used. We’ll have to start them both manually. Naively running pipewire won’t work but it will make the issue explicit:
$ pipewire
[W][00120.281504] pw.context   | [       context.c:  353 pw_context_new()] 0x447970: can't load dbus library: support/libspa-dbus
[E][00120.313251] pw.module    | [   impl-module.c:  276 pw_context_load_module()] No module "libpipewire-module-rt" was found
[E][00120.318522] mod.protocol-native | [module-protocol-:  565 init_socket_name()] server 0x460aa8: name pipewire-0 is not an absolute path and no runtime dir found. Set one of PIPEWIRE_RUNTIME_DIR, XDG_RUNTIME_DIR or USERPROFILE in the environment
[E][00120.320760] pw.conf      | [          conf.c:  559 load_module()] 0x447970: could not load mandatory module "libpipewire-module-protocol-native": No such file or directory
[E][00120.322600] pw.conf      | [          conf.c:  646 create_object()] can't find factory spa-node-factory
The daemon, during startup, tries to create the UNIX socket that will be used by clients to communicate with it; its default name is pipewire-0. However, without specific environment variables, PipeWire does not know where to put it. The fix is therefore to invocate pipewire with the XDG_RUNTIME_DIR variable set:
$ XDG_RUNTIME_DIR=/run pipewire
[W][03032.468669] pw.context   | [       context.c:  353 pw_context_new()] 0x507978: can't load dbus library: support/libspa-dbus
[E][03032.504804] pw.module    | [   impl-module.c:  276 pw_context_load_module()] No module "libpipewire-module-rt" was found
[E][03032.530877] pw.module    | [   impl-module.c:  276 pw_context_load_module()] No module "libpipewire-module-portal" was found
Some warnings still occur, but they do not block PipeWire in its process:
- The first line is to be expected, as we compiled PipeWire without D-Bus support.
- The second one is because the default configuration invokes a PipeWire module that makes the daemon process realtime using setpriority(2) and threads using pthread_setschedparam(3) with SCHED_FIFO. This module, until recently, was not getting compiled if D-Bus support wasn’t available as it had a fallback upon RTKit (D-Bus RPC to ask for augmented process priority, used to avoiding giving the privileges to every process). This is fixed in newer versions as the module is now being compiled without RTKit fallback if D-Bus is not available, but the stable Buildroot version we are using is packaging an older version of PipeWire.
- The third one refers to portal as in xdg-desktop-portal, a D-Bus based interface to expose various APIs to Flatpak applications. This does not matter to us for an embedded use.
The default PipeWire’s daemon configuration can be overridden to remove those warnings: support.dbus in context.properties controls the loading of the D-Bus library, and modules to be loaded are declared in context.modules. The default configuration is located at /usr/share/pipewire/pipewire.conf and a good way to override is it to touch a file with the same name in /etc/pipewire.
Tip: PipeWire’s logging is controlled using the PIPEWIRE_DEBUG environment variable, as described in the documentation.
We can therefore use various PipeWire clients and connect to the daemon: XDG_RUNTIME_DIR=/run pw-top should display both the dummy and freewheel drivers doing nothing, and XDG_RUNTIME_DIR=/run pw-dump gives us a JSON of the list of objects in PipeWire’s global registry.
The reason we do not see our ALSA PCM device is that PipeWire is not responsible for monitoring /dev and adding new nodes to the graph; that is our session manager’s responsability. WirePlumber’s configuration needs to be updated from the default to avoid it crashing because of the lack of a few optional dependencies. To update it, the recommended way is the same as for PipeWire: by overloading the configuration file with one located in /etc/wireplumber. Here are the issues with a default config:
- It expects the SPA bluez library which has as unconditional dependencies libm, dbus, sbc and bluez. It therefore does not get built and cannot be found at runtime by WirePlumber.
wireplumber.confhas a{ name = bluetooth.lua, type = config/lua }component, which should be commented out to disable Bluetooth support. - v4l2 support, through the SPA v4l2 library, has not been built. This can be enabled using the
BR2_PACKAGE_PIPEWIRE_V4L2flag. Disabling the v4l2 monitor requires not calling thev4l2_monitor.enable(), which needs to be commented out in/usr/share/wireplumber/main.lua.d/90-enable-all.lua(Lua’s comments start with two dashes). - The ALSA monitor tries to reserve ALSA devices using the
org.freedesktop.ReserveDevice1D-Bus-based protocol. - Similarly to PipeWire’s
libpipewire-module-portal, WirePlumber has support for Flatpak’s portal, which needs to be disabled as it relies on DBus.
The last two issues can be solved by using the following Lua configuration script, in /etc/wireplumber/main.lua.d/90-disable-dbus.lua:
alsa_monitor.properties["alsa.reserve"] = false
default_access.properties["enable-flatpak-portal"] = false
Once all that is done, WirePlumber’s daemon keeps running and successfully connects to PipeWire:
$ XDG_RUNTIME_DIR=/run wireplumber
M 03:05:17.904989                 pw ../src/pipewire/context.c:353:pw_context_new: 0x4f21d8: can't load dbus library: support/libspa-dbus
The remaining warning can be gotted rid of by setting support.dbus = false in the context.properties section of WirePlumber’s primary configuration.
Tip: those modifications can be added to our filesystem overlay for persistance accross rebuilds of our root filesystem image.
That’s it! WirePlumber now has detected our ALSA sink and source, adding them as nodes to the PipeWire graph. It will detect source nodes that we add to the graph and will link them to the ALSA sink node, outputting audio for our ears to enjoy.
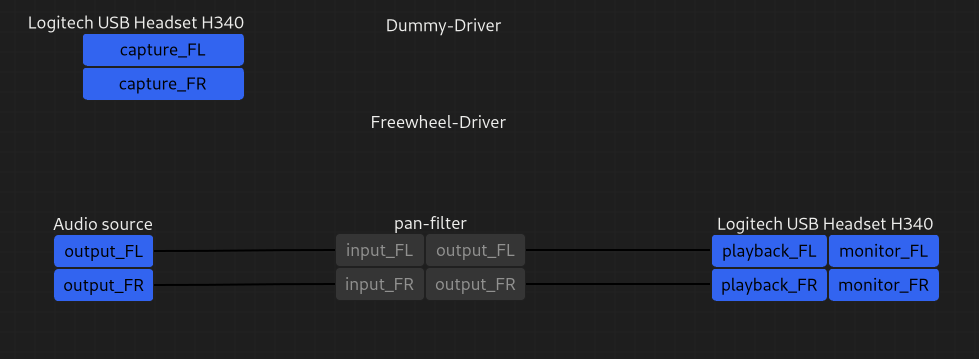
pw-dot, called without any argument, will generate a pw.dot file that represents the active nodes, their ports and the links in the current graph. A .dot file is a textual description of a graph which can be turned graphical using a tool from the Graphviz project. It is simpler to install Graphviz on your host PC, using your favorite package manager, and copy the pw.dot file from the target to the host (a simple local copy as we are using an NFS root filesystem). A SVG file can then be generated as such:
dot -Tsvg pw.dot > pw.svg
Here is what the graph looks like when audio is being outputted using a single source:

Conclusion
We have managed to create a rather bare image, with WirePlumber monitoring ALSA devices and adding them as devices and nodes to the PipeWire graph. WirePlumber automatically creates links between source nodes and the default sink node, which means that audio is outputted.
The next step is to create our own custom PipeWire source node. We’ll be able to use the PipeWire API through libpipewire and see what information and capabilities it exposes relative to the overall graph.


 Like most of us, due to the Covid-19 epidemic, you may be forced to work from home. To take advantage from this time confined at home, we are now proposing all our training courses as online seminars. You can then benefit from the contents and quality of Bootlin
  At Bootlin, we owe a lot to the Free Software community, and we’re doing our best to give back
 Bootlin has internship topics to propose to people studying in French Universities or Engineering Schools:

