Maintaining Yocto Project Documentation

For many years, Bootlin has been a strong user and a contributor to the Yocto Project, delivering numerous customized embedded Linux distributions and Board Support Packages based on Yocto Project and OpenEmbedded to its customers, for a wide range of hardware platforms and architectures.

In 2021, we have been able to bring this engagement further, as Bootlin engineer Michael Opdenacker has been given the opportunity to work as a maintainer for Yocto Project’s documentation, thanks to funding from the Linux Foundation. Since the mourning of Scott Rifenbark, the former maintainer, in early 2020, the project was in need for someone to fill this role.

Yocto Project developers and contributors did their best in the meantime though, in particular by migrating the documentation sources from the DocBook format to reStructuredText, to generate documentation using Sphinx. This migration was also done by the Linux kernel community, as reStructuredText seems to make it easier for developers to contribute to documentation.

For Michael Opdenacker, the interest of getting back to Yocto Project and OpenEmbedded was strong: he was one of the early users, over 15 years ago, of BitBake and OpenEmbedded. Many things have changed since Michael was generating his own OPIE and GPE Palmtop Environment images for handheld devices back in 2004 and 2005.

Indeed, since that time, under the Yocto Project umbrella, BitBake and OpenEmbedded have formed what’s probably the smartest, most versatile and most powerful embedded Linux build system. This build system takes a pretty steep learning curve though, and that’s why maintaining high quality documentation was a key focus from the start.

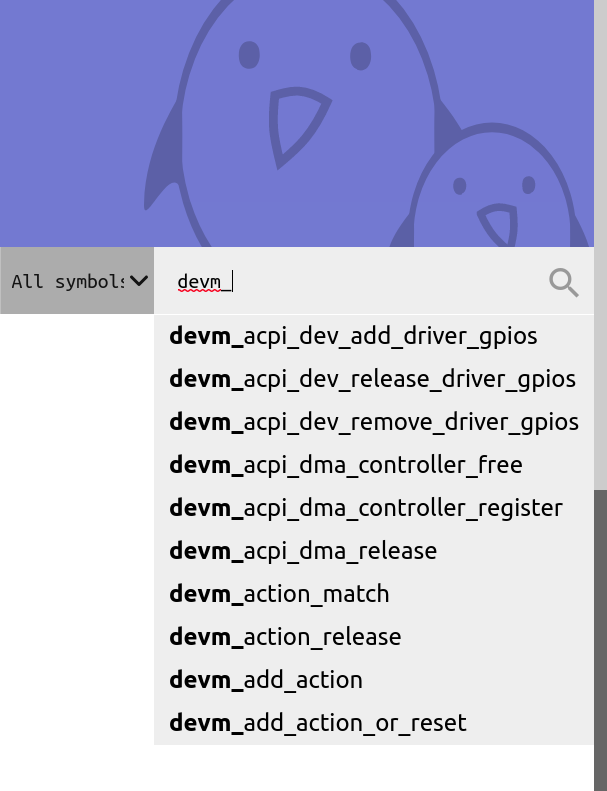
In addition to acting as a maintainer (reviewing and merging patches from contributors, encouraging contributions, managing documentation bugs, keeping the documentation current with the evolution of the code), we have so far also managed to:

  • Create brand new documentation, thanks to studying the source code and to knowledge from core developers. In particular, we documented vulnerability (CVE) management and drafted a first description of Hash Equivalence.
  • Implement a new infrastructure to generate diagrams from SVG sources. Currently, most graphics are bitmaps and do not render well in PDF and EPUB output. The next step is to migrate all diagrams to SVG.
  • Implement styling improvements, trying to eliminate unnecessarily complex sentences and make the documents easier to read.
  • Propose a “Documentation standards” document in markdown format, together with a diagram template with reusable shapes, text boxes and clipart, so that new documentation and diagrams are created in a way that’s consistent with existing documents.
  • Find bugs and improvement opportunities, and implement some of them, thanks to testing the software and reading the code.

Here are our contributions to the project so far, as of Oct. 20, 2021:

Yocto Project is a very welcoming open-source project, in which core developers are keen to help users and contributors. This makes it a real pleasure to participate to this project, in addition to the satisfaction to contribute to the progress of Embedded Linux.

If you are interested in studying Yocto Project and Bitbake’s documentation and contributing to it, you will be most welcome! The best is to get in touch with our community through the docs mailing list or chat with us on IRC. See our mailing lists and chat page for details.

If you’re interested in using Yocto Project for your embedded Linux projects, we also recommend you to check out our Yocto Project and OpenEmbedded system development training course, and its freely available training materials. We recently announced new dates for our upcoming online training classes on the Yocto Project:

Using Buildroot to flash and boot the beta version of BeagleV Starlight

Bootlin recently received a beta prototype of the BeagleV Starlight featuring a RISC-V 64 bit SoC capable of running Linux, designed by StarFive This early version is not available to the general public, but several of us at Bootlin volunteered to join the beta developer program to assist with upstream software development. BeagleBoard.org has a public BeagleV forum that everyone can join for future updates on the project.

Two days after my colleague Thomas Petazzoni received his board, he managed to submit a patch for the mainline version of Buildroot to add support for this new board. Actually, compiling an image with Buildroot and preparing an SD card is easier than downloading and flashing the initial Fedora image offered for this beta board.

If you are just interested in testing the software on your board, you may directly get our binaries from our Build results paragraph.

The following instructions are derived from the board/beaglev/readme.txt file in Thomas’ proposed patch.

How to build

First, clone Buildroot’s git repository if you haven’t done it yet:

$ git clone git://git.buildroot.net/buildroot

Then add a remote branch corresponding to Thomas Petazzoni’s own tree, as his changes haven’t made their way into the mainline yet, and checkout a local copy of his beaglev branch:

$ git remote add tpetazzoni https://github.com/tpetazzoni/buildroot.git
$ git fetch tpetazzoni
$ git checkout -b tpetazzoni-beaglev tpetazzoni/beaglev

Now you can build the binaries for the board:

$ make beaglev_defconfig
$ make

Build results

After building, output/images should contain the following files:

  • Image
  • fw_payload.bin
  • fw_payload.bin.out
  • fw_payload.elf
  • rootfs.ext2
  • rootfs.ext4
  • sdcard.img
  • u-boot.bin

The two important files are:

  • fw_payload.bin.out, which is the bootloader image, containing both OpenSBI (the Open Supervisor Binary Interface, allowing to switch from Machine mode to Supervisor mode) and U-Boot.
  • sdcard.img, the SD card image, which contains the root filesystem, kernel image and Device Tree.

Tested versions of these generated files are available on our website.

Flashing the SD card image

You just need to insert your micro SD card into a card reader (assuming the /dev/sdX device file is used), and type the below command:

$ sudo dd if=output/images/sdcard.img of=/dev/sdX

Preparing the board

To prevent the experimental board from overheating, connect the BeagleV fan to the 5V supply (pin 2 or 4 of the GPIO connector) and GND (pin 6 of the GPIO connector).

To access a serial console, connect a TTL UART cable to pins 6 (GND), 8 (TX) and 10 (RX):
Beagle V - How to connect the serial port

Insert your SD card and power-up the board using a USB-C cable.

Flashing the bootloader

The bootloader pre-flashed on the BeagleV has a non-working fdt_addr_r environment variable value, so it won’t work as-is. Reflashing the existing bootloader with the bootloader image produced by Buildroot is therefore necessary.

When the board starts up, a pre-loader shows a count down of 2 seconds. Interrupt it by pressing any key. You should then reach a menu like
this:

bootloader version:210209-4547a8d
ddr 0x00000000, 1M test
ddr 0x00100000, 2M test
DDR clk 2133M,Version: 210302-5aea32f
0
***************************************************
*************** FLASH PROGRAMMING *****************
***************************************************

0:update uboot
1:quit
select the function:

Press 0 and Enter. You will now see C characters being displayed. Ask your serial port communication program to send the fw_payload.bin.out file using the Xmodem protocol (with the sx command). For example, here’s how to do it with picocom

picocom should be started as:

$ picocom -b 115200 -s "sx -vv" /dev/ttyUSB0

When you see the C characters on the serial line, press [Ctrl][a] [Ctrl][s]. Picocom will then ask for a file name, and you should type fw_payload.bin.out.

After a few minutes, reflashing should be complete. Then, restart the board. It will automatically start the system from the SD card, and reach the login prompt:

Welcome to Buildroot
buildroot login: root
# uname -a
Linux buildroot 5.10.6 #2 SMP Sun May 2 17:23:56 CEST 2021 riscv64 GNU/Linux

Useful resources

Here are useful resources for people who already have the Beagle V board:

We will keep updating this page according to progress in the upstream projects:

  • Support for the board in mainline Buildroot
  • Later, support for the board in mainline U-Boot and Linux

Videos and slides of Bootlin presentations at FOSDEM 2021

The videos from Bootlin’s presentations earlier this month at FOSDEM 2021 are now publicly available. Once again, FOSDEM was a busy event, even if it was online for once. As in most technical conferences, Bootlin engineers volunteered to share their experience and research by giving two talks.

Maxime Chevallier – Network Performance in the Linux Kernel, Getting the most out of the Hardware

Abstract: The networking stack is one of the most complex and optimized subsystems in the Linux kernel, and for a good reason. Between the wild range of applications, the complexity and variety of the networking hardware, getting good performance while keeping the stack easily usable from userspace has been a long-standing challenge.

Nowadays, complex Network Interface Controllers (NICs) can be found even on small embedded systems, bringing powerful features that were previously found only in the server world closest to day to day users.

This is a good opportunity to dive into the Linux Networking stack, to discover what is used to make networking as fast as possible, both by using all the features of the hardware and by implementing some clever software tricks.

In this talk, we cover these various techniques, ranging from simple batch processing with NAPI, queue management with RSS, RPS, XPS and so on, flow steering and filtering with ethool and TC, to finish with the newest big change that is XDP.

We dive into these various techniques and see how to configure them to squeeze the most out of your hardware, and discover that what was previously in the realm of datacenters and huge computers can now also be applied to embedded linux development.

Here are PDF slides for this presentation.

Michael Opdenacker – Embedded Linux from Scratch in 45 minutes, on RISC-V

Abstract: Discover how to build your own embedded Linux system completely from scratch. In this presentation and tutorial, we show how to build a custom toolchain (Buildroot), bootloader (opensbi / U-Boot) and kernel (Linux), that one can run on a system with the new RISV-V open Instruction Set Architecture emulated by QEMU. We also show how one can build a minimal root filesystem by oneself thanks to the BusyBox project. The presentation ends by showing how to control the system remotely through a tiny webserver. The approach is to provide only the files that are strictly necessary. That’s all the interest of embedded Linux: one can really control and understand everything that runs on the system, and see how simple the system can be. That’s much easier than trying to understand how a GNU/Linux system works from a distribution as complex as Debian!

The presentation also shares details about what’s specific to the RISC-V architecture, in particular about the various stages of the boot process. This presentation shares all the hardware (!), source code build instructions and demo binaries needed to reproduce everything at home, and add specific improvements. Most of the details are also useful to people using other hardware architectures (in particular arm and arm64).

It’s probably the first time a tutorial manages to show so many aspects of embedded Linux in less than an hour. See by yourself! At least, that’s for sure the first one demonstrating how to boot Linux from U-Boot in a RISC-V system emulated by QEMU.

Here are PDF slides for this presentation.

New feature highlights in Elixir Cross Referencer v2.0 and v2.1

The 2.1 release of the Elixir Cross Referencer is now live on https://elixir.bootlin.com/.

Development of new features has accelerated in the recent months, thanks to the contributions from Tamir Carmeli (Github), Chris White (Github) and Maxime Chrétien (Github), who was hired at Bootlin as an intern. I am going to describe the most important new features from such contributors, but the three of them actually made many smaller contributions to many aspects of Elixir.

So, here are the important new features you can now find in Elixir…

Support for symbol documentation

Thanks to Chris White, when you search for a function, you can now see where it is documented, at least when it is done in the Linux kernel way, extracting documentation from comments in the sources.

Symbol documentation in Elixir

This way, when documentation is available, you can immediately know the meaning and expected values of the parameters of a given function and its return value.

Support for Kconfig symbols

Maxime Chrétien has extended Elixir to support kernel configuration parameters. Actually, he contributed a new parser to the universal-ctags project to do so. This way, you can explore C sources and Kconfig files and find the declarations and uses of kernel parameters:

Elixir Kconfig symbols

Now, every time we mention a kernel configuration parameter in our free training materials, we can provide an Elixir link to them. Here is an example for CONFIG_SQUASHFS. Don’t hesitate to use such links in your documents and e-mails about the Linux kernel!

Note that you also have Kconfig symbol links in defconfig files, allowing to understand non-default kernel configuration settings for a given SoC family or board. See this example.

Support for Device Tree aliases

Maxime Chrétien also extended Elixir to support Device Tree labels. This way, when you explore a Device Tree source file and see a reference (phandle) to such a label, you can easily find where it’s defined and what the default properties of the corresponding node are.

Elixir Device Tree Source symbols

Following such extensions to Elixir to support new scopes for symbols, we extended the interface to allow to make searches for symbols either in specific contexts (C, Kconfig or DT), or in all contexts. In most of the cases, a single context will suffice, but we’re anyway offering a mode to perform searches in all contexts at the same time:

Elixir support for multiple symbol contexts

Support for Device Tree compatible strings

v2.1 of the Elixir Cross Referencer also adds support for Device Tree compatible strings, also contributed by Maxime Chrétien. When browsing Device Tree files, you can instantly find which drivers drivers can be bound to the corresponding devices, which properties such drivers require from such devices (as specified in the Device Tree bindings), and other Device Tree files using the same compatible string.

Elixir device tree compatible links
Elixir device tree compatible string search results

Symbol auto-completion in the search dialog

Elixir Cross Referencer v2.1 also features symbol search autocompletion, another capability implemented by Maxime Chrétien. This makes it easy to find Linux kernel function names while programming!

Elixir symbol autocompletion featur

Pygments support for Device Tree source files

In addition to this improvement for Device Tree indexing, Maxime has also contributed a new lexer to the Pygments project, which is used by Elixir for HTML syntax highlighting for all types of files.

REST API

Thanks to Tamir Carmeli, it’s now possible to access the Elixir database through a new REST API, instead of going through its web interface. This way, you can make Elixir queries from data processing scripts, for example.

Testing infrastructure

Chris White has implemented an extensive testing infrastructure to quickly detect regressions before the corresponding changes are applied to production servers. Tamir Carmeli also contributed a test system for the REST API.Thanks to this, each new commit is tested on Travis CI.

Parallel build for the Elixir database

Maxime Chrétien has managed to multithread indexing work. While Maxime is still exploring further options, this has already allowed to divide indexing time by an approximate factor of two.

Limitations

The main limitation of the Elixir Cross Referencer is that it doesn’t try to match any context. For example, the actual implementation of a symbol may depend on the value of a configuration option. When browsing a source file, Elixir also always links to all possibilities for each symbol (there can be multiple unrelated instances of the same symbol across the kernel sources) instead of narrowing the search to the definition corresponding to the currently browsed file. Elixir leave it up to the human user to find out which result matches the context of origin.

This is particularly true for Device Tree symbols that have unrelated occurrences everywhere in the source tree, such as i2c0. In a distant future, we may be able to restrict the search to the context of an originating file.

Contribute

If you have new ideas for extending the Elixir Cross Referencer to support more features and use cases, please share them on the project’s bug tracker. If they are feasible without compromising the relative simplicity and scalability of our engine, we will be happy to implement them!

Covid-19: Bootlin proposes online sessions for all its courses

Tux working on embedded Linux on a couchLike most of us, due to the Covid-19 epidemic, you may be forced to work from home. To take advantage from this time confined at home, we are now proposing all our training courses as online seminars. You can then benefit from the contents and quality of Bootlin training sessions, without leaving the comfort and safety of your home. During our online seminars, our instructors will alternate between presentations and practical demonstrations, executing the instructions of our practical labs.

At any time, participants will be able to ask questions.

We can propose such remote training both through public online sessions, open to individual registration, as well as dedicated online sessions, for participants from the same company.

Public online sessions

We’re trying to propose time slots that should be manageable from Europe, Middle East, Africa and at least for the East Coast of North America. All such sessions will be taught in English. As usual with all our sessions, all our training materials (lectures and lab instructions) are freely available from the pages describing our courses.

Our Embedded Linux and Linux kernel courses are delivered over 7 half days of 4 hours each, while our Yocto Project, Buildroot and Linux Graphics courses are delivered over 4 half days. For our embedded Linux and Yocto Project courses, we propose an additional date in case some extra time is needed to complete the agenda.

Here are all the available sessions. If the situation lasts longer, we will create new sessions as needed:

Type Dates Time Duration Expected trainer Cost and registration
Embedded Linux (agenda) Sep. 28, 29, 30, Oct. 1, 2, 5, 6 2020. 17:00 – 21:00 (Paris), 8:00 – 12:00 (San Francisco) 28 h Michael Opdenacker 829 EUR + VAT* (register)
Embedded Linux (agenda) Nov. 2, 3, 4, 5, 6, 9, 10, 12, 2020. 14:00 – 18:00 (Paris), 8:00 – 12:00 (New York) 28 h Michael Opdenacker 829 EUR + VAT* (register)
Linux kernel (agenda) Nov. 16, 17, 18, 19, 23, 24, 25, 26 14:00 – 18:00 (Paris time) 28 h Alexandre Belloni 829 EUR + VAT* (register)
Yocto Project (agenda) Nov. 30, Dec. 1, 2, 3, 4, 2020 14:00 – 18:00 (Paris time) 16 h Maxime Chevallier 519 EUR + VAT* (register)
Buildroot (agenda) Dec. 7, 8, 9, 10, and 11, 2020 14:00 – 18:00 (Paris time) 16 h Thomas Petazzoni 519 EUR + VAT* (register)
Linux Graphics (agenda) Dec. 1, 2, 3, 4, 2020 14:00 – 18:00 (Paris time) 16 h Paul Kocialkowski 519 EUR + VAT* (register

* VAT: applies to businesses in France and to individuals from all countries. Businesses in the European Union won’t be charged VAT only if they provide valid company information and VAT number to Evenbrite at registration time. For businesses in other countries, we should be able to grant them a VAT refund, provided they send us a proof of company incorporation before the end of the session.

Each public session will be confirmed once there are at least 6 participants. If the minimum number of participants is not reached, Bootlin will propose new dates or a full refund (including Eventbrite fees) if no new date works for the participant.

We guarantee that the maximum number of participants will be 12.

Dedicated online sessions

If you have enough people to train, such dedicated sessions can be a worthy alternative to public ones:

  • Flexible dates and daily durations, corresponding to the availability of your teams.
  • Confidentiality: freedom to ask questions that are related to your company’s projects and plans.
  • If time left, possibility to have knowledge sharing time with the instructor, that could go beyond the scope of the training course.
  • Language: possibility to have a session in French instead of in English.

Online seminar details

Each session will be given through Jitsi Meet, a Free Software solution that we are trying to promote. As a backup solution, we will also be able to Google Hangouts Meet. Each participant should have her or his own connection and computer (with webcam and microphone) and if possible headsets, to avoid echo issues between audio input and output. This is probably the best solution to allow each participant to ask questions and write comments in the chat window. We also support people connecting from the same conference room with suitable equipment.

Each participant is asked to connect 15 minutes before the session starts, to make sure her or his setup works (instructions will be sent before the event).

How to register

For online public sessions, use the EventBrite links in the above list of sessions to register one or several individuals.

To register an entire group (for dedicated sessions), please contact training@bootlin.com and tell us the type of session you are interested in. We will then send you a registration form to collect all the details we need to send you a quote.

You can also ask all your questions by calling +33 484 258 097.

Questions and answers

Q : Should I order hardware in advance, our hardware included in the training cost?
R : No, practical labs are replaced by technical demonstrations, so you will be able to follow the course without any hardware. However, you can still order the hardware by checking the “Shopping list” pages of presentation materials for each session. This way, between each session, you will be able to replay by yourself the labs demonstrated by your trainer, ask all your questions, and get help between sessions through our dedicated Matrix channel to reach your goals.

Q: Why just demos instead of practicing with real hardware?
A: We are not ready to support a sufficient number of participants doing practical labs remotely with real hardware. This is more complicated and time consuming than in real life. Hence, what we we’re proposing is to replace practical labs with practical demonstrations shown by the instructor. The instructor will go through the normal practical labs with the standard hardware that we’re using.

Q: Would it be possible to run practical labs on the QEMU emulator?
R: Yes, it’s coming. In the embedded Linux course, we are already offering instructions to run most practical labs on QEMU between the sessions, before the practical demos performed by the trainer. We should also be able to propose such instructions for our Yocto Project and Buildroot training courses in the next months. Such work is likely to take more time for our Linux kernel course, practical labs being closer to the hardware that we use.

Q: Why proposing half days instead of full days?
A: From our experience, it’s very difficult to stay focused on a new technical topic for an entire day without having periodic moments when you are active (which happens in our public and on-site sessions, in which we interleave lectures and practical labs). Hence, we believe that daily slots of 4 hours (with a small break in the middle) is a good solution, also leaving extra time for following up your normal work.

Internships for 2020 at Bootlin

Note: these internship positions have been filled. We can only accept new interns from mid-June 2020 on. Don’t hesitate to apply if you are interested.

Bootlin penguins at workFor 2020, Bootlin proposes five internship topics, this time open to all students from the European Union, studying in European Universities.

All these topics will give you an opportunity to make substantial (and very useful!) contributions to an open-source project.

Here are the details about our internship topics:

As you can see, all these topics propose both a challenging technical opportunity, but also require strong interaction with the community of users and developers of free and open-source software used in embedded projects.

More details are available in the descriptions. The internships can start from February 2020, for a minimum duration of 4 months. These internships will take place either in our offices in Toulouse, Lyon or Orange, in France, depending on the topics. These internships are open to all students from the European Union.

For all questions about our internships, please contact jobs@bootlin.com

Raspberry Pi: update breaks Raspbian Stretch

Raspberry Pi logoToday, the three Raspberry Pis that we have on our network went down. They were all running Raspbian (Debian for Raspberry Pi) Stretch.

While this issue can be solved, it is serious enough to require to remove the micro-SD card and manually fix the the root filesystem. Therefore, it seems you cannot fix this issue unless you have physical access to your system.

Here are details to attract attention to this issue…

As I started telling you, our systems were down, well almost. Some services were still running, as they were still responding to ping through our VPN. However, SSH access was no longer available:

$ ssh scan
ssh_exchange_identification: Connection closed by remote host

After connecting a serial cable to one of the Pis, and adding init=/bin/sh to the /boot/cmdline.txt file. I found that I couldn’t seem to execute at least some executables. Everything I tried to execute was causing a segmentation fault.

It was time to remove the micro-SD card and look at system logs. Inspecting /var/log/apt/history.log revealed that the raspi-copies-and-fills package was updated yesterday (March. 11, 2019). This allowed me to make a search for issue reports with this package name. Indeed, before having such a lead, I couldn’t find what I was looking for, as there are too many discussions about the use of the Raspberry Pi! So, here’s what I quickly found following this lead:

raspi-copies-and-fills package gone AWOL? (Raspberry Pi forums)
Ras3 crashes after update (Raspberry Pi forums)

These posts have all details. All you need to do is take away the micro-SD card, repair the second partition with e2fsck -f /dev/mmcblk0p2 and remove the etc/ld.so.preload file inside this partition.

Note, that at the time of this writing, this issue has already been fixed, so it is safe to upgrade your Pi if it is still up and running, or right after repairing your Raspbian root filesystem.

This incident is very unfortunate, as you need to physically access your board to recover from it. I hope you don’t run updates as frequently as we do (or right after the time when the update was issued), and that your Pis are not impacted, otherwise possibly forcing you to travel or to crawl into difficult to access places to reach your boards.

However, I don’t want blame the community volunteers running Raspbian. They have made a terrific job maintaining this distro which had been flawlessly running for more many years on our systems. This seems as good as what we get from commercial distributions.

I hope that not too many services ran by Raspberry Pis will be disrupted because of this issue. However, that may be yet another way to prove how popular such devices are.

Free seats in embedded Linux and kernel training sessions (Mar 2019)

Student penguinsAt Bootlin, we owe a lot to the Free Software community, and we’re doing our best to give back as much as we can.

One way of doing that is welcoming community contributors in our public training sessions organized in France. We’ve done that multiple times several years back, and this allowed us to meet very interesting people (who even had very valuable experience and points of view to share with the other course participants), while of course giving them extra knowledge that they can use for further contributions.

Here are the next sessions in which we can offer a free seat:

See our Free training seats page for practical details about how to apply.

Don’t hesitate to apply to this free seat. In past editions, we didn’t have so many people applying, and therefore you have a real chance to get selected!

Follow Bootlin on Mastodon

We’ve started to use Mastodon (in addition to Twitter and LinkedIn) to share quick news with you: new blog posts, contributions to Free Software projects, photos at events, etc.

Did you know Mastodon? I’ll like Twitter, but better, decentralized and really free (as in Free Software). I discovered it by attending one of the conferences we sponsor (Capitole du Libre in Toulouse, France) and by following the efforts of Framasoft to provide decentralized Internet services.

There is a very nice article introducing Mastodon and its strengths vs Twitter: Mastodon Is Better than Twitter: Elevator Pitch.

Here is a summary of Mastodon’s advantages:

  • Being Free Software and not biased by the need to maximize revenue for its investors
  • It’s decentralized and therefore controlled by its users. You are free to join an instance that matches your interests and sensibility, but of course you can follow anyone on any other instance. It’s also easy to move to another instance or even host your own one
  • There are no Retweets but Boosts. Retweets allow to share a post with your own comments to all your followers. This creates flame wars in the best interest of Twitter. Twitter needs its users to spend as much time as possible viewing the content they host (and therefore their promoted content at the same time). Instead, Mastodon only allows to “boost” the visibility of someone else’s post, without allow you to add your own comments. Mastodon has no interest in making you stay as long as possible by creating flame wars. It just lets you focus on the content your are interested in.

In a nutshell, using Mastodon contributes to a better world in which users are in control of their data, interests and time.

What about joining the Mastodon network and give it a try ! Go to https://joinmastodon.org, choose your perfect community (your Mastodon instance… we are on https://fosstodon.org), and follow us if you wish on https://fosstodon.org/@bootlin.

We hope that you will like the experience.

tftp and NFS booting on Beagle Bone Black Wireless and Pocket Beagle

BeagleBoneBlack Wireless board  booting through tftp and NFS
BeagleBoneBlack Wireless board booting through tftp and NFS

Here are details about booting the Beagle Bone Black Wireless board through NFS. I’m writing this here because it doesn’t seem to be documented anywhere else (except in our Linux kernel and driver development course, for which I had to support this feature).

Why

Booting a board on a root filesystem that is a directory on your workstation (development PC) or on a server, shared through the network, is very convenient for development purposes.

For example, you can update kernel modules or programs by recompiling them on your PC, and the target board will immediately “see” the updates. There’s no need to transfer them in some way.

Doing this is quite straightforward on boards that have an Ethernet port, and well documented throughout the Internet (see our instructions). However, things get more complicated with boards that have no such port, such as the Beagle Bone Black Wireless or the Pocket Beagle.

The Beagle Bone Black Wireless board has WiFi support, but booting on NFS directly from the kernel (instead of using an initramfs) is another kind of challenge.

Something easier to use is networking over USB device (also called USB gadget as our operating system is running on the USB device side), which is supported by both Linux and U-Boot.

Note that the below instructions also work on the original Beagle Bone Black, bringing the convenience of not having to use an RJ45 cable. All you need is the USB device cable that you’re using for power supply too.

These instructions should also support the Pocket Beagle board, which is similar, though much simpler.

Preparing U-Boot

This part may just work out of the box if the U-Boot version on your board is recent and was built using the default configuration for your board.

If that’s not the case, you can reflash U-Boot on your board using our instructions.

Now, let’s configure networking in U-Boot:

  • ipaddr: IP address of the board
  • serverip: IP address of your PC or server
setenv ipaddr 192.168.0.100
setenv serverip 192.168.0.1

Make sure that this address belongs to a separate network segment from the one used by your PC to connect to the network.

We also need to configure Ethernet over USB device:

  • ethact: controls which interface is currently active.
  • usbnet_devaddr: MAC address on the device side
  • usbnet_hostaddr: MAC address on the host side
setenv ethact usb_ether
setenv usbnet_devaddr f8:dc:7a:00:00:02
setenv usbnet_hostaddr f8:dc:7a:00:00:01
saveenv

Note that the above MAC addresses are arbitrary.

Configure your PC

These instructions have been tested on Ubuntu 18.04, but they should be easy to adapt on other GNU/Linux distributions.

To configure your network interface on the workstation side, we need to know the name of the network interface connected to your board.

However, you won’t be able to see the network interface corresponding to the Ethernet over USB device connection yet, because it’s only active when the board turns it on, from U-Boot or from Linux. When this happens, the network interface name will be enx. Given the value we gave to usbnet_hostaddr, it will therefore be enxf8dc7a000001.

Then, instead of configuring the host IP address from NetWork Manager’s graphical interface, let’s do it through its command line interface, which is so much easier to use:

nmcli con add type ethernet ifname enxf8dc7a000001 ip4 192.168.0.1/24

To download the kernel and device tree blob which are also on your PC, let’s install a TFTP server on it:

sudo apt install tftpd-hpa

You can then test the TFTP connection, which is also a way to test that USB networking works. First, put a small text file in /var/lib/tftpboot.

Then, from U-Boot, do:

tftp 0x81000000 textfile.txt

The tftp command should have downloaded the textfile.txt file from your development workstation into the board’s RAM at location 0x81000000. You can verify that the download was successful by dumping the contents of memory:

md 0x81000000

We are now ready to load and boot a Linux kernel!

Kernel configuration

These instructions were tested with Linux 4.19

Configuring and cross-compiling the Linux kernel for the board is outside the scope of this article, but again, such information is easy to find (such as in our training slides).

Here, we’re just sharing the Linux kernel configuration settings that are needed for networking over USB device. Since they are not supported by the default configuration file for the omap2plus CPU family (for several reasons that were discussed on the Linux kernel mainling list), it took a bit of time to figure out which ones were needed. Here they are:

Add the below options to support networking over USB device:

  • CONFIG_USB_GADGET=y
  • CONFIG_USB_MUSB_HDRC=y: Driver for the USB OTG controller
  • CONFIG_USB_MUSB_GADGET=y: Use the USB OTG controller in device (gadget) mode
  • CONFIG_USB_MUSB_DSPS=y
  • Check the dependencies of CONFIG_AM335X_PHY_USB. You need to set CONFIG_NOP_USB_XCEIV=y to be able to set CONFIG_AM335X_PHY_USB=y
  • Find the ”USB Gadget precomposed configurations” menu and set it to static instead of module so that CONFIG_USB_ETH=y

How did I found out which settings were needed? I had to check the device tree to find the USB device controller. Then, using git grep, I found the driver that was supporting the corresponding compatible string. Then, looking at the Makefile in the driver directory, I found which kernel configuration settings were needed.

When compiling is over, copy the zImage and am335x-boneblack-wireless.dtb files to the TFTP server home directory (/var/lib/tftpboot).

You also need an NFS server on your workstation:

sudo apt install nfs-kernel-server

Then edit the /etc/exports file as root to add the following line, assuming that the IP address of your board will be 192.168.0.100:

/home/user/nfsroot 192.168.0.100(rw,no_root_squash,no_subtree_check)

(If you don’t have a root filesystem yet, you can use the one in our lab data archive.)

Then, restart the NFS server:

sudo /etc/init.d/nfs-kernel-server restart

Configuring the kernel command line

Back to the U-Boot command line, configure the kernel command line by setting the bootargs environment variable (all in just one line):

setenv bootargs root=/dev/nfs rw ip=192.168.0.100:::::usb0 console=ttyO0,115200n8 g_ether.dev_addr=f8:dc:7a:00:00:02 g_ether.host_addr=f8:dc:7a:00:00:01 nfsroot=192.168.0.1:/home/user/nfsroot,nfsvers=3

Also set the series of commands to run at boot time:

setenv bootcmd 'tftp 0x81000000 zImage; tftp 0x82000000 am335x-boneblack-wireless.dtb; bootz 0x81000000 - 0x82000000'
saveenv

You are ready to boot:

boot

Now check the kernel log and make sure an IP address is correctly assigned to your board by Linux. If NFS booting doesn’t work yet, that could be because of NFS server or client issues. If that’s the case, you should find details in the NFS server logs in /var/log/syslog on your PC.