Bootlin recently received a beta prototype of the BeagleV Starlight featuring a RISC-V 64 bit SoC capable of running Linux, designed by StarFive This early version is not available to the general public, but several of us at Bootlin volunteered to join the beta developer program to assist with upstream software development. BeagleBoard.org has a public BeagleV forum that everyone can join for future updates on the project.
Two days after my colleague Thomas Petazzoni received his board, he managed to submit a patch for the mainline version of Buildroot to add support for this new board. Actually, compiling an image with Buildroot and preparing an SD card is easier than downloading and flashing the initial Fedora image offered for this beta board.
If you are just interested in testing the software on your board, you may directly get our binaries from our Build results paragraph.
The following instructions are derived from the board/beaglev/readme.txt file in Thomas’ proposed patch.
How to build
First, clone Buildroot’s git repository if you haven’t done it yet:
$ git clone git://git.buildroot.net/buildroot
Then add a remote branch corresponding to Thomas Petazzoni’s own tree, as his changes haven’t made their way into the mainline yet, and checkout a local copy of his beaglev branch:
$ git remote add tpetazzoni https://github.com/tpetazzoni/buildroot.git
$ git fetch tpetazzoni
$ git checkout -b tpetazzoni-beaglev tpetazzoni/beaglev
Now you can build the binaries for the board:
$ make beaglev_defconfig
$ make
Build results
After building, output/images should contain the following files:
Imagefw_payload.binfw_payload.bin.outfw_payload.elfrootfs.ext2rootfs.ext4sdcard.imgu-boot.bin
The two important files are:
fw_payload.bin.out, which is the bootloader image, containing both OpenSBI (the Open Supervisor Binary Interface, allowing to switch from Machine mode to Supervisor mode) and U-Boot.sdcard.img, the SD card image, which contains the root filesystem, kernel image and Device Tree.
Tested versions of these generated files are available on our website.
Flashing the SD card image
You just need to insert your micro SD card into a card reader (assuming the /dev/sdX device file is used), and type the below command:
$ sudo dd if=output/images/sdcard.img of=/dev/sdX
Preparing the board
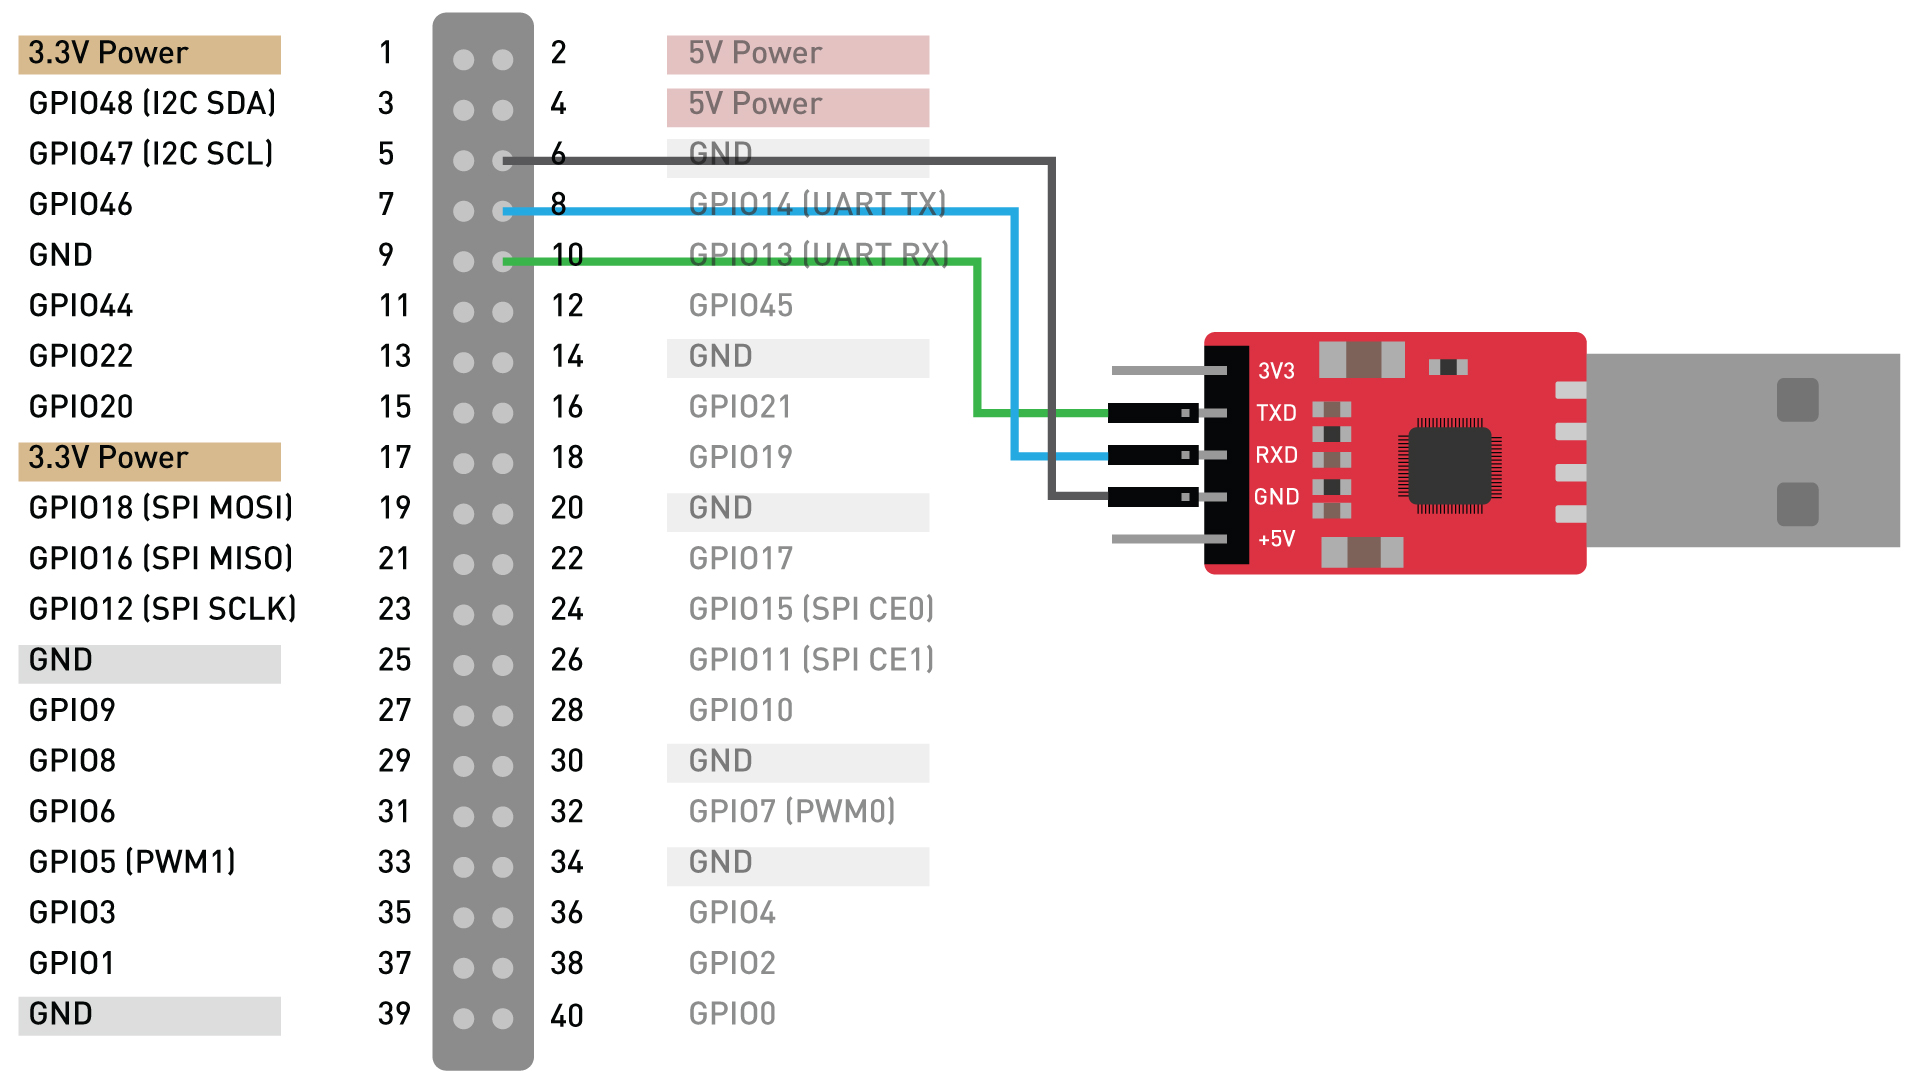
To prevent the experimental board from overheating, connect the BeagleV fan to the 5V supply (pin 2 or 4 of the GPIO connector) and GND (pin 6 of the GPIO connector).
To access a serial console, connect a TTL UART cable to pins 6 (GND), 8 (TX) and 10 (RX):
Insert your SD card and power-up the board using a USB-C cable.
Flashing the bootloader
The bootloader pre-flashed on the BeagleV has a non-working fdt_addr_r environment variable value, so it won’t work as-is. Reflashing the existing bootloader with the bootloader image produced by Buildroot is therefore necessary.
When the board starts up, a pre-loader shows a count down of 2 seconds. Interrupt it by pressing any key. You should then reach a menu like
this:
bootloader version:210209-4547a8d
ddr 0x00000000, 1M test
ddr 0x00100000, 2M test
DDR clk 2133M,Version: 210302-5aea32f
0
***************************************************
*************** FLASH PROGRAMMING *****************
***************************************************

0:update uboot
1:quit
select the function:
Press 0 and Enter. You will now see C characters being displayed. Ask your serial port communication program to send the fw_payload.bin.out file using the Xmodem protocol (with the sx command). For example, here’s how to do it with picocom…
picocom should be started as:
$ picocom -b 115200 -s "sx -vv" /dev/ttyUSB0
When you see the C characters on the serial line, press [Ctrl][a] [Ctrl][s]. Picocom will then ask for a file name, and you should type fw_payload.bin.out.
After a few minutes, reflashing should be complete. Then, restart the board. It will automatically start the system from the SD card, and reach the login prompt:
Welcome to Buildroot
buildroot login: root
# uname -a
Linux buildroot 5.10.6 #2 SMP Sun May 2 17:23:56 CEST 2021 riscv64 GNU/Linux
Useful resources
Here are useful resources for people who already have the Beagle V board:
- BeagleBoard’s beaglev-starlight: GitHub repository containing hardware design files, links to source code repositories (Linux, U-Boot, OpenSBI…) and useful documentation.
- Beagle community forum on Beagle V
We will keep updating this page according to progress in the upstream projects:
- Support for the board in mainline Buildroot
- Later, support for the board in mainline U-Boot and Linux
Great work on buildroot — it may be useful to know that one doesn’t need to re-flash u-boot just yet — but rather just change the fdt_addr_r value — just for those who may want to try the buildroot out but not commit 100%
Simply type Ctrl-C a few times when you see U-Boot 2021.04-rc4-g5b63233bc6-dirty (Apr 08 2021 – 14:09:59 +0800) on screen (you’ve got to be quick), get the u-boot prompt BeagleV # and the type:
env set fdt_addr_r 0x90000000 ; run bootcmd
and hit enter