Last year, Bootlin started contributing to the OP-TEE project, which is an open source Trusted Execution Environment (TEE) implemented using the Arm TrustZone technology. We published a blog post about our contribution of a generic clock framework to OP-TEE, and also presented a talk OP-TEE: When Linux Loses Control (slides, video).
As part of this work, Bootlin engineer Clément Léger contributed to the OP-TEE project, and many of his contributions have already been merged, and released as part of the 3.15 and 3.16 OP-TEE releases. In this blog post, we present some details of our contributions to OP-TEE so far, and our next steps.
Summary
Since then, we contributed a number of features and improvements to OP-TEE. First, a number of generic, HW-agnostic contributions:
We contributed 48 commits to OP-TEE 3.16.0. This level of contribution makes Bootlin engineer Clément Léger the second most active contributor by number of commits for this OP-TEE release.
We will continue our effort on sam5d2 support on OP-TEE and as part of this, there will be contributions on several generic subsystems as well as SAMA5D2 support:
Watchdog support
Generic watchdog API
OP-TEE Watchdog service compatible with arm,smc-wdt Linux driver
Sama5d2 watchdog driver
RTC support
Generic RTC API
OP-TEE RTC PTA to expose RTC to Linux
sama5d2 RTC driver
Linux driver for OP-TEE RTC
SAMA5D2 suspend support
Support forULP0, ULP1, ULP0 Fast and backup modes
PSCI support
SAMA5D2 interrupt controller support
Do not hesitate to contact us if you need help and support to integrate or deploy OP-TEE on your platform, either Microchip platforms, but also other ARM32 or ARM64 platforms.
The Device Tree language is a way to describe hardware that is present in a system and cannot be automatically detected. That’s the case of devices directly implemented on a System on a Chip, such as serial ports, Ethernet or Nand flash controllers. That’s also the case of devices connected to a number of buses, such as I2C and SPI, that do not provide mechanisms for dynamic enumeration and identification of devices.
For a given CPU architecture (ARM, PowerPC, etc), such a description allows to have a unique kernel supporting many different systems with distinct Systems on a Chip. The compiled Device Tree (DTB: Device Tree Binary), passed to the kernel by the bootloader at boot time, lets the kernel know which SoC and devices to initialize. Therefore, when you create a new board, and want to use a standard GNU/Linux distribution on it, all you have to do is create a new Device Tree describing your new hardware, compile it, and boot the distribution’s kernel with it. You don’t need to recompile that kernel, at least when it supports your SoC and the devices on your board.
Kernel developers and board maintainers are not the only ones who may need to make changes to the board device trees, though. Normal users also have legitimate reasons for tweaking the device tree of their board, such as:
Declaring external devices connected to board connectors. The simplest example is an I2C temperature sensor, but this can also include entire expansion boards plugged into the main board.
Changing the hardware blocks that are exposed on the external pins of their System on Chip. This is called Pin Multiplexing, and the Device Tree is the place where such multiplexing is configured.
Modifying operating system related properties, such as the Linux kernel command line or flash partitions.
In you have such a need, a first way to do this would be to directly modify the Device Tree for your hardware in the kernel sources, and recompile it. However, this is a rather bad idea because it will make it more difficult to upgrade to a later version of the kernel, possibly featuring changes to the Device Tree file you modified too. It’s always better not to tweak files maintained by others, and find a way to override them instead.
A second possibility to tweak the Device Tree for a board is to include it from a custom Device Tree for your own use case, using the /include/ statement from the Device Tree language, or #include and the C preprocessor. You can then use references to nodes in the original tree, using labels, and then modify the properties of such nodes or add new subnodes to them. It’s even possible to remove existing nodes and properties by using the /delete-node/ and /delete-property/ statements, as shown in the Device Tree Source Undocumented page.
However, this is still an inconvenient solution. Any time you plug in a new device or an expansion board, or want to tweak other settings, you have to rebuild and update the full Device Tree for your board. What if you could prepare Device Tree fragments for each change to make, compile them once for all, and then, when you boot your device, load the main Device Tree and only the fragments you need, without having anything else to recompile?
This is exactly what Device Tree Overlays are about. For example, in /lib/firmware, the Debian image shipped by BeagleBoard.org contains compiled Device Tree Overlays (DTBO) for the extension boards (also known as capes in the BeagleBoard world) they support, such as:
Then, at boot time, all you have to do is load the main DTB for your board, and then override it using the DTBOs corresponding to the capes which are currently mounted. Kernel contributors have also worked on solutions to load the DTBOs dynamically in the live system, but this solution is not mature yet. Therefore, the bootloader based solution at boot time remains so far the best one.
Writing Device Tree overlays
When the Device Tree overlays were first proposed, their syntax was very special and hard to remember. Fortunately, since version 1.5, the Device Tree compiler (dtc) supports a much more natural syntax for writing such overlays. For example, here are the sources for the overlay for the Relay cape, taken from the BBORG_RELAY-00A2.dts file in BeagleBoard.org’s Linux kernel tree:
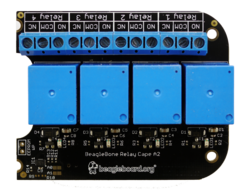
BeagleBone Relay Cape
This example shows us what is specific to Device Tree Overlay source code, compared to the normal Device Tree syntax:
Before any definition, the code must include the /plugin/; statement.
As in normal Device Tree code, you can refer to labels (such as &am33xx_pinmux in the above example), modify their properties, add or remove nodes and properties.
However, you cannot modify nodes which do not have a label. In this case, you have to recall such nodes by describing their absolute path from the root device between curly braces. There are two such instances in the above code: &{/chosen} and &{/}.
Compiling Device Tree overlays
Once you have the source code of the your overlay, it is supposed to be easy to compile it with the Device Tree Compiler. This time, let’s take the example of the BBORG_FAN-A000.dts overlay for the Fan cape, slightly modified:
The only change we made to this file was to replace __TIMESTAMP__ by a real timestamp. This statement is actually a macro meant to be substituted by the C Preprocesor before compiling with dtc.
This is where real life Device Tree overlay examples are getting more difficult to compile. Very simple overlays can be compiled with the above command, but as soon as the code contains #include statements or macros to be substituted by the C preprocessor, you have to call this preprocessor and give it the path to where the corresponding .h files are found in the kernel sources.
Fortunately, the kernel Makefile knows a suitable series of commands to compile such overlay sources.
Let’s clone BeagleBoard.org’s Linux kernel source tree. It contains Device Tree Overlays for most capes that are compatible with BeagleBoarg.org’s boards, and if I understood correctly, BeagleBoard.org’s kernel developers haven’t solved all the conflicts between their definitions and recent kernels yet. So, let’s checkout their 5.10 branch:
git clone https://github.com/beagleboard/linux.git
cd linux
git branch -a
git checkout 5.10
First, let’s install a toolchain, for example the one on Ubuntu:
sudo apt install gcc-arm-linux-gnueabihf
And then let’s prepare the environment for compiling the kernel:
Then, we can configure the kernel for the OMAP SoCs:
make omap2plus_defconfig
We also need to tweak the configuration for compiling the Device Trees and Overlays properly. So, run make menuconfig and set CONFIG_OF_OVERLAY=y. For the practical manipulations, you will also need to set CONFIG_LEDS_GPIO=y and CONFIG_LEDS_CLASS=y.
Device Tree Overlays are found in arch/arm/boot/dts/overlays/. You can compile them along with all normal DTBs with:
make dtbs
In case you want to recompile a specific DT overlay, for example the BBORG_RELAY-00A2.dts file:
$ touch arch/arm/boot/dts/overlays/BBORG_RELAY-00A2.dts
$ make dtbs
  DTCO    arch/arm/boot/dts/overlays/BBORG_RELAY-00A2.dtbo
Of course, for any of this to be useful at the end, you will also need to compile the kernel:
make -j8 zImage
Applying Device Tree overlays
As we already explained, U-Boot is the place where the Device Tree Overlays should be applied. To do this, here are the commands to run in U-Boot. As an example, we’re using the BeagleBone Black and its Relay Cape as example, assuming all the files where copied to the first partition of a micro-SD card, containing a FAT filesystem:
Allocate extra space for the DTB for future overlays, here adding 8192 bytes for example:
fdt resize 8192
Apply the overlay that we just loaded to the main DTB:
fdt apply 0x83000000
We are then ready to load the Linux kernel and boot it. Let’s see a more complete example…
Example usage on BeagleBone Black
You can of course follow this example, but you can also test it by yourself if you own the BeagleBone Black (or similar BeagleBone boards), and its Relay Cape.
Board setup
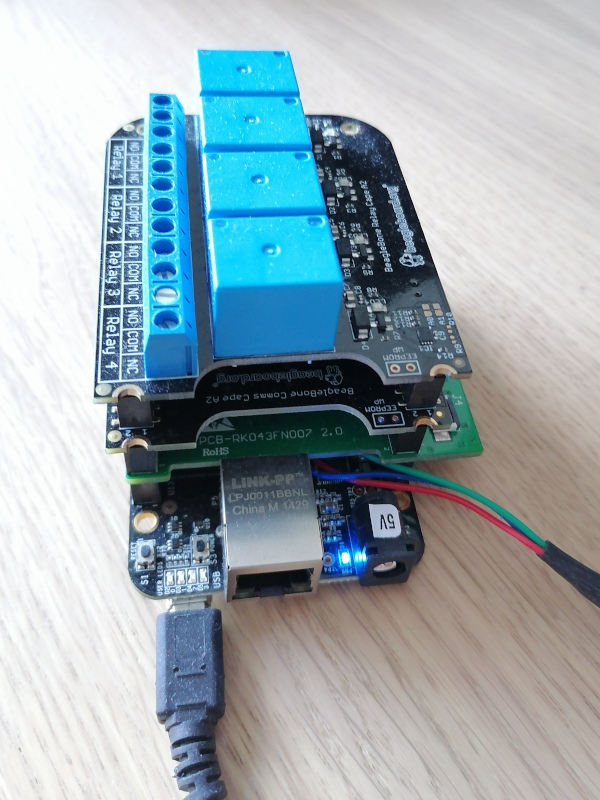
First, connect the Relay Cape to your board. In the below example, more capes are actually stacked, the Relay Cape being on top, as its volume doesn’t allow for further capes:
Then, take a microSD card and format its first partition with the FAT32 filesystem:
sudo mkfs.vfat -F 32 -n boot /dev/mmcblk0p1
Remove the microSD card and insert it again. It should now be mounted on /media/$USER/boot. Download an archive containing all the files you should need for the BeagleBone Black and its Relay Cape, and extract this archive in this mount point.
This archive contains U-Boot binaries for the BeagleBone Black, a DTB for the same board, Device Tree Overlays for BeagleBone capes under the overlays/ directory, and a kernel including its own root filesystem as an initramfs. This way, you don’t have to prepare another partition to hold the root filesystem. Note that the src/ subdirectory contains the Buildroot 2021.02 configuration to generate the root filesystem, as well as the Linux kernel configuration that we used.
To boot on U-Boot on the microSD card, press the USER button next to the USB host connector, when you power-up the board. Note that this is needed only once, until the board is completely switched off again. The board will continue to boot from the microSD card across reboots and resets. Make sure that the U-Boot prompt shows a 2021.07 U-Boot version.
Once in U-Boot, you can load the kernel, DTB and DTBO, apply the overlay as shown in the previous session:
You are now ready to boot your kernel with its updated Device Tree:
bootz 0x81000000 - 0x82000000
Then, log in with the root user and an empty password.
Checking from Linux that the overlay was applied
The first thing you can check is that the device tree overlay was indeed applied. You can do this by checking properties which are specific to the overlay, such as the one that was added to the chosen node (see the BBORG_RELAY-00A2.dts sources once again.
$ cd /proc/device-tree/chosen/overlays/
$ ls
BBORG_RELAY-00A2.kernel  name
Our overlay specific property is there, but in a more general case, look for properties under /proc/device-tree which are specific to each overlay.
Testing the Relay cape
Have a look again at BBORG_RELAY-00A2.dts file. In particular, for each relay, it declares an LED which is controlled by the same GPIO:
Each LED is given a label that will correspond to a directory under /sys/class/leds:
# ls /sys/class/leds/relay-*
/sys/class/leds/relay-jp1:
brightness      max_brightness  subsystem       uevent
device          power           trigger

/sys/class/leds/relay-jp2:
brightness      max_brightness  subsystem       uevent
device          power           trigger

/sys/class/leds/relay-jp3:
brightness      max_brightness  subsystem       uevent
device          power           trigger

/sys/class/leds/relay-jp4:
brightness      max_brightness  subsystem       uevent
device          power           trigger
Since the each LED and associated relay are controlled by the same GPIO, this gives us a convenient interface to control the each relay. We just have to control the corresponding LED by using its interface in /sys/class/leds.
This may not be a generic solution to control relays, but it will be easier than having to use the libgpiod library and its associated tools.
Testing a relay for real
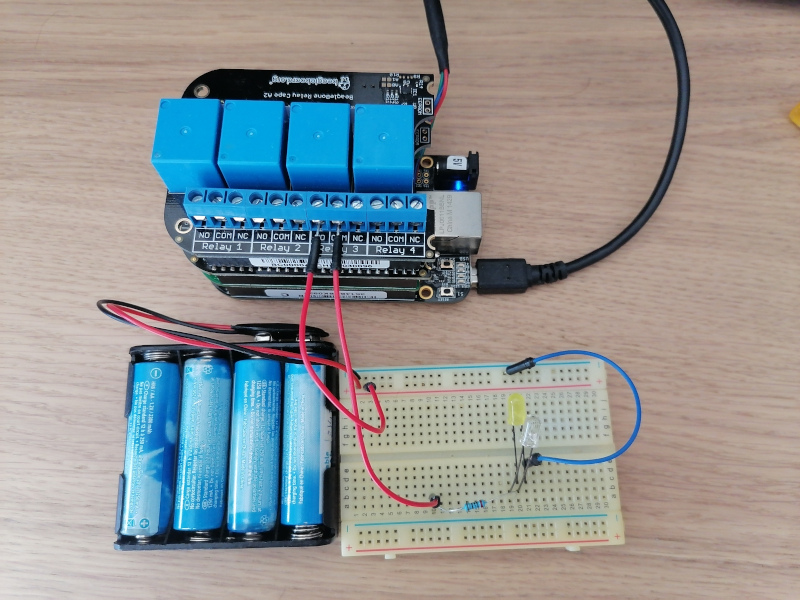
Now, let’s try to control Relay 3.
You are ready to connect a real circuit now. When the relay is inactive, the COM (Common) and NO (Normally Open) ports should be disconnected, while COM and NC (Normally Connected) should be connected. When you write 1 to the GPIO, the relay should then connect COM and NO:
The high voltage and low voltage parts of a relay are supposed to be separate and insulated, but in case their was a defect on my cape, I made my tests with a simple low-voltage circuit. However, relays are meant to be used for controlling normal AC voltages (110V / 230V).
Initial state – Relay off
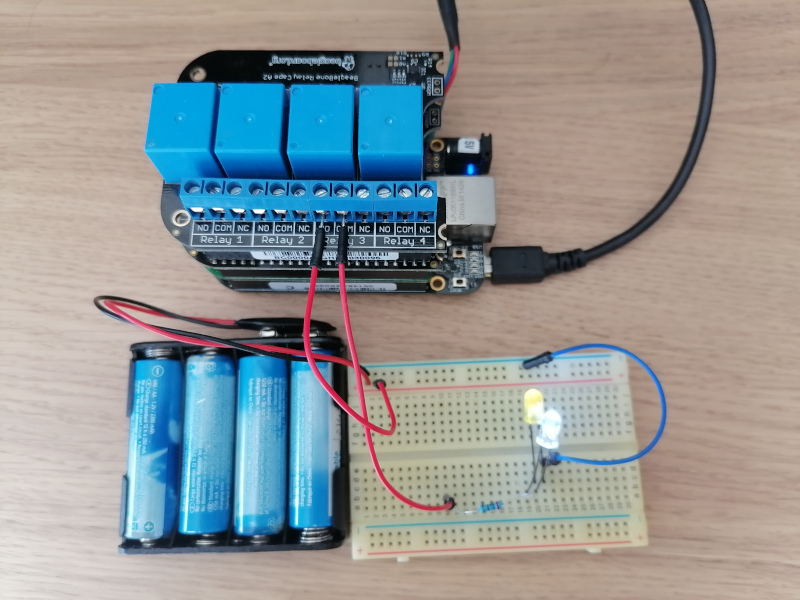
Now, turn on Relay 3 by setting a non zero brightness on the corresponding LED:
echo 1 > /sys/class/leds/relay-jp3/brightness
Relay on, after echo 1 > /sys/class/leds/relay-jp3/brightness
You can turn the relay back off as follows:
echo 0 > /sys/class/leds/relay-jp3/brightness
Don’t hesitate to use this cape in your home automation projects!
What to remember
Device Tree Overlays are Device Tree fragments used to customize the Device Tree of a given board, typically to describe components added externally, including entire expansion boards, or tweak pin multiplexing. That’s the mechanism used by BeagleBoard.org’s kernel developers to support the numerous expansion boards (also known as capes) compatible with their boards. All you have to do is load the main Device Tree Binary for a board (DTB), and then load and apply Device Tree Overlay Binaries (DTBO).
Bootlin thanks BeagleBoard.org for funding the creation of this blog post. Note that more posts are coming in the next weeks, one about the BeagleBone Cape Interface Specification and one about the extension board manager we added to U-Boot.
Linux 5.16 has been released on January 9. As usual, our recommended reading to learn more about this release is the corresponding Kernelnewbies.org page and the two articles from LWN covering the 5.16 merge window: part 1 and part 2.
As usual, Bootlin contributed a number of patches to this release, with a total of 117 commits, making Bootlin the 22th contributing company according to statistics (Unknown and Hobbyists not counting as companies).
Here are the main highlights of our contributions to 5.16:
Alexandre Belloni, as the maintainer of the RTC subsystem, continued to improve the core subsystem and RTC drivers. He added a new user-space interface to RTC to allow getting/settings RTC parameters. It is used to get the features of an RTC from user-space, to get/set the RTC correction or to configure Backup Switch Mode. In addition, Alexandre made various improvements to several RTC drivers, such as adding Backup Switch Mode, and general refactoring.
Clément Léger did a small fix in the clock drivers for Microchip ARM platforms, fixing an issue discovered as part of his work porting OP-TEE to Microchip ARM platforms.
Hervé Codina made some fixes to the fsmc NAND controller driver, which is used on a number of old platforms from ST. They fix support of certain NAND chips on those platforms. These issues were discovered as part of the development of a Linux BSP for an old ST Spear320 platform.
Maxime Chevallier fixed a deadlock in the network stack, that was causing the kernel to stop booting when using a root filesystem over NFS combined with the network interface using a SFP module.
Miquèl Raynal contributed many improvements to the max1027 ADC driver in the IIO subsystem, supporting hardware triggers.
Miquèl Raynal contributed support for the ADC found on Texas Instruments AM437x platforms. This required significant changes in the MFD driver that is used to support the multiple features of this ADC, as well as improvements in the existing IIO driver for TI ADCs.
Paul Kocialkowski contributed a small addition enabling the Rockchip VPU on Rockchip PX30 platforms, and merged the Device Tree bindings for the logiCVC display controller (but not yet the driver itself).
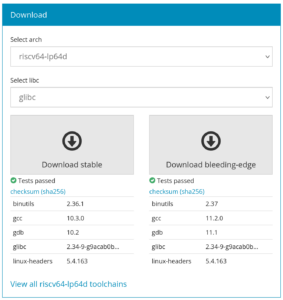
Bootlin has been offering since 2017 a large set of ready to use pre-compiled cross-compilation toolchains at toolchains.bootlin.com. These toolchains are available for a wide range of CPU architectures and CPU variants, and support either the glibc, uClibc-ng or musl C libraries, where applicable.
It’s been quite some time since the last release of those toolchains, so we took the opportunity of this quiet period between Christmas and New Year to finally update the toolchains. We’re happy to announce that we have now published a total of 187 toolchains targeting 46 different CPU architecture variants. As the toolchain release name suggests, they are now built with Buildroot 2021.11.
The most important changes are the following ones:
The so-called stable toolchains are now based on gcc 10.3.0, binutils 2.36.1, Linux headers 4.9, gdb 10.2, glibc 2.34, uClibc 1.0.39 and musl 1.2.2
The so-called bleeding-edge toolchains are now based on gcc 11.2, binutils 2.37, Linux headers 5.4, gdb 11.1, glibc 2.34, uClibc 1.0.39 and musl 1.2.2
The riscv64 toolchains (targeting the LP64 ABI) have been replaced by riscv64-lp64d toolchains (targeting the LP64D ABI), making them more generally useful.
Runtime testing using Qemu has been added for RISC-V 64-bit, m68k-68xxx and OpenRISC.
The gdb cross-debugger is now compiled with both Python and TUI support.
Internally, there’s been some significant refactoring of the scripts and Gitlab CI pipelines that control the build and testing of those toolchains. Many thanks to Romain Naour for providing the ground work that enabled this refactoring.
The toolchains can be directly downloaded from toolchains.bootlin.com. We have also submitted a patch to Buildroot that updates those toolchains, which are directly usable in Buildroot as external toolchains.
Bootlin has been delivering training courses in the field of Embedded Linux since its creation in 2004, delivering over 430 courses to more than 4500 engineers just since 2009, in over 40 countries, with a high-level of quality and a full transparency, with fully open training materials and publicly available training evaluations.
In France, a new quality certification brand for training and skills development service providers, called Qualiopi, has been created and is going to be needed starting January 1, 2022 for French training providers who want to deliver services to French customers who use public funding for training courses. For more details about Qualiopi, see this page in English, or the official page from the French Ministry, in French.
Bootlin has gone through the Qualiopi certification process, making a number of improvements to how we deliver and manage our training courses along the way, and we are happy to announce that Bootlin, at the first attempt, was successfully certified as a Qualiopi compliant training service provider. See our certificate, which can also be verified on the AFNOR certification authority website.
We are proud of this result, which shows our commitment to delivering high quality training courses to all our customers. Do not hesitate to look at our training courses portfolio and contact us if you are interested.
Back in 2019, ST released a brand new processor family, the STM32MP1, whose members are currently based on a dual Cortex-A7 to run Linux combined with one Cortex-M4 to run bare-metal applications, together with a wide range of peripherals.
Following the release of this new platform, Bootlin ported its Embedded Linux and Yocto training courses to be available on STM32MP1, and also published a long series of tutorials showing how to use Buildroot to build an embedded Linux system on STM32MP1: part 1, part 2, part 3, part 4, part 5, part 6 and part 7.
We are happy to announce that we have partnered with ST to develop an improved support of Buildroot on STM32MP1, which is materialized by a Buildroot BR2_EXTERNAL available on Github at https://github.com/bootlin/buildroot-external-st. In Buildroot, a BR2_EXTERNAL is an extension of the core Buildroot, with additional configurations and/or packages.
This BR2_EXTERNAL tree is an extension of Buildroot 2021.02, which provides four example Buildroot configuration to easily get started on STM32MP1 platforms:
st_stm32mp157a_dk1, building a basic Linux system for the STM32MP1 Discovery Kit 1 platform, with a minimal Linux root filesystem
st_stm32mp157c_dk2, building a basic Linux system for the STM32MP1 Discovery Kit 2 platform, with a minimal Linux root filesystem
st_stm32mp157a_dk1_demo, building a much more featureful Linux system for the STM32MP1 Discovery Kit 1 platform, with Linux root filesystem that allows to run Qt5 applications with OpenGL acceleration on the HDMI output, that supports audio, demonstrates the usage of the Cortex-M4, uses OP-TEE, and more.
st_stm32mp157c_dk2_demo, building a much more featureful Linux system for the STM32MP1 Discovery Kit 2 platform, with Linux root filesystem that allows to run Qt5 applications with OpenGL acceleration on both the integrated DSI display and HDMI output, that supports audio, WiFi and Bluetooth, demonstrates the usage of the Cortex-M4, uses OP-TEE, and more.
This BR2_EXTERNAL is designed to work with Buildroot 2021.02, with only a small set of modifications, which since then have been integrated in upstream Buildroot, ensuring that STM32MP1 users can directly use upstream Buildroot for their projects.
This Buildroot support is using the latest software components from the recently released 3.1 BSP from ST (see release notes), so it is based on Linux 5.10, U-Boot 2020.10, TF-A 2.4 and OP-TEE 3.12. We will keep this BR2_EXTERNAL updated with newer releases of the ST BSP.
A number of years ago, the French tax system has created a tax incentive mechanism called Crédit Impôt Recherche (Research Tax Credit) that allows startups and innovative companies to get tax deductions corresponding to a fraction of their research and development costs. This allows French companies to more easily invest in research and development activities.
In 2021, Bootlin has initiated the process to be eligible to this tax incentive mechanism, and we are happy to announce that after studying Bootlin’s expertise, engineering experience and achievements, the French tax administration has confirmed that Bootlin can deliver research and development activities fulfilling the Crédit Impôt Recherche criteria to its customers. This means that Bootlin customers in France can now integrate the cost of Bootlin engineering services that correspond to research and development activities into their Crédit Impôt Recherche and receive a tax incentive corresponding to up to 30% of the cost of our engineering services.
For our customers outside of France, this tax incentive is obviously not available, but the certification of Bootlin by the French tax administration as a company able to deliver research and development activities is another testimonial of our strong technical expertise in our field of Embedded Linux and Linux kernel development.
It’s been a while we haven’t posted about Bootlin contributions to the Linux kernel, and in fact missed both the Linux 5.14 and Linux 5.15 releases, which we will cover in this blog post.
Linux 5.14 was released on August 29, 2021. The usual KernelNewbies.org page and the LWN articles on the merge window (part 1 and part 2) provide the best summaries of the new features and hardware support offered by this release.
Linux 5.15 on the other hand was released on November 1, 2021. Here as well, we have a great KernelNewbies.org article and LWN articles on the merge window (part 1 and part 2).
In total for those two releases, Bootlin contributed 79 commits, in various areas:
Alexandre Belloni, as the RTC subsystem maintainer, contributed 9 patches improving various aspects of RTC drivers, the RTC subsystem or Device Tree bindings for RTC
Clément Léger contributed a small improvement to the at_xdmac driver used on Microchip ARM platforms
Hervé Codina enabled Ethernet support on the old ST Spear320 SoC, by leveraging the existing stmmac Ethernet controller driver
Maxime Chevallier fixed a small issue with the Ethernet PHY on the i.MX6 Solidrun system-on-module
Miquèl Raynal added support for NV-DDR timings in the MTD susbsystem. This allows to improve performance with NAND flash memories that support those timings. Their usage is specifically implemented in the Arasan NAND controller driver, which Miquèl contributed back in Linux 5.8. See our previous blog post on this topic for more details
Miquèl Raynal added support for yet another NAND controller driver, the ARM PL35x, which is used for example on Xilinx Zynq 7000. See our previous blog post on this topic.
Miquèl Raynal added support for NAND chips with large pages (larger than 4 KB) to the OMAP GPMC driver.
Miquèl Raynal made a few fixes to the IIO driver for the max1027 ADC.
Paul Kocialkowski contributed a few patches to enable usage of the Hantro video decoder driver on the Rockchip PX30 processor.
Thomas Perrot contributed one patch to enable usage of the Flex Timers on i.MX7, and one to fix an issue in the PL022 SPI controller driver.
And now, as usual the complete list of our contributions to Linux 5.14 and 5.15:
As part of recent projects, we had to dig into the Linux kernel Industrial I/O (IIO) subsystem with the goals of supporting a new ADC and adding new features to an existing driver. These tasks involved quite a few discussions between our engineering team and the IIO maintainers and reviewers. The aim of this blog post is to summarize the substance of these explanations to help others understand how an IIO kernel driver works and interacts with the core IIO subsystem.
Disclaimer: The IIO core is huge and keeps evolving. The aim of this article is not to cover it entirely, but at least explain our knowledge of how to use its basic features for common situations.
What is IIO?
The Industrial I/O subsystem covers any type of device that is commonly called as a “sensor”: ADCs, IMUs, temperature sensors, accelerometers, pressure sensors, potentiometers, light sensors, proximity sensors, etc (as well as few actuators, which I will on purpose disregard in this blog post). All these devices, besides measuring truly different physical components of our three dimensional world, end-up sharing quite a few properties. Any of these sensors must first be configured in order to know what must be measured and possibly how. When adequate, the device must be triggered in order to start converting. When the requested samples are ready, there must be some kind of signaling involved in order for the user to retrieve and process the data.
When thinking about the generic interfaces which could be needed by all these devices, it is quite straightforward to list:
The configuration before sampling
The triggering mechanism
The signaling for an end of conversion situation
The reading of the samples
The advertisement of the data
Registering an IIO device
The IIO core manipulates struct iio_dev * objects which inherits from struct device. This object should be allocated by the device driver with devm_iio_device_alloc(), providing the size of the driver’s internal structure as second argument. The allocated area dedicated for this internal pointer can be then retrieved with iio_priv().
This iio_dev structure must then be filled with a number of information:
The name of the device
A set of struct iio_info operations, typically a hook to read one or multiple samples on demand, optionally be able to write to the device, etc.
A set of supported modes, such as INDIO_DIRECT_MODE, which is used when samples can be retrieved at any time by the user from sysfs.
A scan mask, namely available_scan_masks which defines what are the possible/impossible scan combinations when requesting a read. Typically, a device might be configured to scan all of its internal channels from 1 to N. This can be described with a list of GENMASK(X, 0), with X ranging from 0 to the maximum number of channels. When the user will request a given set of channels, the IIO core will go through all the available masks registered by the driver and pick the first one that contains the desired channels. The selected mask will be available to the driver through the active_scan_mask entry of the iio_dev structure. If ‘anything goes’ and the devices has no restriction regarding which channel(s) can be scanned, this field should be skipped.
A definition of all the possible channels, including the type of physical measurements the device is able to perform (IIO_VOLTAGE, IIO_CURRENT, IIO_TEMPERATURE, IIO_STEPS, IIO_ROT, etc), the channel index and the data format.
Here is an example of channel description and below the meaning of these fields.
.info_mask_separate indicates an entry in sysfs that will be present for this the channel. In this case, IIO_CHAN_INFO_RAW indicates it is going to be the raw value of the sample.
.info_mask_shared_by_type indicates an entry in sysfs that will be shared by all channels of the same type. IIO_CHAN_INFO_SCALE means that there will be a common voltage scale sysfs entry shared by all the voltage raw entries. If the device was also able to read a temperature, we would also have had a single file indicating the scale for all the temperature samples.
The .scan_type field in the example indicates that values are provided as 16-bit big-endian samples that must be shifted by two bits. The full scale range is 0-1023. This conversion only applies to the buffer reading path: raw values directly read from sysfs and returned by the ->read_raw() hook (see below) should be converted by the driver itself.
Once the device fully described (and initialized, of course), the driver must register it with devm_iio_device_register().
Scaling factors
The int (*read_raw)(struct iio_dev *indio_dev, struct iio_chan_spec const *chan, int *val, int *val2, long mask) callback will be executed when reading either of the ‘raw value’ or ‘scale’ files from sysfs.
The type of data that must be returned is provided in the mask parameter: IIO_CHAN_INFO_RAW to retrieve the raw measurement or IIO_CHAN_INFO_SCALE to retrieve the scaling parameters, based on the scale information available in the iio_chan_spec structure that describes the channel.
For the IIO_CHAN_INFO_RAW case, most drivers return an IIO_VAL_INT type which can be simply “returned” into the *val argument. It is however possible to return a fixed point number, in this case the logic explained right after applies.
For the IIO_CHAN_INFO_SCALE case, the return value indicates what type of scaling should be done. In most cases here a fixed point value will be used so *val and *val2 will carry the scaling parameters. Here are two examples:
IIO_TEMP example:
*val = 1;
*val2 = 8;
ret = IIO_VAL_FRACTIONAL;
The full scale sample value should be multiplied by 1/8 in order to get Celcius degrees.
IIO_VOLTAGE example:
*val = 2500;
*val2 = 10;
ret = IIO_VAL_FRACTIONAL_LOG2;
The full scale range is a 10-bit value mapped to a 0-2500mV input level, said otherwise the scaling factor should be 2500 / 1024. The core will automatically do the computation of this factor and return 2,44140625 to the user in order to get milli-Volts.
Sampling
There are two basic common cases here.
In simple situations, a “single” on-demand read was issued by user-space directly by reading /sys/bus/devices/iio:device/in_<type><index>_raw. In this case the ->read_raw() callback should handle basically all the steps necessary to get a measurement, as detailed in our introduction.
However, user-space can also pick a more advanced way of interacting with the measurement device, called triggers.
A trigger is a specific configuration of the device which will sample a number of channels upon a specific event. This event might be the user requesting it from userspace with a so called software trigger, it might also be an external hardware event, or a periodic signal, or an internal continuous read mode… There are many ways of triggering a sensor and they are all covered by the subsystem.
Many devices cannot handle both modes at the same time. The only situation where this might work smoothly is when a device provides a hardware FIFO where you can read from (or a ‘latest value’ register) while not disrupting the FIFO read back. Otherwise, it will be needed, in order to avoid collisions between these two modes, to verify that exclusive access to the device is granted with a call to iio_device_claim_direct_mode() when starting a direct mode operation. As this helper grabs a mutex, it should be only called from process context and always be balanced with a call to iio_device_release_direct_mode().
IIO interoperability model
In the IIO core these four concepts are used:
IIO device: the hardware part which produces samples
IIO trigger: the signaling capability to request a conversion start
IIO buffers: where to store the samples
IIO events: threshold detectors
Even though a single hardware device might have hardware support for all these features, they must be described and handled separately so that, when applicable, other IIO devices might use them as well, eg. IIO device 2 could start a conversion upon IIO device 1 trigger state change. In practice it is not always possible but the way the API is built should lead us to keep things well separated anyway.
Registering a trigger
A struct iio_trigger must be allocated by devm_iio_trigger_alloc(), giving the new trigger a name.
The trigger should then receive a set of operations (struct iio_trigger_ops) with at least ->set_trigger_state() implemented, in order to switch on and off the trigger. One can use iio_trigger_set_drvdata() in order to link private data with the trigger and get this pointer back from the trigger callbacks.
Once initialized, devm_iio_trigger_register() will register the IIO trigger. This trigger will appear as a dedicated IIO device in sysfs.
It is likely that an IRQ will need to be registered as part of the trigger initialization step: the driver must be notified somehow that the trigger was toggled. If the asynchronous signaling is tied to a “trigger change” condition, which is the easiest situation, then it is advised to provide iio_trigger_generic_data_rdy_poll() as hard IRQ handler. This helper will just call iio_trigger_poll() and return.
You may of course want to handle more than this but in any case the rule is clear, triggers, buffers and devices should be fully separated. Hence, do not directly handle any data from this handler: an IIO trigger is only supposed to indicate a hardware transition, no more.
The call to iio_trigger_poll() will effectively go through the IIO internal interrupt tree, find the device that is connected to the trigger which fired and call the relevant handler in order to request the waiting device to process the data (which may be identical or different than the triggering device).
In the case of the device being limited to, for instance, an End Of Conversion (EOC) interrupt, you should still consider this signal as being suitable for being registered as a trigger. Yes, this might imply an additional delay between the hardware toggling and the IRQ being fired which is not ideal, but from a software point of view, the split between driver code and core logic will let other IIO devices use this IRQ as a trigger with no additional change needed to your code.
Note: There is one exception here. When a device does not provide any visible per-scan interrupt and the software has only access to some kind of FIFO watermark events, the whole trigger + buffer representation is swapped with a pure buffer-only implementation.
Registering triggered buffers
If the device itself is able to provide fast samples, the driver should also register a buffer, with iio_triggered_buffer_setup(). Both a hard IRQ handler and a threaded IRQ handler can be registered, as well as additional callbacks called before and after enabling and disabling the buffers in order to eg. configure the requested channels based on the current ->active_scan_mask.
Upon a trigger condition, these are the handlers that might be chosen by the core if the trigger is connected to your device!
The hard IRQ handler might be used to eg. save timestamps. The threaded IRQ handler is dedicated to the data processing. Depending of the type of trigger (iio_trigger_using_own()) the driver must decide whether it should start a conversion manually or if the data is waiting somewhere in a hardware FIFO, ready to be retrieved.
The final step is to push the samples into the core’s buffers. This should not be done manually. Let’s say that the user requested channels 0, 1 and 3 while the selected scan mask was including all channels from 0 to 4. Just calling iio_push_to_buffers() is the solution: the core knows that it will receive five samples of 16 bits, it also knows that the user only requested three of them and will automatically pick the right ones.
With all these IIO objects registered, you should be able to properly interact with the core and the other drivers, providing trigger capabilities to third party devices, or benefiting from other’s triggers.
What if my design lacks trigger capabilities?
You can still use triggers by enabling IIO_CONFIGFS (enables the configuration interface) and IIO_SW_TRIGGER. Then, you can either choose to trigger your scans from userspace with a simple file write, thanks to CONFIG_IIO_SYSFS_TRIGGER, or leverage timers to get periodic scans with CONFIG_IIO_HRTIMER_TRIGGER.
As an example, here is how to create a sysfs trigger:
Which in this case would mean that each sample is 16 bits wide, values should be considered big-endian, shifted twice before being considered as an unsigned 12-bit value.
# od -t x1 /dev/iio\:device0
0000000 08 06
Should be interpreted as 0x806 >> 2 = 0x201, which should be then multipled by the scaling factor in order to get the final mV value.
Conclusion
While contributing to this (relatively new) subsystem, we discovered a number of interesting features and design choices which would really benefit from a much tougher in-kernel documentation as most of the available information explains how to use IIO (with libiio or configfs) more than how to write a decent and properly shaped IIO device driver. As the subsystem is still pretty recent, it is valid to look at existing drivers to make design choices, but that is not a magic solution as no device never fully matches any software API anyway, and sensors unfortunately do not escape from that sticky rule.
We want to warmly thank Jonathan Cameron, IIO founder and maintainer, for his precious feedback on the mailing list, as well as his valuable review and contribution to this blog post.
We hope this article will help you go through this API and if it does, please mind letting us know by dropping a comment in the section down below!
OP-TEE is a popular open-source reference implementation of a Trusted Execution Environment that relis on the Arm Trustzone technology. While working on the OP-TEE port for an ARM 32-bit system-on-chip, the Microchip SAMA5D2, we needed to add support for the complete clock tree of this SoC. OP-TEE did not have any generic clock support at all and we felt the need to add such a framework. Thanks to this framework, support the 10+ clocks of the Microchip SAMA5D2 was easily imported from Linux with less work than a complete rewrite of the clock tree. Using generic subsystems allows to lower the maintenance cost and easily add new clocks.
In this blog post, we will describe in more details this clock framework, and the contributions we are doing to the OP-TEE project.
Clock framework
The clock framework that we contributed to OP-TEE allows to register clocks and represent a full clock tree with parents. Device Tree support has been added to allows parsing the clocks and their relationships from Device Tree. It provides a consumer API that allows device drivers to query clocks from their Device Tree node, enable or disable them, and get or set the needed clock rates.
assigned-clock-parents and assigned-clock-rates Device Tree properties are also supported and will apply the clock parents and rates described in these properties. A fixed-clock driver matching the "fixed-clock" compatible string has also been added since this one is often present in SoC Device Trees.
Peripheral drivers in OP-TEE can now use the functions provided by the clock framework to get clocks from the Device Tree using clk_dt_get_by_name() and then enable/disable them at will with clk_enable() and clk_disable() . Rates can also be set and retrieved using clk_set_rate() and clk_get_rate().
The pull request was made on OP-TEE github and contained the following commits, which have now been merged in the official upstream OP-TEE project:
With this clock framework in place, we are soon going to contribute support for the Microchip SAMA5D2, which will make use of the new clock framework. Some other platforms will also gain cleaner clock support thanks to this framework: for example, the existing STM32MP1 clock support is expected to be migrated to this clock framework.
In addition, based on this clock framework, SCMI (System Control and Management Interface) clock support has also been added. While OP-TEE already has support for exposing SCMI clocks to clients, the actual callbacks have to be implemented by platform-specific code. This additional support will allow exposing clocks registered within the clock framework to a SCMI client without any custom platform code. A Device Tree description will allow matching SCMI clock identifiers with clocks provided by clock drivers.
 Last year, Bootlin started contributing to the OP-TEE project, which is an open source Trusted Execution Environment (TEE) implemented using the Arm TrustZone technology. We published a blog post about our contribution of a generic clock framework to OP-TEE, and also presented a talk OP-TEE: When Linux Loses Control (slides, video).