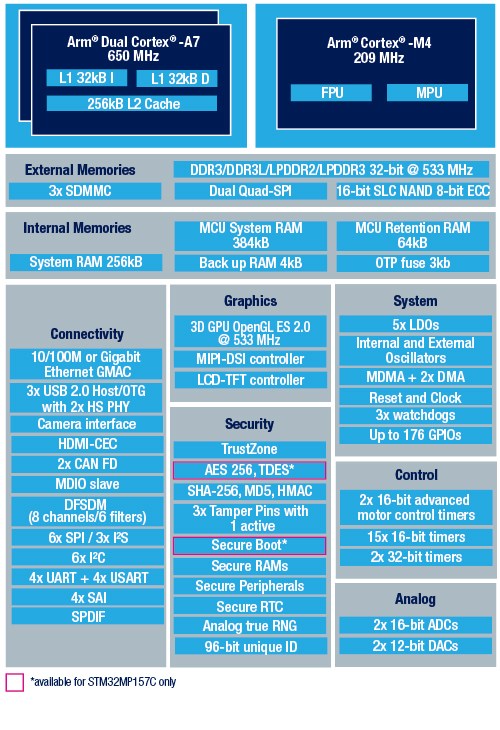
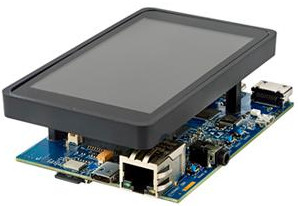
As we announced recently, we are going to publish a series of blost post that describes how to build an embedded Linux device based on the STM32MP1 platform, using the Buildroot build system. In this first article, we are going to see how to create a basic Linux system, with minimal functionality. The hardware platform used in these articles is the STM32MP157-DK2.
List of articles in this series:
- Building a Linux system for the STM32MP1: basic system
- Building a Linux system for the STM32MP1: connecting an I2C sensor
- Building a Linux system for the STM32MP1: enabling Qt5 for graphical applications
- Building a Linux system for the STM32MP1: setting up a Qt5 application development environment
- Building a Linux system for the STM32MP1: developing a Qt5 graphical application
- Building a Linux system for the STM32MP1: implementing factory flashing
- Building a Linux system for the STM32MP1: remote firmware updates
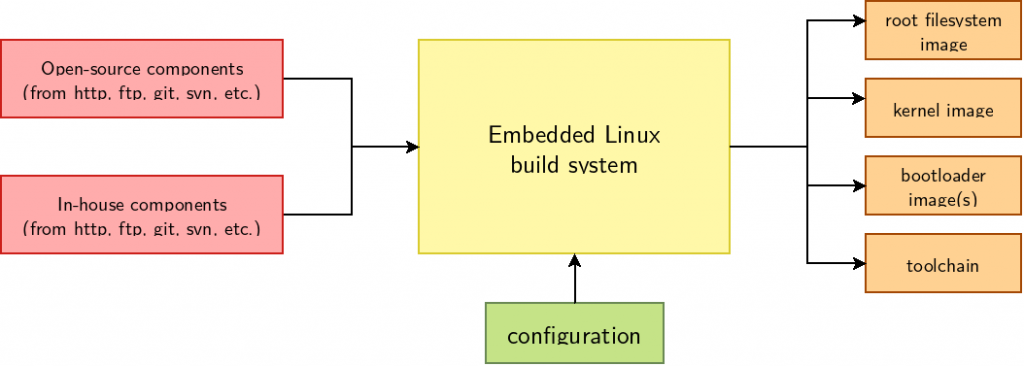
What is Buildroot?
A Linux system is composed of a potentially large number of software components coming from different sources:
- A bootloader, typically U-Boot, responsible for doing some minimal HW initialization, loading the Linux kernel and starting it
- The Linux kernel itself, which implements features such as process management, memory management, scheduler, filesystems, networking stack and of course all device drivers for your hardware platform
- User-space libraries and applications coming from the open-source community: command line tools, graphical libraries, networking libraries, cryptographic libraries, and more.
- User-space libraries and applications developed internally, implementing the “business logic” of the embedded system
In order to assemble a Linux system with all those software components, one typically has two main choices:
- Use a binary distribution, like Debian, Ubuntu or Fedora. Several of these distributions have support for the ARMv7 architecture. The main advantage of this solution is that it is easy: these binary distributions are familiar to most Linux users, they have a nice and easy-to-use package management system, all packages are pre-compiled so it is really fast to generate a Linux system. However, Linux systems generated this way are typically difficult to customize (software components are pre-built, so you cannot easily tweak their configuration to your needs) and difficult to optimize (in terms of footprint or boot time).
- Use a build system, like Buildroot or Yocto/OpenEmbedded. These build systems build an entire Linux system from source code, which means that it can be highly customized and optimized to your needs. Of course, it is less simple than using a binary distribution and because you are building all components from source code, a non-negligible amount of CPU time will be spent on compiling code.
![]() In this series of blog post, we have chosen to use Buildroot, which is an easy-to-use build system, which is a good match for engineers getting started with embedded Linux. For more general details about Buildroot, you can read the freely available training materials of our Embedded Linux development with Buildroot training course.
In this series of blog post, we have chosen to use Buildroot, which is an easy-to-use build system, which is a good match for engineers getting started with embedded Linux. For more general details about Buildroot, you can read the freely available training materials of our Embedded Linux development with Buildroot training course.
Buildroot is a set of Makefiles and script that automates the process of download the source code of the different software components, extract them, configure them, build them and install them. It ultimately generates a system image that is ready to be flashed, and which typically contains the bootloader, the Linux kernel image and the root filesystem. It is important to understand that Buildroot itself does not contain the source code for Linux, U-Boot or any other component: it is only a set of scripts/recipes that describes where to download the source code from, and how to build it.
Building the minimal system with Buildroot
Let’s started by getting the source of Buildroot from its upstream Git repository:
git clone git://git.buildroot.net/buildroot
cd buildroot
Starting a Buildroot configuration is then typically done by running make menuconfig, and then selecting all the relevant options for your system. Here, we are instead going to use a pre-defined configuration that we created for the STM32MP157-DK2 platform. This pre-defined configuration has been submitted to the upstream Buildroot project, but has not yet been merged as of this writing, so we’ll use an alternate Git branch:
git remote add tpetazzoni https://github.com/tpetazzoni/buildroot.git
git fetch tpetazzoni
git checkout -b stm32mp157-dk2 tpetazzoni/2019.02/stm32mp157-dk
The 2019.02/stm32mp157-dk branch in your author’s Buildroot Git repository is based on upstream Buildroot 2019.02.x branch and contains 4 additional patches needed to support the STM32MP157-DK2 platform.
Let’s continue by telling Buildroot to load the pre-defined configuration for the STM32MP157-DK2:
make stm32mp157_dk_defconfig
We could start the build right away, as this configuration works fine, but to illustrate how to modify the configuration (and speed up the build!) we will adjust one aspect of the system configuration. To do so, let’s run Buildroot’s menuconfig. People who have already configured the Linux kernel should be familiar with the tool, as it is the exact same configuration utility.
make menuconfig
At this point, if the command fails due to the ncurses library being missing, make sure to install the libcnurses-dev or ncurses-devel package on your Linux distribution (the exact package name depends on the distribution you’re using).
Once in menuconfig, go to the Toolchain sub-menu. By default the Toolchain type is Buildroot toolchain. Change it to External toolchain by pressing the Enter key. When Buildroot toolchain is selected, Buildroot builds its own cross-compiler, which takes quite some time. Selecting External toolchain tells Buildroot to use a pre-existing cross-compiler, which in our case is the one provided by ARM for the ARMv7 architecture.

Exit menuconfig and save the configuration. It is now time to start the build by running make. However, your author generally likes to keep the output of the build in a log file, using the following incantation:
make 2>&1 | tee build.log
Now that Buildroot starts by checking if your system has a number of required packages installed, and will abort if not. Please follow section System requirements > Mandatory packages of the Buildroot manual to install all the appropriate dependencies. Restart the make command once all dependencies have been installed.
The build process took 10 minutes on your author’s machine. All the build output is conveniently grouped in the sub-directory named output/, in which the most important results are in output/images/:
output/images/zImageis the Linux kernel imageoutput/images/stm32mp157c-dk2.dtbis the Device Tree Blob, i.e the piece of data that describes to the Linux kernel the hardware it is running on. We’ll talk more about Device Tree in the second blog post of this seriesoutput/images/rootfs.{ext4,ext2}is the image of the root filesystem, i.e the filesystem that contains all the user-space libraries and applications. It’s using the ext4 filesystem format, which is the de-facto standard filesystem format in Linux for block storage.output/images/u-boot-spl.stm32is the first stage bootloaderoutput/images/u-boot.imgis the second stage bootloaderoutput/images/sdcard.imgis a complete, ready-to-use SD card image, which was generated from the previous images
Flashing and testing the system
First things first, we’ll need to write sdcard.img to a microSD card:
sudo dd if=output/images/sdcard.img of=/dev/mmcblk0 bs=1M conv=fdatasync status=progress
Of course, make sure that, on your system, the microSD card is really identified as /dev/mmcblk0. And beware that all the data on your microSD card will be lost!
Insert the microSD card in the microSD card connector of the STM32MP157-DK2 board, i.e connector CN15.
Connect a USB to micro-USB cable between your PC and the connector labeled ST-LINK CN11 on the board. A device called /dev/ttyACM0 will appear on your PC, through which you’ll be able to access the board’s serial port. Install and run a serial port communication program on your PC, your author’s favorite is the very minimalistic picocom:
picocom -b 115200 /dev/ttyACM0
Finally, power up the board by connecting a USB-C cable to connector PWR_IN CN6. You should then see a number of messages on the serial port, all the way up to Buildroot login:. You can then login with the root user, no password will be requested.

How is the system booting ?
Let’s look at the main steps of the boot process, by studying the boot log visible on the serial port:
U-Boot SPL 2018.11-stm32mp-r2.1 (Apr 24 2019 - 10:37:17 +0200)
This message is printed by the first stage bootloader, i.e the code contained in the file u-boot-spl.stm32, compiled as part of the U-Boot bootloader. This first stage bootloader is directly loaded by the STM32MP157 system-on-chip. This first stage bootloader must be small enough to fit inside the STM32MP157 internal memory.
U-Boot 2018.11-stm32mp-r2.1 (Apr 24 2019 - 10:37:17 +0200)
This message is printed by the second stage bootloader, which was loaded from storage into external memory by the first stage bootloader. This second stage bootloader is the file u-boot.img, which was also compiled as part of the U-Boot bootloader.
Retrieving file: /boot/zImage
Retrieving file: /boot/stm32mp157c-dk2.dtb
These messages are printed by the second stage bootloader: we see it is loading the Linux kernel image (file zImage) and the Device Tree Blob describing our hardware platform (file stm32mp157c-dk2.dtb). It indicates that U-Boot has loaded both files into memory: it is now ready to start the Linux kernel.
Starting kernel ...
This is the last message printed by U-Boot before jumping into the kernel.
[    0.000000] Booting Linux on physical CPU 0x0
[    0.000000] Linux version 4.19.26 (thomas@windsurf) (gcc version 8.2.1 20180802 (GNU Toolchain for the A-profile Architecture 8.2-2018.11 (arm-rel-8.26))) #1 SMP PREEMPT Wed Apr 24 10:38:00 CEST 2019
And immediately after that, we have the first messages of the Linux kernel, showing the version of Linux and the date/time it was built. Numerous other kernel messages are then displayed, until:
[ 3.248315] VFS: Mounted root (ext4 filesystem) readonly on device 179:4.
This message indicates that the kernel has mounted the root filesystem. After this point, the kernel will start the first user-space process, so the next messages are user-space services being initialized:
Starting syslogd: OK
[...]
Welcome to Buildroot
buildroot login:
Until we reach a login prompt.
Exploring the system
After logging in as root, you have access to a regular Linux shell, with most basic Linux commands available. You can run ps to see the processes, run ls / to see the contents of the root filesystem, etc.
You can also play a bit with the hardware, for example to turn on and off one of the LEDs of the board:
echo 255 > /sys/class/leds/heartbeat/brightness
echo 0 > /sys/class/leds/heartbeat/brightness
Understanding the Buildroot configuration
So far, we have used a pre-defined Buildroot configuration, without really understanding what it does and how it built this basic system for our board. So let’s go back in make menuconfig and see how Buildroot was configured.
In the Target options menu, obviously the ARM Little Endian architecture was chosen, and more specifically Cortex-A7 was chosen as the Target Architecture Variant. Indeed the entire Linux system runs on the Cortex-A7 cores.
In the Build options menu, nothing was changed from the default values.
In the Toolchain menu, we previously modified to use an External toolchain to use a pre-existing cross-compiler and save on build time. All other options were kept as their default.
In the System configuration menu, we defined the following things:
- Root filesystem overlay directories is set to
board/stmicroelectronics/stm32mp157-dk/overlay/. This option tells Buildroot that the contents of theboard/stmicroelectronics/stm32mp157-dk/overlay/directory must be copied into the root filesystem at the end of the build. It allows to add custom files to the root filesystem. - Custom scripts to run after creating filesystem images is set to
support/scripts/genimage.shand the related option Extra arguments passed to custom scripts is set to-c board/stmicroelectronics/stm32mp157-dk/genimage.cfg. This tells Buildroot to call thisgenimage.shscript at the very end of the build: its purpose is to generate the final SD card image we have used.
In the Kernel menu, we have obviously configured which Linux kernel version and configuration should be used:
- We are downloading the Linux kernel source code as a tarball from Github, using a custom Buildroot macro called
github. Based on this information, Buildroot will go to the Git repository at https://github.com/STMicroelectronics/linux/, and get the kernel version identified by the tagv4.19-stm32mp-r1.2 - Configuration file path is set to
board/stmicroelectronics/stm32mp157-dk/linux.config. This is the file that contains the kernel configuration. We have prepared a custom kernel configuration to have a simple but working kernel configuration. Of course, it can be adjusted to your needs, as we will demonstrate in the next blog post. - We enabled the option Build a Device Tree Blob (DTB) and set In-tree Device Tree Source file names to
stm32mp157c-dk2. This tells Buildroot to build and install the Device Tree Blob that matches our hardware platform. - Finally, we enabled Install kernel image to /boot in target, so that the kernel image and the Device Tree blob are installed inside the
/bootdirectory in the root filesystem. Indeed, our U-Boot configuration will load them from here (see below).
In the Target packages menu, we have kept the default: only the BusyBox package is enabled. BusyBox is a very popular tool in the embedded Linux ecosystem: it provides a lightweight replacement for a Linux shell and most common Linux command line tools (cp, mv, ls, vi, wget, tar, and more). Our basic system in fact only contains BusyBox!
In the Filesystem images menu, we have enabled the ext2/3/4 root filesystem type and chosen the ext4 variant. As explained above, ext4 is kind of the de-facto standard Linux filesystem for block storage devices such as SD cards.
In the Bootloaders menu, we enabled U-Boot, where a significant number of options need to be tweaked:
- We download U-Boot from a STMicroelectronics Git repository at https://github.com/STMicroelectronics/u-boot.git and use the Git tag v2018.11-stm32mp-r2.1.
- This U-Boot comes with a pre-defined configuration called
stm32mp15_basic, which we select using Board defconfig. - However, it turns out that this pre-defined configuration enables the STM32 watchdog, and since our Linux user-space does not have a watchdog daemon to tick the watchdog regularly, it would reset constantly. Using a small additional snippet of U-Boot configuration, stored in the file
board/stmicroelectronics/stm32mp157-dk/uboot-fragment.config, we disable the watchdog. Of course, it should be re-enabled and properly handled in Linux user-space for a final product. - In the U-Boot binary format sub-menu, we tell Buildroot that the second stage bootloader image will be called
u-boot.img, and this is the one Buildroot should install inoutput/images - We tell Buildroot that our U-Boot configuration will build a first stage bootloader called
spl/u-boot-spl.stm32, which allows Buildroot to install it inoutput/images - Finally, we pass a custom
DEVICE_TREE=stm32mp157c-dk2option in the U-Boot environment, which is needed for the U-Boot build process to find the Device Tree used internally by U-Boot.
Finally, in the Host utilities menu, we enable the host genimage package.
This entire configuration is saved in a simple text file called configs/stm32mp157_dk_defconfig, which is the one we loaded initially when running make stm32mp157_dk_defconfig. We suggest you take a moment to look at configs/stm32mp157_dk_defconfig and see the configuration options it defines.
What happens during the Buildroot build?
With all these options in place, here is what Buildroot has done to build our system (we have omitted some intermediate steps or package dependencies for the sake of brievity):
- Download and install the pre-built ARM compiler from ARM’s website, and install the C and C++ libraries inside the target root filesystem
- Download the Linux kernel source code from STMicroelectronics Github repository, configure it with our configuration file, build it, install
zImageandstm32mp157c-dk2.dtbboth inoutput/imagesand in the target root filesystem in the/bootdirectory. It also installs the Linux kernel modules inside the target root filesystem - Download the U-Boot source code from STMicroelectronics Github repository, configure it, build it and install
u-boot-spl.stm32and u-boot.img inoutput/images - Download the Busybox source code from the project official website, configure it, build it and install it inside the target root filesystem.
- Copies the contents of the rootfs overlay inside the target root filesystem
- Produce the ext4 image of the root filesystem, and install it as
output/images/rootfs.ext4 - Call the genimage.sh script, whose purpose is to generate the final SD card image,
output/images/sdcard.img
Let’s now have a look at the file board/stmicroelectronics/stm32mp157-dk/genimage.cfg, which tells the genimage utility how to create the final SD card image:
image sdcard.img {
        hdimage {
                gpt = "true"
        }

        partition fsbl1 {
                image = "u-boot-spl.stm32"
        }

        partition fsbl2 {
                image = "u-boot-spl.stm32"
        }

        partition uboot {
                image = "u-boot.img"
        }

        partition rootfs {
                image = "rootfs.ext4"
                partition-type = 0x83
                bootable = "yes"
                size = 256M
        }
}
What this file says is:
- We want to create a file named
sdcard.img - This file will contain a number of partitions, described by a GPT partition table. This is necessary for the STM32MP157 built-in ROM code to find the first stage bootloader.
- The first two partitions are named
fsbl1andfsbl2, and contain the raw binary of the first stage bootloader, i.e there is no filesystem in those partitions. it is the STM32MP157 built-in ROM code that is hardcoded to search the first stage bootloader in the first two partitions whose name start withfsbl. - The third partition named
ubootcontains the second stage bootloader, also as a raw binary (no filesystem). Indeed, the first stage bootloader is configured to search the second bootloader from the third partition of the SD card (this is defined in the U-Boot configuration and can be modified if needed) - The fourth partition contains the ext4 filesystem image that Buildroot has produced, which is in fact our Linux root filesystem, with BusyBox, the standard C/C++ libraries and the Linux kernel image and Device Tree Blob.
This last partition is marked bootable. This is important because the U-Boot configuration for the STM32MP157 hardware platform by default uses the U-Boot Generic Distro Concept. At boot, U-Boot will search for the partition marked bootable, and then inside the filesystem contained in this partition, look for the file /boot/extlinux/extlinux.conf to know how to boot the system.
This file extlinux.conf is inside our root filesystem overlay at board/stmicroelectronics/stm32mp157-dk/overlay/boot/extlinux/extlinux.conf, so it is installed in our root filesystem as /boot/extlinux/extlinux.conf so that U-Boot finds it. This file simply contains:
label stm32mp15-buildroot
  kernel /boot/zImage
  devicetree /boot/stm32mp157c-dk2.dtb
  append root=/dev/mmcblk0p4 rootwait
Which tells U-Boot that the kernel image to load is /boot/zImage, that the Device Tree Blob to use is /boot/stm32mp157c-dk2.dtb and that the string root=/dev/mmcblk0p4 rootwait must be passed as arguments to the Linux kernel when booting. The root=/dev/mmcblk0p4 is particularly important, because it is the one telling the Linux kernel where the root filesystem is located.
So, if we summarize the boot process of our hardware platform with those new details in mind, it looks like this:
- The STM32MP157 built-in ROM code looks for the GPT partitions whose name start with
fsbl, and if one is found, loads the contents into the STM32 internal memory and runs it. This is our first stage bootloader. - This first stage bootloader is hard-coded to load the second stage bootloader from the third partition of the SD card. So it initializes the external RAM, loads this second stage bootloader into external RAM and runs it.
- The second stage bootloader does some more initialization, and then looks for a partition marked bootable. It finds that the fourth partition is bootable. It loads the
/boot/extlinux/extlinux.conffile, thanks to which it learns where the kernel and Device Tree are located. It loads both, and starts the kernel with the arguments also specified in theextlinux.conffile. - The Linux kernel runs, up to the point where it mounts the root filesystem, whose location is indicated by the
root=/dev/mmcblk0p4argument. After mounting the root filesystem, the kernel starts the first user-space process. - The first user-space process that runs is
/sbin/init, implemented by BusyBox. It starts a small number of services, and then starts the login prompt.
Conclusion
You can find the exact Buildroot source code used to reproduce the system used in this article in the branch at 2019.02/stm32mp157-dk-blog-1.
In this long initial blog post, we have learned what Buildroot is, how to use it to build a basic system for the STM32MP157 platform, how the Buildroot configuration was created, and how the STM32MP157 platform is booting.
Stay tuned for the next blog post, during which we will learn how to plug an additional device to the board: a pressure, temperature and humdity sensor connected over I2C, and how to make it work with Linux.
 For many years, Bootlin has been offering an
 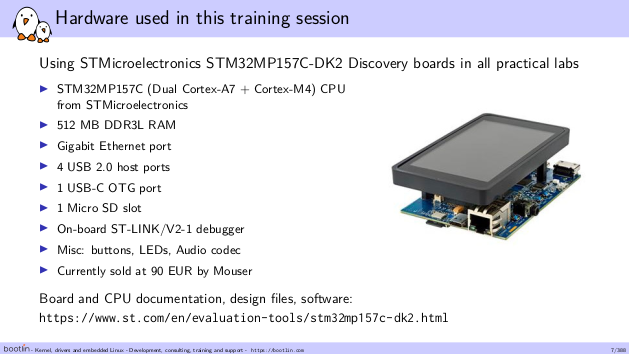 Today, we are happy to announce that all the practical labs of our 4-day variant are now done on the recently announced