Installing Ubuntu 10.04 on the IGEPv2 board. Using the board as a small server.
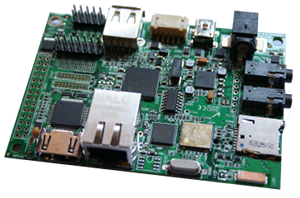
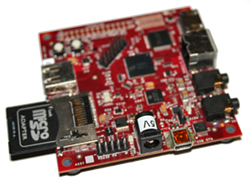
 Last year, folks at Texas Instruments told me about the IGEP v2 board. This board is similar to the Beagle board, but also features 512 MB of RAM and NAND flash (instead of 256 for the Beagle), on board Ethernet (RJ45), Wi-Fi and Bluetooth, all this for only 145 €! Its fast ARM CPU (TI OMAP 3530 running at 720 MHz) and graphical capabilities allow it to be used in for services usually performed by desktop or server CPUs.
At the Bootlin main office, we needed a server to share files, create backups and upload these backups to our servers on the Internet. I decided to use the Ubuntu 10.04 distribution on ARM, based on Debian GNU/Linux. As I didn’t find all the details I needed on the IGEP community website, here are the steps that I took. Several details were found on the http://labs.igep.es/index.php/How_to_get_the_Ubuntu_distribution page though.
This page assumes that you are familiar with building the Linux kernel, controlling an embedded board from a serial line and booting it, and using the GNU/Linux system in general (see the training materials from our embedded Linux course). Beginners may be lost because we don’t give all the details, but more experienced developers should just find the board specific details that they need.
First, get an SD card (at least 2 GB), and prepare its partitions with the mkcard.sh utility.
To compile your kernel, get a CodeSourcery toolchain for ARM. I used the 2010q1 release. Install it in /usr/local/CodeSourcery/arm-2010q1/ (for example)
Get the kernel sources:
$ mkdir $HOME/igep
$ cd $HOME/igep
$ git clone git://git.igep.es/pub/scm/linux-omap-2.6.git
$ cd linux-omap-2.6/
Let’s switch to the latest stable version:
$ git tag
v2.6.28.10-3
v2.6.28.10-igep0020b-0
v2.6.28.10-igep0020b-1
v2.6.28.10-igep0020b-2
v2.6.33.2-0
v2.6.33.4-0
$ git checkout -b v2.6.33.4-0 v2.6.33.4-0
Checking out files: 100% (13116/13116), done.
Switched to a new branch 'v2.6.33.4-0'
Now, set the environment variables for cross-compiling the kernel sources to the arm architecture:
$ export PATH=/usr/local/CodeSourcery/arm-2010q1/bin:$PATH
$ export ARCH=arm
$ export CROSS_COMPILE=arm-none-linux-gnueabi-
Now, take the default configuration for the board and build your kernel:
$ make help | grep igep
$ make igep0020_defconfig
$ make -j 4
$ make uImage
It’s time to build your Ubuntu filesystem, using the Rootstock utility:
$ tar zxvf rootstock-0.1.99.3.tar.gz
$ cd rootstock-0.1.99.3
$ sudo ./rootstock --fqdn igepv2 --login mike --password letmein \
  --imagesize 2G --seed build-essential,openssh-server --dist lucid
Copy the kernel to the first partition of your SD card:
cp arch/arm/boot/uImage /media/boot/
cp .config /media/boot/config-2.6.33.4
Install the root filesystem on the second partition of your SD card:
$ cd /media/rootfs/
$ sudo tar zxvf $HOME/igep/rootstock-0.1.99.3/armel-rootfs-201006102239.tgz
Configure the rootfs to let you log in on the serial console (ttyS2 with OMAP). Do this by copying etc/init/tty1.conf to etc/init/ttyS2.conf and replacing tty1 by ttyS2 in this file.
Install kernel modules manually for the first time:
$ mkdir -p /lib/modules
$ cd $HOME/igep/linux-omap-2.6/
$ make INSTALL_MOD_PATH=/media/rootfs modules_install
In the Rootstock version I tested, the specified user didn’t get created (bug report). To be able to log in, I had to disable the root password by removing the first * character in the root entry in etc/shadow:
We are now ready to boot our new system. First, unmount your SD card partitions:
$ sudo umount /media/boot
$ sudo umount /media/rootfs
Insert your SD card in the slot on your board, connect your serial cable and in the U-boot prompt on the serial line, configure the kernel boot parameters:
$ setenv bootargs mem=512M console=ttyS2,115200n8 root=/dev/mmcblk0p2 rw rootwait
$ setenv bootcmd 'mmc init 0 ; fatload mmc 0 80000000 uImage ; bootm 80000000'
$ setenv autostart yes
$ saveenv
$boot
You should see your Linux kernel boot and get to a login shell. Log in as root with no password.
It is now time for the final tweaks. First, create a non root user (remember the Rootstock bug), allow it to run the sudo command, and choose a root password too:
adduser mike
adduser mike sudo
passwd
Let’s cope with a last Rootstock bug. Add the updates and security repositories to /etc/apt/sources.list:
deb http://ports.ubuntu.com/ubuntu-ports lucid-updates main
deb http://ports.ubuntu.com/ubuntu-ports lucid-security main
Without this, you would miss package updates and security releases, and your packages would never change!
If you use the IGEP board as a server as I do, you may need your server to have a fixed MAC address. The trouble is the e2prom storing the MAC address is not populated by default, and every time you boot, the kernel gives you a random MAC address.
The easiest fix I found was to choose an arbitrary MAC address (you can take the first random one that you get), and force it in /etc/network/interfaces:
auto eth0
iface eth0 inet dhcp
hwaddress ether 00:01:04:1b:2C:1F
As the IGEPv2 board doesn’t have a battery by default, it won’t be able to keep the correct time. You can use the ntp daemon to address this:
sudo apt-get install ntp
Your configuration should now be complete. You can now use your IGEPv2 board as a tiny, ultra low power server with Ubuntu server. All the rest is ordinary Debian / Ubuntu server administration. Of course, you can also install desktop packages and use your board as a desktop replacement (you may need to add kernel command line settings for graphics). Have fun!
By the way, the IGEPv2 board is not the best solution if you all you need is a server. The amazing graphical capabilities of the OMAP chip would just be useless. For a server, better, cheaper and more powerful alternatives are the SheevaPlug and GuruPlug. Don’t miss these very nice devices!


 The Bootlin website is proudly powered by
  For the French speaking readers, we are looking for a graduate engineer to open a new office in Toulouse, France.
 Being a member of the organization committee of the Embedded Linux Conference Europe, I get access to fresh news about this yearly conference. The call for presentations is now over and we have just announced
 If you live near Eindhoven in the Netherlands, or if you can easily get there, you may be interested in the seminar organized by
  No
No