As we announced recently, we are going to publish a series of blost post that describes how to build an embedded Linux device based on the STM32MP1 platform, using the Buildroot build system. In this first article, we are going to see how to create a basic Linux system, with minimal functionality. The hardware platform used in these articles is the STM32MP157-DK2.
List of articles in this series:
- Building a Linux system for the STM32MP1: basic system
- Building a Linux system for the STM32MP1: connecting an I2C sensor
- Building a Linux system for the STM32MP1: enabling Qt5 for graphical applications
- Building a Linux system for the STM32MP1: setting up a Qt5 application development environment
- Building a Linux system for the STM32MP1: developing a Qt5 graphical application
- Building a Linux system for the STM32MP1: implementing factory flashing
- Building a Linux system for the STM32MP1: remote firmware updates
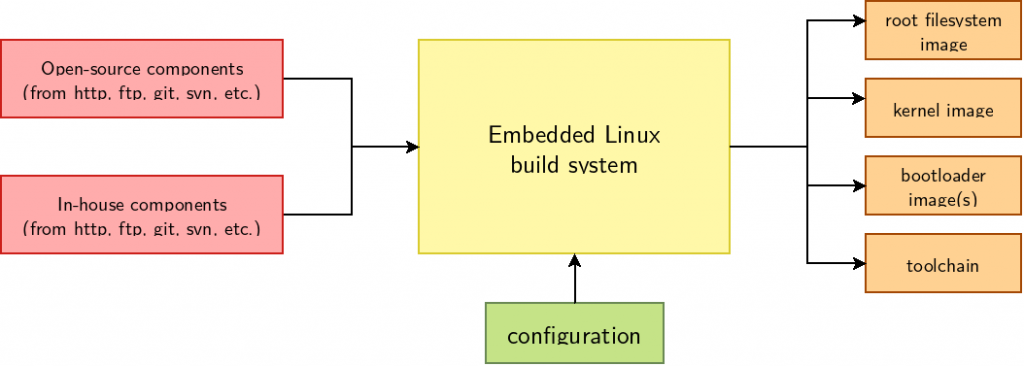
What is Buildroot?
A Linux system is composed of a potentially large number of software components coming from different sources:
- A bootloader, typically U-Boot, responsible for doing some minimal HW initialization, loading the Linux kernel and starting it
- The Linux kernel itself, which implements features such as process management, memory management, scheduler, filesystems, networking stack and of course all device drivers for your hardware platform
- User-space libraries and applications coming from the open-source community: command line tools, graphical libraries, networking libraries, cryptographic libraries, and more.
- User-space libraries and applications developed internally, implementing the “business logic” of the embedded system
In order to assemble a Linux system with all those software components, one typically has two main choices:
- Use a binary distribution, like Debian, Ubuntu or Fedora. Several of these distributions have support for the ARMv7 architecture. The main advantage of this solution is that it is easy: these binary distributions are familiar to most Linux users, they have a nice and easy-to-use package management system, all packages are pre-compiled so it is really fast to generate a Linux system. However, Linux systems generated this way are typically difficult to customize (software components are pre-built, so you cannot easily tweak their configuration to your needs) and difficult to optimize (in terms of footprint or boot time).
- Use a build system, like Buildroot or Yocto/OpenEmbedded. These build systems build an entire Linux system from source code, which means that it can be highly customized and optimized to your needs. Of course, it is less simple than using a binary distribution and because you are building all components from source code, a non-negligible amount of CPU time will be spent on compiling code.
![]() In this series of blog post, we have chosen to use Buildroot, which is an easy-to-use build system, which is a good match for engineers getting started with embedded Linux. For more general details about Buildroot, you can read the freely available training materials of our Embedded Linux development with Buildroot training course.
In this series of blog post, we have chosen to use Buildroot, which is an easy-to-use build system, which is a good match for engineers getting started with embedded Linux. For more general details about Buildroot, you can read the freely available training materials of our Embedded Linux development with Buildroot training course.
Buildroot is a set of Makefiles and script that automates the process of download the source code of the different software components, extract them, configure them, build them and install them. It ultimately generates a system image that is ready to be flashed, and which typically contains the bootloader, the Linux kernel image and the root filesystem. It is important to understand that Buildroot itself does not contain the source code for Linux, U-Boot or any other component: it is only a set of scripts/recipes that describes where to download the source code from, and how to build it.
Building the minimal system with Buildroot
Let’s started by getting the source of Buildroot from its upstream Git repository:
git clone git://git.buildroot.net/buildroot
cd buildroot
Starting a Buildroot configuration is then typically done by running make menuconfig, and then selecting all the relevant options for your system. Here, we are instead going to use a pre-defined configuration that we created for the STM32MP157-DK2 platform. This pre-defined configuration has been submitted to the upstream Buildroot project, but has not yet been merged as of this writing, so we’ll use an alternate Git branch:
git remote add tpetazzoni https://github.com/tpetazzoni/buildroot.git
git fetch tpetazzoni
git checkout -b stm32mp157-dk2 tpetazzoni/2019.02/stm32mp157-dk
The 2019.02/stm32mp157-dk branch in your author’s Buildroot Git repository is based on upstream Buildroot 2019.02.x branch and contains 4 additional patches needed to support the STM32MP157-DK2 platform.
Let’s continue by telling Buildroot to load the pre-defined configuration for the STM32MP157-DK2:
make stm32mp157_dk_defconfig
We could start the build right away, as this configuration works fine, but to illustrate how to modify the configuration (and speed up the build!) we will adjust one aspect of the system configuration. To do so, let’s run Buildroot’s menuconfig. People who have already configured the Linux kernel should be familiar with the tool, as it is the exact same configuration utility.
make menuconfig
At this point, if the command fails due to the ncurses library being missing, make sure to install the libcnurses-dev or ncurses-devel package on your Linux distribution (the exact package name depends on the distribution you’re using).
Once in menuconfig, go to the Toolchain sub-menu. By default the Toolchain type is Buildroot toolchain. Change it to External toolchain by pressing the Enter key. When Buildroot toolchain is selected, Buildroot builds its own cross-compiler, which takes quite some time. Selecting External toolchain tells Buildroot to use a pre-existing cross-compiler, which in our case is the one provided by ARM for the ARMv7 architecture.

Exit menuconfig and save the configuration. It is now time to start the build by running make. However, your author generally likes to keep the output of the build in a log file, using the following incantation:
make 2>&1 | tee build.log
Now that Buildroot starts by checking if your system has a number of required packages installed, and will abort if not. Please follow section System requirements > Mandatory packages of the Buildroot manual to install all the appropriate dependencies. Restart the make command once all dependencies have been installed.
The build process took 10 minutes on your author’s machine. All the build output is conveniently grouped in the sub-directory named output/, in which the most important results are in output/images/:
output/images/zImageis the Linux kernel imageoutput/images/stm32mp157c-dk2.dtbis the Device Tree Blob, i.e the piece of data that describes to the Linux kernel the hardware it is running on. We’ll talk more about Device Tree in the second blog post of this seriesoutput/images/rootfs.{ext4,ext2}is the image of the root filesystem, i.e the filesystem that contains all the user-space libraries and applications. It’s using the ext4 filesystem format, which is the de-facto standard filesystem format in Linux for block storage.output/images/u-boot-spl.stm32is the first stage bootloaderoutput/images/u-boot.imgis the second stage bootloaderoutput/images/sdcard.imgis a complete, ready-to-use SD card image, which was generated from the previous images
Flashing and testing the system
First things first, we’ll need to write sdcard.img to a microSD card:
sudo dd if=output/images/sdcard.img of=/dev/mmcblk0 bs=1M conv=fdatasync status=progress
Of course, make sure that, on your system, the microSD card is really identified as /dev/mmcblk0. And beware that all the data on your microSD card will be lost!
Insert the microSD card in the microSD card connector of the STM32MP157-DK2 board, i.e connector CN15.
Connect a USB to micro-USB cable between your PC and the connector labeled ST-LINK CN11 on the board. A device called /dev/ttyACM0 will appear on your PC, through which you’ll be able to access the board’s serial port. Install and run a serial port communication program on your PC, your author’s favorite is the very minimalistic picocom:
picocom -b 115200 /dev/ttyACM0
Finally, power up the board by connecting a USB-C cable to connector PWR_IN CN6. You should then see a number of messages on the serial port, all the way up to Buildroot login:. You can then login with the root user, no password will be requested.

How is the system booting ?
Let’s look at the main steps of the boot process, by studying the boot log visible on the serial port:
U-Boot SPL 2018.11-stm32mp-r2.1 (Apr 24 2019 - 10:37:17 +0200)
This message is printed by the first stage bootloader, i.e the code contained in the file u-boot-spl.stm32, compiled as part of the U-Boot bootloader. This first stage bootloader is directly loaded by the STM32MP157 system-on-chip. This first stage bootloader must be small enough to fit inside the STM32MP157 internal memory.
U-Boot 2018.11-stm32mp-r2.1 (Apr 24 2019 - 10:37:17 +0200)
This message is printed by the second stage bootloader, which was loaded from storage into external memory by the first stage bootloader. This second stage bootloader is the file u-boot.img, which was also compiled as part of the U-Boot bootloader.
Retrieving file: /boot/zImage
Retrieving file: /boot/stm32mp157c-dk2.dtb
These messages are printed by the second stage bootloader: we see it is loading the Linux kernel image (file zImage) and the Device Tree Blob describing our hardware platform (file stm32mp157c-dk2.dtb). It indicates that U-Boot has loaded both files into memory: it is now ready to start the Linux kernel.
Starting kernel ...
This is the last message printed by U-Boot before jumping into the kernel.
[    0.000000] Booting Linux on physical CPU 0x0
[    0.000000] Linux version 4.19.26 (thomas@windsurf) (gcc version 8.2.1 20180802 (GNU Toolchain for the A-profile Architecture 8.2-2018.11 (arm-rel-8.26))) #1 SMP PREEMPT Wed Apr 24 10:38:00 CEST 2019
And immediately after that, we have the first messages of the Linux kernel, showing the version of Linux and the date/time it was built. Numerous other kernel messages are then displayed, until:
[ 3.248315] VFS: Mounted root (ext4 filesystem) readonly on device 179:4.
This message indicates that the kernel has mounted the root filesystem. After this point, the kernel will start the first user-space process, so the next messages are user-space services being initialized:
Starting syslogd: OK
[...]
Welcome to Buildroot
buildroot login:
Until we reach a login prompt.
Exploring the system
After logging in as root, you have access to a regular Linux shell, with most basic Linux commands available. You can run ps to see the processes, run ls / to see the contents of the root filesystem, etc.
You can also play a bit with the hardware, for example to turn on and off one of the LEDs of the board:
echo 255 > /sys/class/leds/heartbeat/brightness
echo 0 > /sys/class/leds/heartbeat/brightness
Understanding the Buildroot configuration
So far, we have used a pre-defined Buildroot configuration, without really understanding what it does and how it built this basic system for our board. So let’s go back in make menuconfig and see how Buildroot was configured.
In the Target options menu, obviously the ARM Little Endian architecture was chosen, and more specifically Cortex-A7 was chosen as the Target Architecture Variant. Indeed the entire Linux system runs on the Cortex-A7 cores.
In the Build options menu, nothing was changed from the default values.
In the Toolchain menu, we previously modified to use an External toolchain to use a pre-existing cross-compiler and save on build time. All other options were kept as their default.
In the System configuration menu, we defined the following things:
- Root filesystem overlay directories is set to
board/stmicroelectronics/stm32mp157-dk/overlay/. This option tells Buildroot that the contents of theboard/stmicroelectronics/stm32mp157-dk/overlay/directory must be copied into the root filesystem at the end of the build. It allows to add custom files to the root filesystem. - Custom scripts to run after creating filesystem images is set to
support/scripts/genimage.shand the related option Extra arguments passed to custom scripts is set to-c board/stmicroelectronics/stm32mp157-dk/genimage.cfg. This tells Buildroot to call thisgenimage.shscript at the very end of the build: its purpose is to generate the final SD card image we have used.
In the Kernel menu, we have obviously configured which Linux kernel version and configuration should be used:
- We are downloading the Linux kernel source code as a tarball from Github, using a custom Buildroot macro called
github. Based on this information, Buildroot will go to the Git repository at https://github.com/STMicroelectronics/linux/, and get the kernel version identified by the tagv4.19-stm32mp-r1.2 - Configuration file path is set to
board/stmicroelectronics/stm32mp157-dk/linux.config. This is the file that contains the kernel configuration. We have prepared a custom kernel configuration to have a simple but working kernel configuration. Of course, it can be adjusted to your needs, as we will demonstrate in the next blog post. - We enabled the option Build a Device Tree Blob (DTB) and set In-tree Device Tree Source file names to
stm32mp157c-dk2. This tells Buildroot to build and install the Device Tree Blob that matches our hardware platform. - Finally, we enabled Install kernel image to /boot in target, so that the kernel image and the Device Tree blob are installed inside the
/bootdirectory in the root filesystem. Indeed, our U-Boot configuration will load them from here (see below).
In the Target packages menu, we have kept the default: only the BusyBox package is enabled. BusyBox is a very popular tool in the embedded Linux ecosystem: it provides a lightweight replacement for a Linux shell and most common Linux command line tools (cp, mv, ls, vi, wget, tar, and more). Our basic system in fact only contains BusyBox!
In the Filesystem images menu, we have enabled the ext2/3/4 root filesystem type and chosen the ext4 variant. As explained above, ext4 is kind of the de-facto standard Linux filesystem for block storage devices such as SD cards.
In the Bootloaders menu, we enabled U-Boot, where a significant number of options need to be tweaked:
- We download U-Boot from a STMicroelectronics Git repository at https://github.com/STMicroelectronics/u-boot.git and use the Git tag v2018.11-stm32mp-r2.1.
- This U-Boot comes with a pre-defined configuration called
stm32mp15_basic, which we select using Board defconfig. - However, it turns out that this pre-defined configuration enables the STM32 watchdog, and since our Linux user-space does not have a watchdog daemon to tick the watchdog regularly, it would reset constantly. Using a small additional snippet of U-Boot configuration, stored in the file
board/stmicroelectronics/stm32mp157-dk/uboot-fragment.config, we disable the watchdog. Of course, it should be re-enabled and properly handled in Linux user-space for a final product. - In the U-Boot binary format sub-menu, we tell Buildroot that the second stage bootloader image will be called
u-boot.img, and this is the one Buildroot should install inoutput/images - We tell Buildroot that our U-Boot configuration will build a first stage bootloader called
spl/u-boot-spl.stm32, which allows Buildroot to install it inoutput/images - Finally, we pass a custom
DEVICE_TREE=stm32mp157c-dk2option in the U-Boot environment, which is needed for the U-Boot build process to find the Device Tree used internally by U-Boot.
Finally, in the Host utilities menu, we enable the host genimage package.
This entire configuration is saved in a simple text file called configs/stm32mp157_dk_defconfig, which is the one we loaded initially when running make stm32mp157_dk_defconfig. We suggest you take a moment to look at configs/stm32mp157_dk_defconfig and see the configuration options it defines.
What happens during the Buildroot build?
With all these options in place, here is what Buildroot has done to build our system (we have omitted some intermediate steps or package dependencies for the sake of brievity):
- Download and install the pre-built ARM compiler from ARM’s website, and install the C and C++ libraries inside the target root filesystem
- Download the Linux kernel source code from STMicroelectronics Github repository, configure it with our configuration file, build it, install
zImageandstm32mp157c-dk2.dtbboth inoutput/imagesand in the target root filesystem in the/bootdirectory. It also installs the Linux kernel modules inside the target root filesystem - Download the U-Boot source code from STMicroelectronics Github repository, configure it, build it and install
u-boot-spl.stm32and u-boot.img inoutput/images - Download the Busybox source code from the project official website, configure it, build it and install it inside the target root filesystem.
- Copies the contents of the rootfs overlay inside the target root filesystem
- Produce the ext4 image of the root filesystem, and install it as
output/images/rootfs.ext4 - Call the genimage.sh script, whose purpose is to generate the final SD card image,
output/images/sdcard.img
Let’s now have a look at the file board/stmicroelectronics/stm32mp157-dk/genimage.cfg, which tells the genimage utility how to create the final SD card image:
image sdcard.img {
        hdimage {
                gpt = "true"
        }

        partition fsbl1 {
                image = "u-boot-spl.stm32"
        }

        partition fsbl2 {
                image = "u-boot-spl.stm32"
        }

        partition uboot {
                image = "u-boot.img"
        }

        partition rootfs {
                image = "rootfs.ext4"
                partition-type = 0x83
                bootable = "yes"
                size = 256M
        }
}
What this file says is:
- We want to create a file named
sdcard.img - This file will contain a number of partitions, described by a GPT partition table. This is necessary for the STM32MP157 built-in ROM code to find the first stage bootloader.
- The first two partitions are named
fsbl1andfsbl2, and contain the raw binary of the first stage bootloader, i.e there is no filesystem in those partitions. it is the STM32MP157 built-in ROM code that is hardcoded to search the first stage bootloader in the first two partitions whose name start withfsbl. - The third partition named
ubootcontains the second stage bootloader, also as a raw binary (no filesystem). Indeed, the first stage bootloader is configured to search the second bootloader from the third partition of the SD card (this is defined in the U-Boot configuration and can be modified if needed) - The fourth partition contains the ext4 filesystem image that Buildroot has produced, which is in fact our Linux root filesystem, with BusyBox, the standard C/C++ libraries and the Linux kernel image and Device Tree Blob.
This last partition is marked bootable. This is important because the U-Boot configuration for the STM32MP157 hardware platform by default uses the U-Boot Generic Distro Concept. At boot, U-Boot will search for the partition marked bootable, and then inside the filesystem contained in this partition, look for the file /boot/extlinux/extlinux.conf to know how to boot the system.
This file extlinux.conf is inside our root filesystem overlay at board/stmicroelectronics/stm32mp157-dk/overlay/boot/extlinux/extlinux.conf, so it is installed in our root filesystem as /boot/extlinux/extlinux.conf so that U-Boot finds it. This file simply contains:
label stm32mp15-buildroot
  kernel /boot/zImage
  devicetree /boot/stm32mp157c-dk2.dtb
  append root=/dev/mmcblk0p4 rootwait
Which tells U-Boot that the kernel image to load is /boot/zImage, that the Device Tree Blob to use is /boot/stm32mp157c-dk2.dtb and that the string root=/dev/mmcblk0p4 rootwait must be passed as arguments to the Linux kernel when booting. The root=/dev/mmcblk0p4 is particularly important, because it is the one telling the Linux kernel where the root filesystem is located.
So, if we summarize the boot process of our hardware platform with those new details in mind, it looks like this:
- The STM32MP157 built-in ROM code looks for the GPT partitions whose name start with
fsbl, and if one is found, loads the contents into the STM32 internal memory and runs it. This is our first stage bootloader. - This first stage bootloader is hard-coded to load the second stage bootloader from the third partition of the SD card. So it initializes the external RAM, loads this second stage bootloader into external RAM and runs it.
- The second stage bootloader does some more initialization, and then looks for a partition marked bootable. It finds that the fourth partition is bootable. It loads the
/boot/extlinux/extlinux.conffile, thanks to which it learns where the kernel and Device Tree are located. It loads both, and starts the kernel with the arguments also specified in theextlinux.conffile. - The Linux kernel runs, up to the point where it mounts the root filesystem, whose location is indicated by the
root=/dev/mmcblk0p4argument. After mounting the root filesystem, the kernel starts the first user-space process. - The first user-space process that runs is
/sbin/init, implemented by BusyBox. It starts a small number of services, and then starts the login prompt.
Conclusion
You can find the exact Buildroot source code used to reproduce the system used in this article in the branch at 2019.02/stm32mp157-dk-blog-1.
In this long initial blog post, we have learned what Buildroot is, how to use it to build a basic system for the STM32MP157 platform, how the Buildroot configuration was created, and how the STM32MP157 platform is booting.
Stay tuned for the next blog post, during which we will learn how to plug an additional device to the board: a pressure, temperature and humdity sensor connected over I2C, and how to make it work with Linux.
Very nice article ! thanks a lot Thomas.
I assume “git branch -b stm32mp157-dk2 …” should be replaced with “git checkout -b stm32mp157-dk2 …”.
rgs,
Fixed, thanks 🙂
very nice article . thanks for sharing.
for me, use the external toolchain is very slow(~1 kb/s to download from armkeil.blob.core.windows.net).
switch to buildroot toolchain is even faster. but seems another issue as default toolchain option is compiled against uclibc with header 4.20.x, which is not aligned with stmicro’s linux/u-boot release. so the build is failed without producing the images.
btw: can we use the original source with latest release(linux/u-boot etc.) instead of vendor’s release ? maybe just extract the vendor-specific patches/device tree or still need plenty of manual works ?
Regarding the external toolchain, it all depends on where you are located, and which bandwidth you have with the ARM servers that provide the toolchain. Alternatively, you could use an external toolchain from http://toolchains.bootlin.com.
If you switch to a Buildroot toolchain, you must indeed tell Buildroot to use the same kernel headers as the kernel being built, and which kernel version is being used. This is perfectly normal, as Buildroot needs to know in menuconfig the version of the kernel headers that will be used, and it can’t know that from the kernel sources since they have not been downloaded at this point.
Regarding your last question: the current versions of upstream U-Boot and Linux don’t have full support for the STM32MP157 Discovery Board. Linux 5.2 will have a base Device Tree for this board, so starting from Linux 5.2, you’ll be able to easily use upstream Linux. Overall, upstreaming the support for the platform is an on-going effort, and in a few months time, I’m pretty sure everything will be fully upstream.
Hi Thomas,
Excellent explanation!
My first MCU was stm32F103 which is awesome for embedded beginners like me. The most challenging part with MP series that this SOC require an external RAM, and I, for example, have no idea, what I should do if I need to build a bare minimum prototype, lets say with mp151(the cheapest one) and one/two IC of DDR3.
Do you think you can make an article about that, with suggestions, how to choose a ram memory, minimum power supply IC’s, resonator if required, how to modify device tree with chosen configuration of hardware?
Thanks
Hello Denys, thanks for your feedback on our blog post. The questions you ask are really related to the hardware design, which isn’t Bootlin’s expertise. I suggest you to find other sources of information about this. However, if you are worried about the external RAM and the surrounding HW design, I suggest you to have a look at the osd32mp15x, a system-in-package solution from Octavo Systems (https://octavosystems.com/octavo_products/osd32mp15x/), which includes the STM32MP15 + RAM + PMIC in a single package, which significantly reduces the HW design of the board. This was mentioned in our blog post at https://bootlin.com/blog/stm32mp1-system-on-chip-bootlin-member-of-st-partners-program/.
As always in the linux world the information is dated (I suppose) and fails to work. The instruction regarding git remote add tpetazzoni https://github.com/tpetazzoni/buildroot.git fail and return “fatal: not a git repository (or any of the parent directories): .git”.
I reviewed the git buildroot branch to see if I could locate the needed script but could not. How about simply letting us newbies know about the selection made in menuconfig?
The error you’re getting means you’re not inside a Git repository. So I think you cloned the official Buildroot Git repository, but forgot to “cd” into it, even though the “cd buildroot” is clearly in the instructions of the blog post. So to make it clear, the steps are:
1. git clone the official Buildroot repo
2. cd buildroot/
3. git remote add tpetazzoni my Github buildroot repo
4. git fetch tpetazzoni
Got to the branch mentioned in get. Downloaded the zip and extracted over the top of the existing buildroot from original git. Build failed at the end where it is trying to:
>>> toolchain-external-arm-arm 2018.11 Installing to staging directory
Fails with:
/usr/bin/install -D -m 0755 /home/greg/buildroot/output/build/toolchain-external-arm-arm-2018.11/toolchain-wrapper /home/greg/buildroot/output/host/bin/toolchain-wrapper
ln: failed to create symbolic link ‘/home/greg/buildroot/output/host/arm-buildroot-linux-gnueabihf/sysroot/usr/lib’: No such file or directory
package/pkg-generic.mk:278: recipe for target ‘/home/greg/buildroot/output/build/toolchain-external-arm-arm-2018.11/.stamp_staging_installed’ failed
make[1]: *** [/home/greg/buildroot/output/build/toolchain-external-arm-arm-2018.11/.stamp_staging_installed] Error 1
Makefile:84: recipe for target ‘_all’ failed
make: *** [_all] Error 2
I’m not sure how you get to this point. Could you make sure this is the result of a fully clean build, i.e:
1. make clean
2. make stm32mp157_dk_defconfig
3. make
If you still get the failure, please post the full log on some pastebin site. Perhaps you can contact me by e-mail, or through the Buildroot IRC channel, it might be easier to provide some support.
Hello Thomas,
when i use make comand,build faild :
Your Perl installation is not complete enough; at least the following
modules are missing:
ExtUtils::MakeMaker
support/dependencies/dependencies.mk:27: recipe for target ‘dependencies’ failed
make: *** [dependencies] Error 1
Well, the error message says it all: you’re missing a Perl package on your system. Use your Linux distribution package manager to install the package that provides the ExtUtils::MakeMaker Perl module. On Fedora, the package is named perl-ExtUtils-MakeMaker.
very nice article, but i have a question ,
“loads the contents into the STM32 internal memory and runs it”
“loads this second stage bootloader into external RAM and runs it.”
what’s the difference between internal memory and externl RAM?
Internal memory is inside the system on chip, but is very limited in size.
External RAM is outside, but the external RAM controller must be configured properly according to your RAM chips. That’s more complex to setup and use. Therefore, that’s done in the second stage bootloader.
Hello Thomas,
I would like to use the STM32MP157-DK2 for a hobby. I am not very familiar with embedded linux. Will this process work correctly in MacOS? Or should I be running my desktop under Linux? If Linux, do you have a preferred distro that I should use?
Clark
Hi Clark,
I wouldn’t advise to test with MacOS as the development tools we use are mostly tested on Linux. You may be the first one to face some issues, and it will probably be harder to get support.
So, a Linux distro (Debian/Ubuntu or Fedora/RedHat should work fine) would be best, preferrably through a native installation, or if not possible, through a virtual machine (though there will be a performance hit).
Cheers,
Michael.
Hey Thomas, you can ignore my earlier question. I can report that the process DOES NOT work on MacOS but it works just fine on Ubuntu 18.04.2. You probably already knew that.
I didn’t mention it earlier, but I want to say this…..
THANK YOU THANK YOU THANK YOU THANK YOU!!!!! for providing these tutorials on the STM32MP1. Also I want to thank bootlin for providing their classes to us as open source. That is amazingly generous. Your company is awesome. If I were a lot younger (I’m 72) I would pester you guys to let me work with you.
I’m hoping to learn a lot about developing GUIs using linux in the MP1 using your and your companies tutorials. It’s all pretty exciting. I’ve played around with GUI development for STM32 applications using TouchGFX and I am pretty disappointed in it. There are lots of bugs, it took weeks to just get a simple GUI to compile, and it is very unintuitive. It seems like every release added new bugs and the documentation was not very good.
So now I’m off to try another way using Linux in the MP1.
Thanks again. You guys are fantastic.
Clark
I’m trying to build an image for the STM32MP157C-EV1 board, instead of the DK2.
I first duplicated your process, and the image I built, runs correctly on the DK2 board.
I then created an stm32mp157_ev_defconfig, which is a copy of the …dk_defconfig file, replacing references to the the dk2 device tree file with stm32ps157c_ev1, and references to the “board/stmicroelectronics/stm32mp157-dk” folder with “board/stmicroelectronics/stm32mp157-ev”, which is a copy of the -dk folder, but referencing “/boot/stm32mp157c-ev1.dtb” instead of -dk2.dtb in the extlinux.conf file.
The EV1 image initially boots OK, but SDHCI does not recognize the SD card, and instead mounts some other memory at mmc0 and attempts to find the boot kernel there. For example, where your would normally expect to see this on boot up:
[ 1.723381] sdhci: Copyright(c) Pierre Ossman
[ 1.723385] Synopsys Designware Multimedia Card Interface Driver
[ 1.723669] sdhci-pltfm: SDHCI platform and OF driver helper
[ 1.737122] mmc0: new high speed SDHC card at address 0007
I instead see this:
[ 1.742757] sdhci: Secure Digital Host Controller Interface driver
[ 1.747591] sdhci: Copyright(c) Pierre Ossman
[ 1.751913] Synopsys Designware Multimedia Card Interface Driver
[ 1.759223] sdhci-pltfm: SDHCI platform and OF driver helper
[ 1.768282] usbcore: registered new interface driver usbhid
[ 1.772508] usbhid: USB HID core driver
[ 1.777341] stm32-ipcc 4c001000.mailbox: ipcc rev:1.0 enabled, 6 chans, proc 0
[ 1.785502] stm32-rproc m4@0: wdg irq registered
[ 1.788926] remoteproc remoteproc0: m4 is available
[ 1.794177] stm32-adc-core 48003000.adc: Linked as a consumer to regulator.8
[ 1.800658] stm32-adc-core 48003000.adc: Linked as a consumer to regulator.6
[ 1.828035] mmc0: new DDR MMC card at address 0001
Any thoughts I what I may be doing wrong?
Thanks!
Hi Mark,
That’s typically a question you could ask to the stm32 people too (linux-stm32 at st-md-mailman.stormreply.com, according to the Linux MAINTAINERS file), to get an answer faster…
Cheers,
Michael.
The EV1 board has a built-in eMMC, so the mmc0 device you’re seeing is the internal eMMC, not the external SD card.
At first, your articles and the much work behind there are very very good.
Thank you.
But why you don’t use Debian?
Buildroot’s building of all packages needs long time. Also yocto builds are very slow.
Debian Packages are ready to install. In case of security update you can user newer packages.
Yes you have a bigger memory footprint, but memory is mostly not a problem.
It gives much more good things for a debian based system.
A simple build process (for i.mx8) is described here:
http://variwiki.com/index.php?title=Debian_Build_Release&release=RELEASE_BUSTER_V2.1_DART-MX8M
Very friendly for developer.
I wish, i can have this for my STM32MP1 board (https://wiki.dh-electronics.com/index.php/Avenger96)
Hello EmbeddedUser. Thanks for your comment!
We believe that both build systems (Yocto, Buildroot, OpenWRT, etc.) and binary distributions (Debian, Ubuntu, Fedora, etc.) are interesting. Each has its own advantages and drawbacks. Indeed, Debian is typically much more familiar to desktop users, you don’t have to wait for long builds, you benefit from the major security work done by Debian, and more. But there are also some drawbacks: it is much easier to customize packages with a build system, it is much easier to rebuild the entire system with different compiler flags, etc.
In any case, if you want to build a Debian system for your STM32MP1, you could for example have a look at the Debos project (see https://github.com/go-debos/debos and https://events.linuxfoundation.org/wp-content/uploads/2017/12/Cooking-a-Debian-System-One-Two-Debos-Ana-Guerrero-L%C3%B3pez-Collabora.pdf).
Hello Thomas,
thank you for your comment. I’ve started the project 🙂 with the following for me clear steps.
Can you have a short look over there and give some comments please?
I use a debian 10 vm.
script: build.sh
#!/bin/bash
# script helper functions
toolchain ()
{
# i use normaly aria2 instead of wget, can retry broken images
sudo apt install aria2
mkdir -p downloads
cd downloads
aria2c https://developer.arm.com/-/media/Files/downloads/gnu-a/8.3-2019.03/binrel/gcc-arm-8.3-2019.03-x86_64-arm-linux-gnueabihf.tar.xz
cd ..
tar xf downloads/gcc-arm-8.3-2019.03-x86_64-arm-linux-gnueabihf.tar.xz
}
clone_uboot ()
{
## https://github.com/u-boot/u-boot/blob/master/board/st/stm32mp1/README
git clone https://github.com/u-boot/u-boot.git
}
build_uboot ()
{
export CROSS_COMPILE=/opt/avenger96/gcc-arm-8.3-2019.03-x86_64-arm-linux-gnueabihf/bin/arm-linux-gnueabihf-
cd u-boot
export KBUILD_OUTPUT=stm32mp15_basic
make stm32mp15_basic_defconfig
make DEVICE_TREE=stm32mp157a-avenger96 all
cd ..
}
clone_kernel ()
{
#git clone https://github.com/torvalds/linux.git
git clone -b ‘v5.3’ –single-branch –depth 1 https://github.com/torvalds/linux.git
}
build_kernel ()
{
## https://github.com/dh-electronics/linux-stm32mp1/blob/master/Documentation/arm/stm32/overview.rst
cd linux
export CROSS_COMPILE=/opt/avenger96/gcc-arm-8.3-2019.03-x86_64-arm-linux-gnueabihf/bin/arm-linux-gnueabihf-
export ARCH=arm
make multi_v7_defconfig
make
# ‘stm32mp157a-avenger96.dts’
cd ..
}
build_dtb ()
{
cd linux
export CROSS_COMPILE=/opt/avenger96/gcc-arm-8.3-2019.03-x86_64-arm-linux-gnueabihf/bin/arm-linux-gnueabihf-
export ARCH=arm
make stm32mp157a-avenger96.dtb
cd ..
}
build_modules ()
{
cd linux
export CROSS_COMPILE=/opt/avenger96/gcc-arm-8.3-2019.03-x86_64-arm-linux-gnueabihf/bin/arm-linux-gnueabihf-
export ARCH=arm
make modules
cd ..
}
build_debianrootfs ()
{
@echo todo build build debianrootfs
}
build_sdcard ()
{
@echo todo build sdcard
}
# script main
mkdir -p /opt/avenger96
cd /opt/avenger96
toolchain
clone_uboot
build_uboot
clone_kernel
build_kernel
build_dtb
build_modules
build_debianrootfs
build_sdcard
Hi there! Tell me how to change the orientation of the display?
Hi Vlad! Changing the orientation of the display is typically done efficiently with hardware-backed rotation, which is sadly unavailable for the stm DRM Linux kernel driver. If you are using Qt, one option is to apply a rotation transform to the root window.
Thank You, Pavel Kocialkowski. Now I try to configure EGLFS c using MESA. Hardware rendering is not enabled. Include: Gallium Etnaviv driver and Gallium swrast driver. But there is an error when you run the application- “Framebuffer size format is invalid”. Settings QT_QPA_EGLFS_FB and QT_QPA_EGLFS_PHYSICAL_…. no effect. The test produces: qt.scenegraph.general: Animation Driver: using vsync: 20.00 ms
qt.scenegraph.general: texture atlas dimensions: 512×512
qt.scenegraph.general: R/G/B/A Buffers: 8 8 8 0
qt.scenegraph.general: Depth Buffer: 24
qt.scenegraph.general: Stencil Buffer: 8
qt.scenegraph.general: Samples: 0
qt.scenegraph.general: GL_VENDOR: VMware, Inc.
qt.scenegraph.general: GL_RENDERER: softpipe
qt.scenegraph.general: GL_VERSION: OpenGL ES 3.1 Mesa 19.2.1 with GL_RENDERER everything is clear, but with GL_VENDOR it should not be “Vivante Corporation”? In the settings of make linux-nconfig everything is left unchanged. Can in it it is necessary to include still something on DRM?
Hey Vlad, it looks like mesa is trying to use software rendering instead of the GPU. You should check in the kernel logs that the
etnavivdriver is loaded (you can also check that the/dev/dri/renderD128node exists). If all of that is fine, then your kernel configuration is okay and you may be having device access right issues. If not, you should rework your kernel config to include the etnaviv DRM driver.Is this to say that there’s no way to configure the framebuffer to landscape orientation for the STM32MP157-DK2 display? e.g. via modified .dts file? Is the only way to do this via X or Qt?
Hellao Thomas,
I followed your example step by step many times. But when I load and run sdcard.img on the stm32mp157c-dk2 board and run it and watching it with “picocom -b 115200 / dev / ttyACM0”, the kernel always freezes on the same line. I watched it with some other terminal softwares also. The last line I see is “[ 1.730468] usbhid: USB HID core driver”. What could be the reason?The stm32mp157c-dk2 board I use does not have a TFT display, I’m using connected to a monitor with HDMI. Could that be the problem? I’d appreciate it if you answered. I want to use stm32mp157c-dk2 board with QT5.
Hello aykutkes. Unfortunately, without further details and the ability to look at the problem ourselves, it will be difficult to help you. On my board, after this message, I get this:
[ 1.800699] usbhid: USB HID core driver
[ 1.803256] mmc1: queuing unknown CIS tuple 0x80 (2 bytes)
[ 1.811604] mmcblk0: mmc0:0007 SD16G 14.4 GiB
[ 1.811682] stm32-ipcc 4c001000.mailbox: ipcc rev:1.0 enabled, 6 chans, proc 0
Is your USB-C power supply providing enough power ? You can also try to pass “loglevel=8 initcall_debug” on the kernel command line to get a bit more details.
Hello Thomas,
I am trying to build an image for STM32MP157C-DK2 which has the screen in landscape mode. I have followed these tutorials, and the image works well. However, I would like to be able to display and application “horizontally”. I already have looked into kernel’s drivers: panel-orisetech-otm8009a.c (where are configured the timings), and the drivers related to drm, such as, drm_panel.c, drm_modes.c… But I do not know who I can change the screen display, even, if it is possible to do that change without changing the drivers.
I look forward to hearing from you.
Best regards,
Aitor
See the answer from my colleague Paul at https://bootlin.com/blog/building-a-linux-system-for-the-stm32mp1-basic-system/comment-page-1/#comment-2177695 for this orientation problem. Do not hesitate to contact us if you need support on this topic.
Hi, is this suggesting it’s not possible to rotate the framebuffer without resorting to using Qt?
How can i upgrade the Qt version or change the version that buildroot uses ?
Hello Kingsong. You need to change the Buildroot packages for Qt5, and point them to a different version. Note that this will require updating the hashes of the tarballs, and possibly adjusting various other aspects of those packages to accommodate for changes in the new Qt5 version.
Alternatively, I would recommend you to use a newer Buildroot version, which very likely has a more recent Qt5 version. The 2020.02 release of Buildroot is going to be published in the next days.
hello,
first of all thank you for your great article.
I have one STM32MP157A-DK1, as far as I know DK1 is very similar to DK2, and a sd-image for DK1 should work fine in one DK2 board.
I followed your instructions, DK1 starts to boot and then it stops suddenly at the following step:
…
[ 1.614133] stm32f7-i2c 5c002000.i2c: STM32F7 I2C-1 bus adapter
[ 1.622964] mmci-pl18x 58005000.sdmmc: Linked as a consumer to regulator.8
[ 1.628624] mmci-pl18x 58005000.sdmmc: mmc0: PL180 manf 53 rev2 at 0x58005000 irq 58,0 (pio)
[ 1.665643] mmci-pl18x 58007000.sdmmc: allocated mmc-pwrseq
[ 1.670083] mmci-pl18x 58007000.sdmmc: Linked as a consumer to regulator.8
[ 1.677882] mmci-pl18x 58007000.sdmmc: mmc1: PL180 manf 53 rev1 at 0x58007000 irq 59,0 (pio)
[ 1.711720] sdhci: Secure Digital Host Controller Interface driver
I already tested 2 different SD-cards and the results are similar.
Do you Know if this can be related with board(DK1)? SD-cards?
Thank you
I also have two STM32MP157A-DK1 and I am also getting the same issue. For me it worked just fine with a fresh SD card (Sandisk Ultra, 16 GB) on one board. For second board, I formatted a used SD card of same make and size. But this time I am stuck. I tried building OS image again and one more SD card but to no avail. Kindly let me know where I am going wrong.
Thanks
I have recently merged in upstream Buildroot a proper defconfig for the DK1. Could you test the current Buildroot master branch, and build the stm32mp157a_dk1_defconfig configuration?
Steps followed by me:
1> git clone git://git.buildroot.net/buildroot
Cloning into ‘buildroot’…
remote: Enumerating objects: 366664, done.
remote: Counting objects: 100% (366664/366664), done.
remote: Compressing objects: 100% (118154/118154), done.
remote: Total 366664 (delta 256695), reused 356434 (delta 247050)
Receiving objects: 100% (366664/366664), 78.02 MiB | 213.00 KiB/s, done.
Resolving deltas: 100% (256695/256695), done.
2> cd buildroot/
3> git remote add tpetazzoni https://github.com/tpetazzoni/buildroot.git
4> git fetch tpetazzoni
remote: Enumerating objects: 681, done.
remote: Counting objects: 100% (681/681), done.
remote: Total 1083 (delta 681), reused 681 (delta 681), pack-reused 402
Receiving objects: 100% (1083/1083), 304.31 KiB | 716.00 KiB/s, done.
Resolving deltas: 100% (771/771), completed with 487 local objects.
From https://github.com/tpetazzoni/buildroot
* [new branch] 2012.11.x -> tpetazzoni/2012.11.x
* [new branch] 2019.02/k1c -> tpetazzoni/2019.02/k1c
* [new branch] 2019.02/stm32mp157-dk -> tpetazzoni/2019.02/stm32mp157-dk
* [new branch] 2019.02/stm32mp157-dk-blog-1 -> tpetazzoni/2019.02/stm32mp157-dk-blog-1
* [new branch] 2019.02/stm32mp157-dk-blog-2 -> tpetazzoni/2019.02/stm32mp157-dk-blog-2
* [new branch] 2019.02/stm32mp157-dk-blog-3 -> tpetazzoni/2019.02/stm32mp157-dk-blog-3
* [new branch] 2019.02/stm32mp157-dk-blog-4 -> tpetazzoni/2019.02/stm32mp157-dk-blog-4
* [new branch] 2019.02/stm32mp157-dk-blog-5 -> tpetazzoni/2019.02/stm32mp157-dk-blog-5
* [new branch] 2019.02/stm32mp157-dk-blog-6 -> tpetazzoni/2019.02/stm32mp157-dk-blog-6
* [new branch] 2019.02/stm32mp157-dk-blog-7 -> tpetazzoni/2019.02/stm32mp157-dk-blog-7
* [new branch] 2019.11/k1c -> tpetazzoni/2019.11/k1c
* [new branch] bootlin-toolchains -> tpetazzoni/bootlin-toolchains
* [new branch] fix-versions -> tpetazzoni/fix-versions
* [new branch] gbm -> tpetazzoni/gbm
* [new branch] gettext-tiny -> tpetazzoni/gettext-tiny
* [new branch] gnuconfig -> tpetazzoni/gnuconfig
* [new branch] master -> tpetazzoni/master
* [new branch] next -> tpetazzoni/next
* [new branch] ppsh-v7 -> tpetazzoni/ppsh-v7
* [new branch] ppsh-v7-work -> tpetazzoni/ppsh-v7-work
* [new branch] ppsh-v8 -> tpetazzoni/ppsh-v8
* [new branch] ppsh-v8-work -> tpetazzoni/ppsh-v8-work
* [new branch] qt5-rework-install -> tpetazzoni/qt5-rework-install
* [new branch] stm32mp157-dk -> tpetazzoni/stm32mp157-dk
* [new branch] things-outside-br-v2 -> tpetazzoni/things-outside-br-v2
* [new branch] things-outside-br-v3 -> tpetazzoni/things-outside-br-v3
5> git checkout -b stm32mp157-dk1 tpetazzoni/2019.02/stm32mp157-dk
D board/stmicroelectronics/stm32-post-build.sh
D board/stmicroelectronics/stm32mp157-dk/genimage.cfg
D board/stmicroelectronics/stm32mp157-dk/linux.config
D board/stmicroelectronics/stm32mp157-dk/overlay/boot/extlinux/extlinux.conf
D board/stmicroelectronics/stm32mp157-dk/readme.txt
D board/stmicroelectronics/stm32mp157-dk/uboot-fragment.config
Branch ‘stm32mp157-dk1’ set up to track remote branch ‘2019.02/stm32mp157-dk’ from ‘tpetazzoni’.
Switched to a new branch ‘stm32mp157-dk1’
6> make stm32mp157a_dk1_defconfig
make: *** No rule to make target ‘stm32mp157a_dk1_defconfig’. Stop.
Not sure where I am going wrong. Please excuse me for a long reply, but I felt this might help to identify the possible source of error.
Thanks
You’re still in Thomas’ original branch! It seems you’re running git commands without understanding them… You just need:
> git clone git://git.buildroot.net/buildroot
> cd buildroot/
> make stm32mp157a_dk1_defconfig
Thank you, It is working now!
Hi all,
Anyone know how to correctly configure the audio codec on the DK2 for use within the Buildroot system within the context of this tutorial ?
I haven’t tested audio support on the DK2 so far, but overall the steps should be:
Do not hesitate to contact us for additional support on STM32MP157 development.
Hi Thomas, Nice tutorial article, everything works fine until I got to the point where I needed to run make 2>&1 | tee build.log, then I got this error messages. All buildroot dependencies are up to date.
I’m running Linux (Ubuntu latest version) on Windows using Windows Subsystem Linux (WSL) which automatically runs linux terminal on root.
Could the root configuration cause this error?.
~/buildroot# make 2>&1 | tee build.log
>>> host-pkgconf 1.5.3 Downloading
/bin/bash: -c: line 0: syntax error near unexpected token `(‘
/bin/bash: -c: line 0: `PATH=”/root/buildroot/output/host/bin:/root/buildroot/output/host/sbin:/usr/local/sbin:/usr/local/bin:/usr/sbin:/usr/bin:/sbin:/bin:/usr/games:/usr/local/games:/mnt/c/Program Files/WindowsApps/CanonicalGroupLimited.UbuntuonWindows_1804.2020.5.0_x64__79rhkp1fndgsc:/mnt/c/MinGW/bin:/mnt/c/Program Files (x86)/Common Files/Oracle/Java/javapath:/mnt/c/Windows/System32:/mnt/c/Windows:/mnt/c/Windows/System32/wbem:/mnt/c/Windows/System32/WindowsPowerShell/v1.0:/mnt/c/Windows/System32/OpenSSH:/mnt/c/MinGW/bin”:/mnt/c/Program Files (x86)/Intel/Intel(R) Management Engine Components/DAL:/mnt/c/Program Files/Intel/Intel(R) Management Engine Components/DAL:/mnt/c/Program Files/Git/cmd:/mnt/c/Program Files/Amazon/AWSCLIV2:/mnt/c/CooCox/CoIDE/gcc/bin:/mnt/c/Users/L-21/AppData/Local/Microsoft/WindowsApps:/mnt/c/Users/L-21/AppData/Local/Programs/Microsoft VS Code/bin:/snap/bin” BR2_DL_DIR=”/root/buildroot/dl” BUILD_DIR=/root/buildroot/output/build O=/root/buildroot/output flock /root/buildroot/dl/pkgconf/ support/download/dl-wrapper -c ‘1.5.3’ -d ‘/root/buildroot/dl/pkgconf’ -D ‘/root/buildroot/dl’ -f ‘pkgconf-1.5.3.tar.xz’ -H ‘package/pkgconf//pkgconf.hash’ -n ‘pkgconf-1.5.3’ -N ‘pkgconf’ -o ‘/root/buildroot/dl/pkgconf/pkgconf-1.5.3.tar.xz’ -u https+https://distfiles.dereferenced.org/pkgconf -u http\|urlencode+http://sources.buildroot.net/pkgconf -u http\|urlencode+http://sources.buildroot.net — ‘
package/pkg-generic.mk:143: recipe for target ‘/root/buildroot/output/build/host-pkgconf-1.5.3/.stamp_downloaded’ failed
make[1]: *** [/root/buildroot/output/build/host-pkgconf-1.5.3/.stamp_downloaded] Error 1
Makefile:84: recipe for target ‘_all’ failed
make: *** [_all] Error 2
I know some people are using Buildroot under WSL, since we fixed an issue not long ago with fakeroot to make it work under WSL. In your case, the error comes from your PATH that contains directories with parenthesis. There is also a double quote lost in the middle of your PATH specification. I would suggest to try with a simpler PATH value and see if that helps.
Hi 🙂
Could you write me how to configure (change configuration) linux kernel when the kernel location is from stmicroelectronic site.
BR2_LINUX_KERNEL=y
BR2_LINUX_KERNEL_CUSTOM_TARBALL=y
BR2_LINUX_KERNEL_CUSTOM_TARBALL_LOCATION=”$(call github,STMicroelectronics,linux,v4.19-stm32mp-r1.2)/linux-v4.19-stm32mp-r1.2.tar.gz”
BR2_LINUX_KERNEL_USE_CUSTOM_CONFIG=y
BR2_LINUX_KERNEL_CUSTOM_CONFIG_FILE=”board/stmicroelectronics/stm32mp157-dk/linux.config”
after using the following command make linux-menuconfig there are many error 🙁
Should I download linux kernel before the command or the linux – kernel should be downloaded automatically.
Please give me some advice how to do it.
Thanks in advance.
Regards
Artur
Hello Arturs. The kernel that will be built by Buildroot is defined in the configuration interface, like any other aspect of the system: run “make menuconfig”, go to the Linux kernel menu, and there you can specify which version should be built, from where it should be downloaded, how it should be downloaded (tarball, Git, etc.).
The kernel does not need to be downloaded manually: Buildroot is here to take care of downloading everything for you, including the Linux kernel source code.
Thank you for your support. I am beginner in embedded systems and I decided to start with buildroot. I don’t understand everything yet, but I have to start with something.
I am trying to build a system for STM32f429- disco. It seems to be easier to start (less peripherals etc.) if it’s not please write it, maybe it’s easier to start with STM32MP1.
Unfortunately, I have a problem with building the system on STM32F429 with the 5.6 version of linux kernel.
If I want to change something in the linux kernel I get the following error. Unfortunately, I don’t know how to fix it – not enough knowledge.
Applying 0001-ARM-stm32f249-disco-don-t-force-init-in-chosen-boota.patch using patch:
patching file arch/arm/boot/dts/stm32f429-disco.dts
Reversed (or previously applied) patch detected! Skipping patch.
1 out of 1 hunk ignored — saving rejects to file arch/arm/boot/dts/stm32f429-disco.dts.rej
package/pkg-generic.mk:228: recipe for target ‘/home/artur/buildroot/output/build/linux-5.6.3/.stamp_patched’ failed
make: *** [/home/artur/buildroot/output/build/linux-5.6.3/.stamp_patched] Error 1
I only clone buildroot: git clone git://git.buildroot.net/buildroot
load pre-definied config: make stm32f429_disco_defconfig
change version of kernel to 5.6 using :make xconfig
and I would like to change configuration of kernel using configurator :make linux-xconfig but the result is above error 🙁
Regards
Artur
Hello Artur. I am not sure if starting with stm32f429 is going to be easier. As it uses a Cortex-M4, it lacks a MMU. While Linux has support for noMMU platforms, it brings a number of limitations and additional complexities which are most likely going to make your life harder. I would recommend you to start with the STM32MP1, which uses a more conventional ARMv7-A CPU core, which has a MMU and allows to run Linux “normally”.
Regarding your specific issue: the stm32f429_diso_defconfig points to a particular kernel version, and it applies kernel patches on top of that kernel version. If you modify the kernel version… obviously the patches won’t apply anymore. You have to adapt the patches accordingly. Maybe even they are not needed anymore, if everything was in upstream Linux as of 5.6.
Hi
Could you explain me differences between the two following configuration of buildroot for kernel:
1) Default configuration for stm32mp..dk2 after clonning buildroot
BR2_LINUX_KERNEL=y
BR2_LINUX_KERNEL_CUSTOM_VERSION=y
BR2_LINUX_KERNEL_CUSTOM_VERSION_VALUE=”5.4.26″
BR2_LINUX_KERNEL_USE_CUSTOM_CONFIG=y
BR2_LINUX_KERNEL_CUSTOM_CONFIG_FILE=”board/stmicroelectronics/stm32mp157c-dk2/linux.config”
BR2_LINUX_KERNEL_DTS_SUPPORT=y
BR2_LINUX_KERNEL_INTREE_DTS_NAME=”stm32mp157c-dk2″
BR2_LINUX_KERNEL_INSTALL_TARGET=y
2) Previous configuration for stm32mp..dk2 created by Thomas Petazzoni
BR2_LINUX_KERNEL_CUSTOM_TARBALL=y
BR2_LINUX_KERNEL_CUSTOM_TARBALL_LOCATION=”$(call github,STMicroelectronics,linux,v4.19-stm32mp-r1.2)/linux-v4.19-stm32mp-r1.2.tar.gz”
BR2_LINUX_KERNEL_USE_CUSTOM_CONFIG=y
BR2_LINUX_KERNEL_CUSTOM_CONFIG_FILE=”board/stmicroelectronics/stm32mp157-dk/linux.config”
BR2_LINUX_KERNEL_DTS_SUPPORT=y
BR2_LINUX_KERNEL_INTREE_DTS_NAME=”stm32mp157c-dk2″
BR2_LINUX_KERNEL_INSTALL_TARGET=y
Why it was changed ?
Regards
Artur
Hello Arturs. The above configuration (that you list as configuration 1) is using the official Linux kernel from kernel.org, while the below configuration (that you list as configure 2) is using a fork of the Linux provided by ST specifically to support the STM32MP1 platform.
Back when I started this series of blog post, the support for STM32MP1 in the official Linux kernel was not entirely there yet, so I’ve opted to use the fork provided by ST. In the mean time, the support in the official Linux kernel has greatly improved, so the Buildroot defconfig was changed in commit https://git.buildroot.org/buildroot/commit/?id=7c05a0a830a34dc6c3232dc0c3e9951133aea206 to use the official Linux kernel instead of the ST fork.
Hi 🙂
I would like to do some modification in DeviceTree and U-BOOT dts file. After changing something in the files it is necessary to build “new” dtb files.
Please write me how to do it without rebuilding all (it takes too much time).
Regards
Artur
How to do this efficiently is explained in the second blog post of this series, https://bootlin.com/blog/building-a-linux-system-for-the-stm32mp1-connecting-an-i2c-sensor/, where we precisely modify the Device Tree, and explain how to do it properly and efficiently.
The buildroot system built in these blogs does not correctly shutdown.
There is no ‘shutdown’ applet in busybox and the ‘poweroff’ does not power off, it simply reboots. This makes the system unusable for battery powered devices that need to fully power off.
The Yocto image that ST distribute with the STM32MP157C-DK2 kit does correctly shutdown using either shutdown or poweroff.
As a relative newbie. Where would I start to figure out the difference between the shutdown behaviour between these two images?
I have not investigated the power off sequence on the STM32MP157, but it could be that it requires the TF-A firmware. If you have only followed this series of blog posts until this first article, we are using at this point the U-Boot SPL -> U-Boot -> Linux boot sequence, which does not involve TF-A. In a later blog post, we switch to the TF-A -> U-Boot -> Linux boot sequence (also called “trusted” sequence by ST). The Yocto image is using this boot sequence. If you want Buildroot to use it, following along until our blog post https://bootlin.com/blog/building-a-linux-system-for-the-stm32mp1-implementing-factory-flashing/, section “Change the Linux system boot chain”. Note that this is really just an hypothesis, I haven’t tested to confirm.
Did you ever figure out how to fix the shutdown/poweroff issue?
Hi Thomas,
I followed your instructions and I have a working system. But I cannot see the login prompt in my picocom terminal. I can see it only in the display of the evaluation board. Is it a matter of configuration in the kernel or something else?
Best,
Thibault
The default Buildroot configuration is to spawn a getty on the kernel console. So if your console= argument in the kernel command line points to a serial port, you should see the kernel boot messages *and* the login prompt on the serial port. If the console= argument points to the display, you will see the kernel boot messages *and* the login prompt on the display.
Hello
There is no ttyACM0 in /dev/
What may be wrong?
Difficult to say without more details. Could you check the kernel logs on your PC when you plug/unplug the USB cable that connects your PC to the STM32MP157 serial port ? Could you run “lsusb” with/without the USB cable plugged in? This will allow you to find out if the USB device is detected or not, and see if it’s some kind of hardware issue, or a software problem.
Any idea on what I might be doing wrong where changes don’t seem to be utilized? In menuconfig, I have a different hostname set, but after exiting, saving, and running make, the resulting image has the hostname “buildroot”
I just did a test here, and changing the host name, running “make” afterwards, I definitely do have the new hostname defined in output/target/etc/hostname, and therefore in my filesystem image.
However, note that not all configuration changes are taken into account after just a new “make”. For many configuration changes, a complete rebuild is necessary. See https://buildroot.org/downloads/manual/manual.html#full-rebuild for some details.
Hi Thomas,
I’ve been trying to get a decent Linux distro on the STM32MP1 DK2 board. I can flash the OpenSTLinux images but really would like to have a native gcc toolchain on the board. I run into problems when I try to install python packages that try to call gcc during setup.
I’m thinking about giving buildroot a shot, couple quick questions;
1) Can I get a Linux install with all the basic build tools (gcc, etc.) running on the board with buildroot?
2) YOur excellent article series is over a year old, is the starting point still the same (your repo from 2019.02) or should I use the most recent stuff from the main buildroot repo?
Thanks,
Andrew
Hello Andrew.
Buildroot does not support at all having a toolchain on the target, see https://buildroot.org/downloads/manual/manual.html#faq-no-compiler-on-target
However, you shouldn’t need a compiler on the target to use Python packages. The setup phase of Python packages is done by Buildroot at build time, i.e by Buildroot itself, during the build of your system, on your workstation. Once on the target, Python modules that are already installed do not need a toolchain. I think your mistake is probably that you are trying to use pip or manually build Python modules on the target, and this is not how it should be done: it should be done within Buildroot, which already has packages for a large number of Python modules. If one is missing, it is trivial to add, using the utils/scanpypi script.
Regarding the version of Buildroot, you can certainly use 2020.02, which is the currently maintained LTS. 2020.02 has a defconfig for the STM32MP1 DK2 board, so it should be easily to get up and running.
Don’t hesitate to contact us if you need commercial support around building Python modules for your system.
Hi Thomas,
Sounds great, I’ll give your suggestions a try. I thought with the specs close to the original Raspberry Pi a gcc toolchain wouldn’t be unreasonable but the link you included explains it well. I’ll do a parallel investigation getting arch linux going if I find the time.
Thanks,
Andrew
The specs of the hardware have nothing to do about the availability or not of a compiler on the target. It is really a Buildroot policy/decision to not support installing a compiler on the target. Even if you generate a Buildroot system for a 16-core x86-64 system with 64 GB of RAM, you would still not have a compiler on the target.
Hi Thomas, great article!
So do we have to have at least 4 partitions? This example seems to point in this direction:
# SD card update example with SPL as FSBL
PC $> dd if=u-boot-spl.stm32 of=/dev/sdb1 conv=fdatasync
PC $> dd if=u-boot-spl.stm32 of=/dev/sdb2 conv=fdatasync
PC $> dd if=/dev/zero of=/dev/sdb3 conv=fdatasync
PC $> dd if=u-boot.img of=/dev/sdb3 conv=fdatasync
Well, you need 2 copies of the first stage bootloader, and 1 copy of the second stage bootloader, so that’s 3 partitions, plus of course probably one or several more to store your Linux kernel and root filesystem.
Hello Thomas,
I installed buildroot according to this article and followed every single step. The Flas was successfull but I don’t have basic packages on it. When using a remote controle software and connect with my STM32 device, I can’t “make” or do anything else. I know that the ubuntu and debiand distro are not supported but how am I supposed to install packages? I am new to MPUs and Buildroot that’s why I am a bit lost.
On my host PC using Ubuntu 18.04 everything was perfect. The make was successfull and the files were complete.
These are the only files that I got on my STM32MP157C-DK2
bin lib media root tmp
boot lib32 mnt run usr
dev linuxrc opt sbin var
etc lost+found proc sys
Thank you
Hello Thomas
I don’t know why my comment did not appear but my problem is that everything went well. SD-Card flashed, My STM boots correctly ( on the ON mode appearently) and I get the same screen that you got with the same features that you explained in the article. Now when I want to install a package even the make or apt commands are not available. I did everything like you described it in the article and still I didn’t get anything.
when I ” ls / ” I get
bin lib media root tmp
boot lib32 mnt run usr
dev linuxrc opt sbin var
etc lost+found proc sys
Can you please help me?
Thank you .
Hello Peter. All comments on this blog are moderated, due to spam, so they don’t appear immediately.
Buildroot does not allow adding packages directly on the target: there is no compiler, and no package management system. To add more software components, you need to go back to your build machine, run Buildroot “make menuconfig”, adjust your Buildroot configuration, restart the Buildroot build, and reflash a new image.
Please note that I’ll be teaching an online Buildroot training course soon, registration is open at https://www.eventbrite.fr/e/bootlin-embedded-linux-development-with-buildroot-training-seminar-tickets-108855638144
Dear Thomas,
Just wanted to check with you as to where and how you control the cores. For example i want to disable the second A7 and use only one core, as an experiment. Is it even possible for me to do that? where do i make the changes? Please advice. Novice here.
Regards
Asking Linux to only use one core is easy: boot with maxcpus=1. But then it’s up to you to write the code to startup and control the second A7. Indeed, on STM32MP1, what Linux supports is controlling the startup of the M4, using a remoteproc driver, but not controlling the second A7 core, which is normally used for regular SMP operation in Linux.
Hi Thomas,
Thank you for your guide.
I’m having issues with the compilation of the build root.
More specifically, “make 2>&1 | tee build.log”
I’m using the Manjaro distro. I’m using GCC v10.2.0.
I have installed all the packets listed here: https://buildroot.org/downloads/manual/manual.html#requirement-mandatory .
I’m having issue with fakeroot.
These are my logs: https://pastebin.com/3w1N33NY
Fakeroot seems to have some issues.
How can i solve it?
Your machine is probably using glibc 2.33, which is causing build issues with fakeroot. You can apply/backport the 2 following Buildroot commits:
https://git.buildroot.org/buildroot/commit/package/fakeroot?id=f45925a951318e9e53bead80b363e004301adc6f
https://git.buildroot.org/buildroot/commit/package/fakeroot?id=e41b170b328cc086334948ff3b8038075e2c09ce
I applied these commits by using cherry-pick command.
I resolved merges by accepting the incoming changes and i also repeat the process.
This is the result:
https://pastebin.com/47gUpHN8
aclocal: error: couldn’t open directory ‘build-aux’: No such file or directory
autoreconf: /home/lvlz/data/Work/test/Path/STM32_M1/buildroot/output/host/bin/aclocal failed with exit status: 1
make: *** [package/pkg-generic.mk:230: /home/lvlz/data/Work/test/Path/STM32_M1/buildroot/output/build/host-fakeroot-1.20.2/.stamp_configured] Errore 1
Difficult to help without having access to your exact Buildroot tree and reproducing the issue, I’m afraid.
Hi Thomas,
Built an image from upstream buildroot repository for my STM32MP157A-DK1. My kit does not have display panel, so I use HDMI monitor instead. The problem is that there is no output on monitor. Everything is working with default SD-card image (with OpenSTLinux). What can be the cause of this and how do I debug such things?
CONFIG_DRM and CONFIG_DRM_STM are set by default in Linux config
Here is log from serial port: https://justpaste.it/5ic8l
Hello Anatolii. It is difficult to help without having the full kernel configuration, and reproducing in hardware. However, in addition to the DRM driver, you also need the HDMI transceiver driver enabled in your kernel configuration. I don’t see anything display related in your boot log, so it is most likely because some driver needed for the display pipeline is not enabled in your kernel configuration.
If you need commercial support around Buildroot on STM32MP1, do not hesitate to contact us!
Thanks, found the problem. CONFIG_DRM_SII902X was not set in /board/stmicroelectronics/stm32mp157a-dk1 config file. Now HDMI is working but with no console, only logs.
Hi, I’ve been playing around with a STM32MP157a-dk1 board, and buildroot for a few weeks. So far I’ve built buildroot, with some tweaks here and there to the configs. I like it so far, quite easy to build my software against, and the resulting image is SOOOOOO tiny and fast.
Next, I wanted to attempt to build the kernel that ST provides, since it appears that they’re quite further ahead than the mainline kernel with respect to low power states. However, I’d like to stick with buildroot, because I don’t like ST’s kitchen sink approach to their distro. I downloaded their 5.10.10 patches from:
https://wiki.st.com/stm32mpu/wiki/STM32MP1_Developer_Package_-_Linux_kernel
and told buildroot to build a 5.10.10 kernel, but apply the patches found therein. All built just fine, but after uboot hands over, my serial console ends with
Starting kernel …
Wondering if there is something simple I forgot to enable/disable?
Hello Flo, thanks for your message. Glad to see that you found Buildroot useful.
You can’t just change the kernel version: you also need to change TF-A and U-Boot to be aligned with Linux 5.10. Indeed, while the kernel is normally relatively independent from the firmware, ST has moved to using the SCMI interface to control clocks, and it’s now the TF-A firmware that takes care of the clocks, based on SCMI requests made by the Linux kernel.
So you can’t mix and match old TF-A/U-Boot with a brand new 5.10 kernel from ST. At Bootlin, we have successfully tested this week the combination of TF-A/U-Boot/Linux provided by ST as part of their 3.0, including validation of the low-power state on the DK1 platform, and all that with a Buildroot-based configuration.
Hey Thomas, thanks for your reply. I assumed it would be something like this, but don’t have a very clear view of the whole TF-A ecosystem.
Is this something I can enable with the current buildroot/uboot by toggling some features? Or is it more elaborate, and I’m better off waiting for people who know what they’re doing to implement it and integrate in future releases of buildroot? I’m happy to be a guinea pig/tester, but not sure how to get involved.
Well, it’s just a matter of pointing Buildroot to the appropriate TF-A, U-Boot and Linux version/configuration. The TF-A build process has slightly changed however in the latest ST release, so it might a bit of tweaking. Don’t hesitate to get in touch with us at Bootlin, we can help with this sort of integration work.
Will do if I find an application further than me hacking in my basement. For the time being, just knowing it is possible is enough to keep me going 🙂
Thanks for the great blogs!
Bonjour M.Petazzoni, il me semble que vous êtes français donc je me permets de vous écrire dans cette langue, si cela pose problème je pourrais réitérer mon message en anglais.
J’essaye depuis maintenant deux mois de booter ma board stm32mp157c-dk2 mais malheureusement sans succès.
Je suis dans le même cas que Flo, j’essaye de booter avec la trusted boot chain de ST, soit TF-A + U-Boot et SP_min sur la partie sécurisée. J’utilise les dernières versions fournis dans le developer package de ST et je compile sous Buildroot.
Actuellement je vois sur ma console ( l’écran de la board reste noir) et en rajoutant des printf dans le code de U-Boot que j’arrive jusqu’à l’instruction ”Starting kernel…” et que je jump à l’adresse du Kernel, puis plus rien.
Je me suis inspiré de la configuration que vous avez publié sur github (blog 6) en l’adaptant à la dernière version de Buildroot pour arriver jusque là.
Est-ce qu il vous serez possible de me partager vos fichiers .config de Buildroot, Linux et U-Boot afin de sûrement me débloquer et me permettre d’avancer ?
Cordialement
Guillaume
I’ll reply in English so that the answer serves everybody. I would suggest that you start with two non-working solutions:
– Either you use the Git branch used in this blog post, as-is, with no changes.
– Or you use the Buildroot 2021.05 release (just published) and use the stm32mp157c_dk2_defconfig which is also known to be working, with no changes.
This will allow you to verify your setup. Then you can progressively make changes to adjust to your needs.
Note that in the coming weeks, we will be working on improved/more recent support for the STM32MP1 platforms in Buildroot, including defconfigs to use the latest code drops from ST. We can always provide commercial support around Buildroot and embedded Linux development on STM32MP1. Contact us for details!
git clone https://git.buildroot.net/buildroot is the right URL
Hi below are these results of these commands:
git remote add tpetazzoni https://github.com/tpetazzoni/buildroot.git
git fetch tpetazzoni
git checkout -b stm32mp157-dk2 tpetazzoni/2019.02/stm32mp157-dk
Results:
abdulrehman@abdul:~/buildroot$ git remote add tpetazzoni https://github.com/tpetazzoni/buildroot.git
fatal: remote tpetazzoni already exists.
abdulrehman@abdul:~/buildroot$ git fetch tpetazzoni
remote: Not Found
fatal: repository ‘https://github.com/tpetazzoni/’ not found
abdulrehman@abdul:~/buildroot$ git checkout -b stm32mp157-dk2 tpetazzoni/2019.02/stm32mp157-dk
fatal: ‘tpetazzoni/2019.02/stm32mp157-dk’ is not a commit and a branch ‘stm32mp157-dk2’ cannot be created from it
abdulrehman@abdul:~/buildroot$
It works just fine here. Complete log:
Good day! Conducted the assembly according to your blog. There is a problem when loading the kernel. Collected for STM32MP157A-DK1.
[ 1.625500] mmci-pl18x 58005000.sdmmc: Linked as a consumer to regulator.8
[ 1.631196] mmci-pl18x 58005000.sdmmc: mmc0: PL180 manf 53 rev2 at 0x58005000 irq 58,0 (pio)
[ 1.668248] mmci-pl18x 58007000.sdmmc: allocated mmc-pwrseq
[ 1.672637] mmci-pl18x 58007000.sdmmc: Linked as a consumer to regulator.8
[ 1.680510] mmci-pl18x 58007000.sdmmc: mmc1: PL180 manf 53 rev1 at 0x58007000 irq 59,0 (pio)
[ 1.714400] sdhci: Secure Digital Host Controller Interface driver
The last thing that comes to the port …
Please tell me what could be the matter?
Hello Vitaly. There was no problem loading the kernel, as the messages you’re showing are from the kernel, so the kernel was properly loaded, and started up. However, to give you some hints, I would need the complete boot logs, not just the part that you think is relevant (because in fact it doesn’t contain the relevant parts). I would suspect that the kernel command line is not correct, and therefore it’s not able to mount the root filesystem, and just stuck because of that. But without seeing the full boot log, it’s difficult to help. You can contact us at info@bootlin.com with the full boot log.
Hello. I’ve also experiencing this kind of issue wherein it would stop booting and the last output is similar above like this “sdhci: Secure Digital Host Controller Interface driver”. Is there any fix for this kind of issues? I’m newbie in using STM32MP157A and still trying to figure out the workarounds for this board.
Hello Thomas,
I am following the steps mentioned in the article and flashed SD card with sdcard.img and then inserted SD card into the board. But I don’t see any boot messages or anything. It’s just blank screen. Only thing displayed on the display is “No signal”!. Can you please let me know what could be the potential issue?
Thanks in advance!
The basic Buildroot system doesn’t show anything on the screen: you need a serial port connected to the board, as explained in this blog post. Also, for up-to-date instructions on how to use Buildroot for STM32MP1 platforms, see https://github.com/bootlin/buildroot-external-st
Hi,
We got the image by following your steps.
But instead of using ethernet, we would like to use usb0 ethernet.
We installed “libcomposite”, “g_ether” and use modprobe to load these drivers as well.
we also have script as below, this script work find on BBB, but not on STM32mp1 buildroot. Do you know any other modules or flags need to be added when build kernel?
Thanks
#!/bin/sh
# set -e
GADGET_DIR=/config/usb_gadget/g1
OLDPWD=$(pwd)
printf “Starting USB gadget: ”
# modprobe cppi41 // BBB only
# modprobe musb-dsps // BBB only
# modprobe phy-am335x // BBB only
modprobe libcomposite
usb_idVendor=”0x1234″
usb_idProduct=”0x1234″
usb_bcdDevice=”0x0100″
usb_bcdUSB=”0x0200″
usb_serialnr=”000000″
usb_product=”USB Device”
usb_iserialnumber=”12345678ABCD”
usb_imanufacturer=”ABCD”
usb_iproduct=”Test”
mkdir -p /config
mount -t configfs none /config
mkdir ${GADGET_DIR}
cd ${GADGET_DIR}
echo ${usb_bcdUSB} > bcdUSB
echo ${usb_idVendor} > idVendor
echo ${usb_idProduct} > idProduct
echo ${usb_bcdDevice} > bcdDevice
#0x409 = english strings…
mkdir strings/0x409
echo ${usb_iserialnumber} > strings/0x409/serialnumber
echo ${usb_imanufacturer} > strings/0x409/manufacturer
echo ${usb_iproduct} > strings/0x409/product
mkdir functions/rndis.usb0
if [ -f functions/rndis.usb0/class ]; then
echo EF > functions/rndis.usb0/class
echo 04 > functions/rndis.usb0/subclass
echo 01 > functions/rndis.usb0/protocol
fi
echo 1 > os_desc/use
echo 0xCD > os_desc/b_vendor_code || true
echo MSFT100 > os_desc/qw_sign
echo “RNDIS” > functions/rndis.usb0/os_desc/interface.rndis/compatible_id
echo “5162001” > functions/rndis.usb0/os_desc/interface.rndis/sub_compatible_id
mkdir -p configs/c.1
ln -s configs/c.1 os_desc
mkdir -p functions/rndis.usb0/os_desc/interface.rndis/Icons
echo 2 > functions/rndis.usb0/os_desc/interface.rndis/Icons/type
echo “%SystemRoot%\\system32\\shell32.dll,-233” > functions/rndis.usb0/os_desc/interface.rndis/Icons/data
mkdir -p functions/rndis.usb0/os_desc/interface.rndis/Label
echo 1 > functions/rndis.usb0/os_desc/interface.rndis/Label/type
echo “BeagleBone USB Ethernet” > functions/rndis.usb0/os_desc/interface.rndis/Label/data
ln -s functions/rndis.usb0 configs/c.1/
ls /sys/class/udc/ > UDC
cd ${OLDPWD}
echo “OK”
I’ve been trying to use your blog posts to build a system for the DK1. I’ve used your git repo, and everything is standard, however I get to the point of
>>> Linux custon building
I get the following error:
scripts/dtc/Makefile:23: *** dtc needs libyaml for DT schema validation support. Install the necessary libyaml development package.. Stop.
I installed libyaml-dev, but continue to get the same problem. Any advice? Thank you
Could you please try to use https://github.com/bootlin/buildroot-external-st which provides a much more up-to-date Buildroot support for STM32MP1 boards ?
Thank you for all the information. I unsuccessfully tried using https://github.com/bootlin/buildroot-external-st the create an image for the STM32MP157D-DK1 board.
My finding are documented at “Buildroot build failed for STM32MP157d-dk1 board” (https://stackoverflow.com/questions/76154999/buildroot-build-failed-for-stm32mp157d-dk1-board)
I hope you can provide some feedback.
Regards
It seems you have resolved your issue by yourself:
https://github.com/bootlin/buildroot-external-st/issues/36
I was following this blog post, and encountered the following error
“You must install ‘python’ on your build machine”
I resolved this issues by creating a symlink
sudo ln -s python2.7 python
Following post were helpful to find a resolution.
https://github.com/firesim/FireMarshal/issues/232
https://stackoverflow.com/questions/22626867/howto-symlink-python-to-python2-7-as-non-superuser
thanks alot for this documentation. I tried to follow the steps with ubuntu24.04 and struggled when I tried to make 2>&1 ¦ tee build.log -> host-fakeroot 1.20.2 Building. I searched the web and found something about */package/m4 but then I run into the next error with the versions of m4. Maybe you already know this issue and can help me?
Please try to use https://github.com/bootlin/buildroot-external-st which provides a much more up-to-date Buildroot support for STM32MP1 boards.
Here is our announcement about it: https://bootlin.com/blog/buildroot-external-st-buildroot-for-stm32mp1/
Hi Köry, Hi Thomas,
Thanks for your very detailed introduction to STM32MP1 and buildroot building system. I’ve followed your instructions in detail, every step, carefully executing every step you’ve written about. (Fixed some compilation errors with patches), but I’ve finally made this configuration buildable, and after I’ve flashed it to sdcard kernel can’t fully boot. It looks like /dev/ partition is mounted “read only” and kernel can’t create devices there.
Here is the complete log: https://pastebin.com/Etwcd55i
I’m a bit confused now, maybe you’ve faced with this before and can give me some hints in which direction I have to go to?
I’m looking forward to hearing from you
Pavel P.
Hello Pavel. Thanks for your comment. This blog post is very old, and targets a very old version of Buildroot. For more recent work on STM32MP1 support in Buildroot, check out https://github.com/bootlin/buildroot-external-st.