As stated in a previous blog post, we officially launched our lab on 2016, April 25th and it is contributing to KernelCI since then. In a series of blog post, we’d like to present in details how our lab is working.
We previously introduced the lab and its integration in KernelCI, and presented its hardware infrastructure. Now is time to explain how it actually works on the software side.
Continuous integration in Linux kernel
Because of Linux’s well-known ability to run on numerous platforms and the obvious impossibility for developers to test changes on all these platforms, continuous integration has a big role to play in Linux kernel development and maintenance.
More generally, continuous integration is made up of three different steps:
- building the software which in our case is the Linux kernel,
- testing the software,
- reporting the tests results;
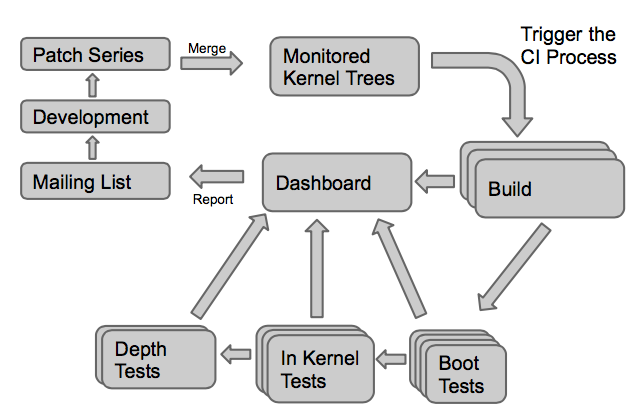
KernelCI checks hourly if one of the Git repositories it tracks have been updated. If it’s the case then it builds, from the last commit, the kernel for ARM, ARM64 and x86 platforms in many configurations. Then it stores all these builds in a publicly available storage.
Once the kernel images have been built, KernelCI itself is not in charge of testing it on hardware. Instead, it delegates this work to various labs, maintained by individuals or organizations. In the following section, we will discuss the software architecture needed to create such a lab, and receive testing requests from KernelCI.
Core software component: LAVA
At this moment, LAVA is the only supported software by KernelCI but note that KernelCI offers an API, so if LAVA does not meet your needs, go ahead and make your own!
What is LAVA?
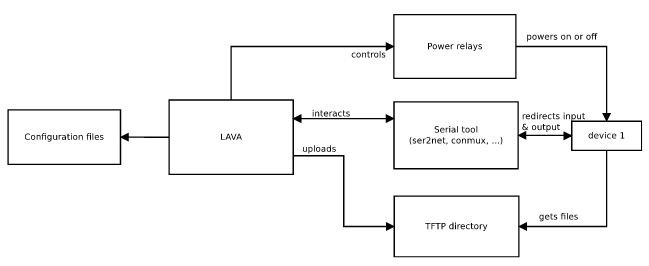
LAVA is a self-hosted software, organized in a server-dispatcher model, for controlling boards, to automate boot, bootloader and user-space testing. The server receives jobs specifying what to test, how and on which boards to run those tests, and transmits those jobs to the dispatcher linked to the specified board. The dispatcher applies all modifications on the kernel image needed to make it boot on the said board and then fully interacts with it through the serial.
Since LAVA has to fully and autonomously control boards, it needs to:
- interact with the board through serial connection,
- control the power supply to reset the board in case of a frozen kernel,
- know the commands needed to boot the kernel from the bootloader,
- serve files (kernel, DTB, rootfs) to the board.
The first three requirements are fulfilled by LAVA thanks to per-board configuration files. The latter is done by the LAVA dispatcher in charge of the board, which downloads files specified in the job and copies them to a directory accessible by the board through TFTP.
LAVA organizes the lab in devices and device types. All identical devices are from the same device type and share the same device type configuration file. It contains the set of bootloader instructions to boot the kernel (e.g.: how and where to load files) and the bootloader configuration (e.g.: can it boot zImages or only uImages). A device configuration file stores the commands run by a dispatcher to interact with the device: how to connect to serial, how to power it on and off. LAVA interacts with devices via external tools: it has support for conmux or telnet to communicate via serial and power commands can be executed by custom scripts (pdudaemon for example).
Control power supply
Some labs use expensive Switched PDUs to control the power supply of each board but, as discussed in our previous blog post we went for several Devantech ETH008 Ethernet-controlled relay boards instead.
Linaro, the organization behind LAVA, has also developed a software for controlling power supplies of each board, called pdudaemon. We added support for most Devantech relay boards to pdudaemon.
Connect to serial
As advised in LAVA’s installation guide, we went with telnet and ser2net to connect the serial port of our boards. Ser2net basically opens a Linux device and allows to interact with it through a TCP socket on a defined port. A LAVA dispatcher will then launch a telnet client to connect to a board’s serial port. Because of the well-known fact that Linux devices name might change between reboots, we had to use udev rules in order to guarantee the serial we connect to is the one we want to connect to.
Actual testing
Now that LAVA knows how to handle devices, it has to run jobs on those devices. LAVA jobs contain which images to boot (kernel, DTB, rootfs), what kind of tests to run when in user space and where to find them. A job is strongly linked to a device type since it contains the kernel and DTB specifically built for this device type.
Those jobs are submitted to the different labs by the KernelCI project. To do so, KernelCI uses a tool called lava-ci. Amongst other things, this tool contains a big table of the supported platforms, associating the Device Tree name with the corresponding hardware platform name. This way, when a new kernel gets built by KernelCI, and produces a number of Device Tree Blobs (.dtb files), lava-ci knows what are the corresponding hardware platforms to run the kernel on. It submits the jobs to all the labs, which will then only run the tests for which they have the necessary hardware platform. We have contributed a number of patches to lava-ci, adding support for the new platforms we had in our lab.
Reporting test results
After KernelCI has built the kernel, sent jobs to contributing labs and LAVA has run the jobs, KernelCI will then get the tests results from the labs, aggregate them on its website and notify maintainers of errors via a mailing list.
Challenges encountered
As in any project, we stumbled on some difficulties. The biggest problems we had to take care of were board-specific problems.
Some boards like the Marvell RD-370 need a rising edge on a pin to boot, meaning we cannot avoid pressing the reset button between each boot. To work out this problem, we had to customize the hardware (swap resistors) to bypass this limitation.
Some other boards lose their serial connection. Some lose it when resetting their power but recover it after a few seconds, problem we found acceptable to solve by infinitely reconnecting to the serial. However, we still have a problem with a few boards which randomly close their serial connection without any reason. After that, we are able to connect to the serial connection again but it does not send any character. The only way to get it to work again is to physically re-plug the cable used by the serial connection. Unfortunately, we did not find yet a way to solve this bug.
The Linux kernel of our server refused to bind more than 13 USB devices when it was time to create a second drawer of boards. After some research, we found out the culprit was the xHCI driver. In modern computers, it is possible to disable xHCI support in the BIOS but this option was not present in our server’s BIOS. The solution was to rebuild and install a kernel for the server without the xHCI driver compiled. From that day, the number of USB devices is limited to 127 as in the USB specification.
Conclusion
We have now 35 boards in our lab, with some being the only ones represented in KernelCI. We encourage anyone, hobbyists or companies, to contribute to the effort of bringing continuous integration of the Linux kernel by building your own lab and adding as many boards as you can.
Interested in becoming a lab? Follow the guide!