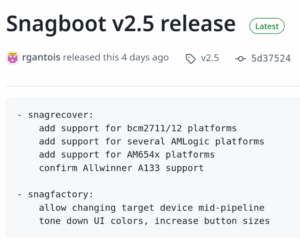
 Version 2.5 of Snagboot was released last week! The updates in this version mostly target snagrecover, with two brand new SoC families supported! Let’s take a look at what’s new.
Author: Romain Gantois
Snagboot 2.4 release overview
 Snagboot is an open-source and vendor-neutral tool to recover and reflash a wide variety of embedded platforms, leveraging the communication protocols offered by the boot ROMs of most modern system-on-chips. It replaces unpractical, vendor-specific and often closed-source tools provided by silicon vendors.
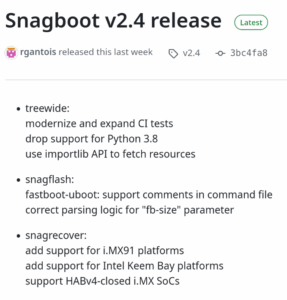
Spring 2025 has been especially rich in Snagboot contributions. Various bug fixes, feature requests and even support for additional SoC families have been submitted to the official repository. Version 2.4 of Snagboot was released last Monday, which gives us a good opportunity to take a closer look at some of these improvements.
Back from Netdev 0x19
 Around mid-March, Bootlin engineers Köry Maincent and Romain Gantois had the chance to attend edition 0x19 of the Netdev conference, where developers from the Linux kernel networking community assemble for four days of technical presentations and discussions.
They were generally very much impressed by the quality and detail of the talks given during this conference, and they have selected two of the talks that they found the most interesting, which they summarized below. We expect the slides and videos to be published at some point in the future, but they don’t seem to be available at the moment.
Upgrading Snagboot to a fully-fledged factory flashing tool
Snagboot is a fully open-source and vendor-agnostic recovery and flashing tool released by Bootlin in 2023. It is composed of snagrecover and snagflash, which respectively run U-Boot on a target platform using USB recovery mode and flash non-volatile storage devices using USB gadgets exposed by U-Boot.
While the combination of snagrecover and snagflash allows to reflash a board during development, it doesn’t fully address the needs of factory flashing: fast processing of multiple boards in parallel, monitoring of individual board statuses during the flashing process, and compatibility with Windows, which is the most often used operating system on factory floors.
Back in March 2024, Texas Instruments contacted Bootlin with a project request: to grow Snagboot into an efficient factory flashing tool. The goal was for factory operators to have a way of efficiently flashing groups of devices using a single user-friendly interface.
While this project could have been executed internally by engineers at Texas Instruments, the team at TI realized the importance of keeping this work agnostic to TI and driving this truly as an Open Source project. We thank TI for partnering with us and sponsoring us to deliver this tool that will cater to the flash writing needs of a variety of small and medium sized manufacturing houses & industry in general.
Consequently, Bootlin is proud to release the 2.0 version of Snagboot, which includes a factory flashing tool that runs on both Windows and Linux!
This tool supports a wide range of platforms from different vendors. All boards using supported SoCs are themselves supported without any extra effort, provided proper U-Boot support exists and USB recovery ports are routed in hardware.
Continue reading “Upgrading Snagboot to a fully-fledged factory flashing tool”
Snagboot 1.3 release overview
Snagboot, Bootlin’s vendor-agnostic recovery tool for embedded platforms, has been under continued development since its first release in May 2023. Let’s take a look at the main changes brought by version 1.3, published just a few days ago.
Passing USB device paths
Both snagrecover and snagflash previously relied on USB vendor ID:product ID addresses to find recovery devices exposed by boards. This was problematic in the case where two boards with the same vendor and product IDs had to be recovered or reflashed simultaneously. To solve this issue, we added the ability for snagrecover and snagflash to use USB paths of the form bus:port1-port2-... instead.
The main challenge we faced while implementing this feature was integration into the NXP i.MX recovery process. In Snagboot 1.2, i.MX recovery relied on the Python ctypes bindings to the hidapi library. These bindings did not allow searching for an HID device using bus/port paths. This, and other issues we encountered with hidapi bindings led us to drop them entirely and reimplement a partial HID library inside the Snagboot codebase.
i.MX53 support
Martin Fuzzey contributed a set of changes to snagrecover that added support for the i.MX53 family of SoCs. A few changes to the protocol layer of Snagboot were necessary since these SoCs used a raw USB device instead of an HID device.
Improvements to the AM335x setup script
Recovering AM335x platforms with Snagboot requires setting up a recovery shell using a special helper script. We’ve cleaned up the syntax and some of the logic of this script to bring it closer to POSIX compatibility and allow non-Bash shells such as Fish shell to run it successfully.
These are the main changes brought by v1.3. If you’re curious to see more, you can view the full changelog here. Thank you to all the people who contributed to this release!
Snagboot: Designing a USB recovery process for AM335x SoCs
A few months ago, Bootlin released Snagboot, an open-source and generic replacement to the vendor-specific, sometimes proprietary, tools used to recover and reflash embedded platforms. This has led us to design recovery processes over USB for several different SoC families.
Our goal for each recovery process was the following: be able to upload U-Boot in external RAM and run it without modifying any non-volatile memories. Implementing this for many different platforms was challenging, as each vendor used different protocols, bootloader binaries, and methods to boot from recovery mode. Moreover, it was critical that the recovery tool be as user-friendly as possible, not requiring any complex configuration or vendor-specific workflows. This blog post describes the strangest recovery process we had to support so far: the one provided over USB by the Texas Instruments AM335x SoC.
Initializing AM335x platforms
When booted, each SoC has a specific sequence of actions it performs to load and run a target operating system or bare-metal program. This sequence typically starts with a ROM code, stored in a non-volatile internal memory. The main job of a ROM code is to search for a first-stage bootloader in various external memories and load it to internal RAM. In the case of AM335x platforms, this initialization sequence is described in the TI reference manual.
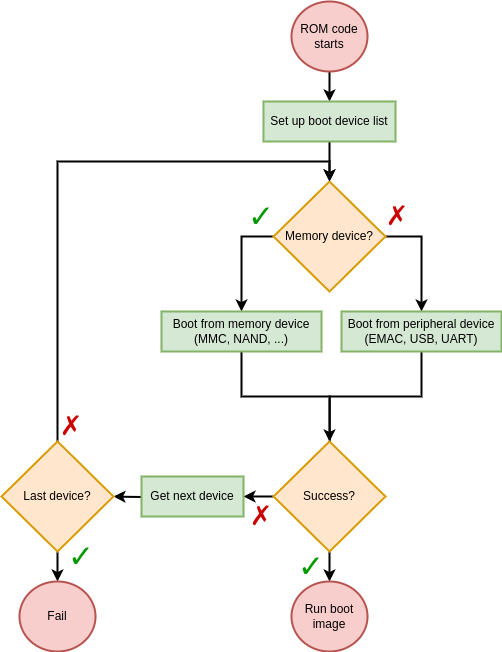
As we can see, there is nothing too outlandish here. The ROM code checks each device in its boot sequence and attempts to boot from it. What is particularly interesting to us here is the Boot from peripheral device part. Indeed, our ultimate goal is to send U-Boot to the SoC over a USB connection. So we will now dig a little further into this peripheral boot feature. The reference manual states that the AM335x ROM code is capable of booting from three types of peripheral interfaces: EMAC (Ethernet), USB and UART. Considering what we said earlier, what really interests us here is the USB boot feature. The USB boot procedure is described in more detail in the reference manual. And this is where things get a little strange.
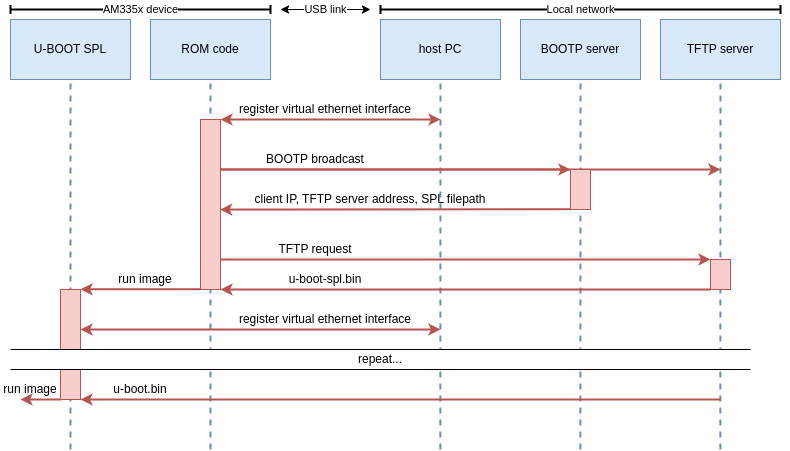
Most ROM codes we’ve encountered use fairly simple vendor protocols to communicate over USB. You’ll typically find some memory read/write operations, some run operations, and maybe a few vendor-specific commands. The AM335x ROM code however, uses network protocols to boot over USB! Specifically, the ROM code exposes an RNDIS class device which will be registered as an Ethernet interface by the host-side rndis_host driver. The ROM code will then broadcast BOOTP requests. A BOOTP server on the network should respond to this and supply the SoC with an IP address and the address of a TFTP server. Finally, the ROM code will download the first stage firmware from this TFTP server. To summarize, here is the expected USB boot procedure for AM335x SoCs:
This poses a number of issues. Remember, our goal is to boot the SoC using snagboot, a user-friendly and easily configurable CLI tool. Meaning we can’t expect the user to perform any complicated network configurations to be able to use the tool! So these are the main challenges associated with recovering AM335x SoCs:
- We need a BOOTP and TFTP server to respond to the ROM code. These servers need IP addresses, which means our tool has to obtain IPs every time it runs.
- BOOTP and TFTP servers use ports 67 and 69 which are privileged. However, we don’t want users to have to run snagboot as root.
- The ROM code requires an IP address, which means that snagboot has to supply a valid IP address to it every time it runs the recovery.
- If another BOOTP server is present on the user’s network during recovery, it could try to answer the ROM code, interfering with snagboot’s operation.
Designing a user-friendly recovery process
To circumvent these challenges, we made use of a number of nice Linux features. Firstly, we can see that the common theme in all these issues is interference with the user’s network. We have to work with local routers to get IP addresses, and we have to ensure that other BOOTP servers will not race us to respond to the board. To address this need, we’ve made use of network namespaces, which are a way of partitioning network resources on the system. When a process runs in a separate network namespace, it will not share network interfaces, routing rules, or firewall rules with the rest of the system.
This is very interesting to us, as it means that we can effectively create a sandbox environment where we can interact with the AM335x ROM code without touching the user’s local network! We can set whatever strange routing and firewall rules we want, and they will be automatically destroyed when we delete the namespace! The general sequence for our recovery process is:
- Move the ROM Code’s virtual ethernet interface to a new “snagbootnet” namespace
- Set up firewall rules to link ports 67 and 69 to unprivileged ports 9067 and 9069, which will spare us from running as root.
- Set up routing rules to assign whatever IP’s we want to the ROM interface and the servers generated by snagboot.
- Run snagrecover which will serve a U-Boot SPL image to the ROM Code
- Repeat the same process to serve a U-Boot image to SPL (SPL will use essentially the same boot process as the ROM code)
# These iptable rules will allow snagboot to use unprivileged ports 9067 and 9069
# as proxies for privileged ports 67 and 69
ip netns exec $NETNS_NAME iptables -t nat -A PREROUTING \
   -p udp --dport 67 -j DNAT --to-destination :9067
ip netns exec $NETNS_NAME iptables -t nat -A PREROUTING \
   -p udp --dport 69 -j DNAT --to-destination :9069
ip netns exec $NETNS_NAME iptables -t nat -A POSTROUTING \
   -p udp --sport 9067 -j MASQUERADE --to-ports 67
ip netns exec $NETNS_NAME iptables -t nat -A POSTROUTING \
   -p udp --sport 9069 -j MASQUERADE --to-ports 69
The network namespace and network configurations can be done by a wrapper script, that will be executed by the user before running snagboot normally. However, there is another challenging issue with this method. When U-Boot SPL runs, it will expose a new RNDIS interface which will be registered by the host system and be brought up in the default network namespace. This means that we will not be able to access SPL’s virtual ethernet interface from inside our custom network namespace! Thus, we must use one final trick to automatically move SPL’s interface inside our namespace when it is brought up. The namespace setup script will run a polling subprocess in the background. This subprocess will regularly check /sys/class/net for new interfaces matching certain USB addresses, and will automatically move them to our namespace once detected.
poll_interface () {
  # check for network interfaces with device nodes matching our ROM code
  # and SPL RNDIS gadget addresses
  ROMNETFILE=$(grep -l "PRODUCT=$ROMUSB" $(grep -l "DEVTYPE=usb_interface" /sys/class/net/*/device/uevent))
  SPLNETFILE=$(grep -l "PRODUCT=$SPLUSB" $(grep -l "DEVTYPE=usb_interface" /sys/class/net/*/device/uevent))
  if [ -e "$ROMNETFILE" ]; then
    config_interface "$(echo $ROMNETFILE | cut -d '/' -f 5)"
  fi
  if [ -e "$SPLNETFILE" ]; then
    config_interface "$(echo $SPLNETFILE | cut -d '/' -f 5)"
  fi
}
You can check out the full setup script by running snagrecover --am335-setup if you are interested.
With this, we have a complete recovery process for AM335! From the user’s points of view, the only big difference with other SoC recoveries is an additional helper script that needs to be run before snagrecover. Designing the AM335x support for Snagboot was a very interesting technical problem, with a solution that illustrated the flexibility offered by Linux systems.
Releasing Snagboot: a cross-vendor recovery tool for embedded platforms
Recovering and reflashing a bricked board can be a tedious process. It often involves flashing an SD card to bring your device back up, and it gets worse if the board does not have an SD card slot to begin with. Thankfully, most embedded platforms almost always include some form of recovery via USB or UART, which usually involves sending a boot image to the platform’s ROM code. A few tools exist that leverage this functionality to offer quick recovery and reflashing via USB, such as STM32CubeProgrammer, SAM-BA or UUU. However, these tools are all vendor-specific, which means that developers working on various kinds of platforms have to switch between different tools and learn how to use each one.
To address this issue, Bootlin is happy to release today a new recovery and reflashing tool, called Snagboot, which intends to be a generic and open-source replacement to the vendor-specific tools mentioned earlier. It is composed of two parts:
- snagrecover, which uses vendor-specific ROM code mechanisms to initialize external RAM and run your bootloader (typically U-Boot), without modifying any non-volatile memories.
- snagflash, which communicates with your bootloader over USB to flash system images to non-volatile memories, using either DFU, USB Mass Storage or fastboot.
Snagboot currently supports about 50 different SoC models, from six different SoC families:
- STMicroelectronics STM32MP1
- Microchip SAMA5
- NXP i.MX6/7/8
- Texas Instruments AM335x
- Allwinner Sunxi
- Texas Instruments AM62x
You can get it from PyPI or browse the sources on github. Our extensive user guide gives all the details on how to setup and use Snagboot on supported platforms. We hope that this tool will be useful to embedded software engineers and that it will continue to grow as support for more SoCs/platforms is added! If you’re familiar with a certain SoC family’s boot process, don’t hesitate to contribute to the project by adding support for your platform!