Building embedded Linux systems
 Typical embedded Linux systems include a wide number of software components, which all need to be compiled and integrated together. Two main approaches are used in the industry to integrate such embedded Linux systems: build systems such as Yocto/OpenEmbedded, Buildroot or OpenWrt, and binary distributions such as Debian, Ubuntu or Fedora. Of course, both options have their own advantages and drawbacks.
One of the benefits of using standard binary distributions such as Debian or Ubuntu is their widespread use, their serious and long-term security maintenance and their large number of packages. However, they often lack appropriate tools to automate the process of creating a complete Linux system image that combines existing binary packages and custom packages.
In this blog post, we introduce ELBE (Embedded Linux Build Environment), which is a build system designed to build Debian distributions and images for the embedded world. While ELBE was initially focused on Debian only, Bootlin contributed support for building Ubuntu images with ELBE, and this blog post will show as an example how to build an Ubuntu image with ELBE for a Raspberry Pi 3B.
ELBE base principle
When you first run ELBE, it creates a Virtual Machine (VM) for building root filesystems. This VM is called initvm. The process of building the root filesystem for your image is to submit and XML file to the initvm, which triggers the building of an image.
The ELBE XML file can contain an archive, which can contain configuration files, and additional software. It uses pre-built software in the form of Debian/Ubuntu packages (.deb). It is also possible to use custom repositories to get special packages into the root filesystem. The resulting root file system (a customized Debian or Ubuntu distribution) can still be upgraded and maintained through Debian’s tools such as APT (Advanced Package Tool). This is the biggest difference between ELBE and other build systems like the Yocto Project and Buildroot.
Bootlin contributions
As mentioned in this blog post introduction, Bootlin contributed support for building Ubuntu images to ELBE, which led to the following upstream commits:
- Add optional mirror for host architecture
- docs: elbeoverview: Update doc about url mirror
- examples: Add support to an armhf ubuntu image
- dbsfed.xsd: Add Ubuntu release names
- elbepack: default-init: Add ubuntu-keyring
- elbexml: Write url-list mirror in the host sysroot.
- elbeproject: invert repo action after package build
- examples: armhf-ubuntu.xml: Update url-list mirror architecture option
- pbuilder: Update the mirror management of pbuilder hook
- pbuilder: Use host mirror when cross building
Build an Ubuntu image for the Raspberry Pi 3B
We are now going to illustrate how to use ELBE by showing how to build an image for the popular RaspberryPi 3B platform.
Add required packages
This was tested on Ubuntu 20.04. Install the below packages if needed, and make sure you are in the libvirt, libvirt-qemu and kvm groups:
$ sudo apt install python3 python3-debian python3-mako \
  python3-lxml python3-apt python3-gpg python3-suds \
  python3-libvirt qemu-utils qemu-kvm p7zip-full \
  make libvirt-daemon libvirt-daemon-system \
  libvirt-clients python3-urwid
$ sudo adduser youruser libvirt
$ sudo adduser youruser libvirt-qemu
$ sudo adduser youruser kvm
$ newgrp libvirt
$ newgrp libvirt-qemu
$ newgrp kvm
Prepare ELBE initvm
First, you need to clone ELBE’s git reposority:
git clone https://github.com/Linutronix/elbe.git
We need to use the v13.2 version because our latest contributions for Ubuntu support made it to 13.2:
$ cd elbe
$ git checkout v13.2
To create the initvm:
$ PATH=$PATH:$(pwd)
$ elbe initvm create --devel
The --devel parameter allows to use ELBE from the current working directory into the initvm.
If the command fails with the Signature with unknown key: message you need to add these keys to apt. Use the following command where XXX is the key to be added:
$ sudo apt-key adv --keyserver keyserver.ubuntu.com --recv-keys XXX
Creating your initvm should take at least 10 to 20 minutes.
In case you rebooted your computer or stopped the VM, you will need to start it:
$ elbe initvm start
Create an ELBE project for our Ubuntu image.
To begin with, we will base our image on the armhf-ubuntu example. We create an ELBE pbuilder project and not a simple ELBE project because we later want to build our own Linux kernel package for our board:
$ elbe pbuilder create --xmlfile=examples/armhf-ubuntu.xml \
  --writeproject rpi.prj --cross
The project identifier is written to rpi.prj. We save the identifier to a shell variable to simplify the next ELBE commands:
$ PRJ=$(cat rpi.prj)
Build the Linux package
As explained earlier we want to use ELBE to build our package for the Linux kernel. ELBE uses the standard Debian tool pbuilder to build packages. Therefore, we need to have debianized sources (i.e sources with the appropriate Debian metadata in a debian/ subfolder) to build a package with pbuilder.
First clone the Linux repositories:
$ git clone -b rpi-5.10.y https://github.com/raspberrypi/linux.git
$ cd linux
Debianize the Linux repositories. We use the elbe debianize command to simplify the generation of the debian folder:
$ elbe debianize
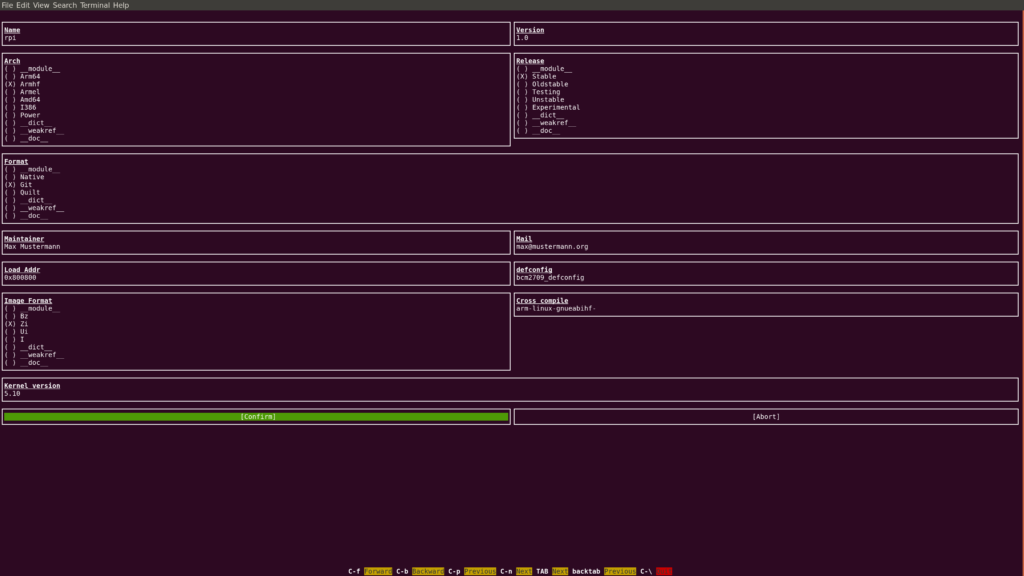
Fill the settings in the UI as follows (make sure you reduce the font size if you don’t see the Confirm button):

Make sure you set Name to rpi. Otherwise, you won’t get the output file names we use in the upcoming instructions.
The debianize command helps to create the skeleton of the debian folder in the sources. It has been pre-configured for a few packages like bootloaders or the Linux kernel, to create the rules to build these packages. It may need further modifications to finish the packaging process. Take a look a the manual to have more information on debianization. In our case, we need to tweak the debian/ folder with the two following steps to cross-build the Raspberry Linux kernel without error.
Append the below lines to the debian/rules file (use tabs instead of spaces):
override_dh_strip:
	dh_strip -Xscripts

override_dh_shlibdeps:
	dh_shlibdeps -Xscripts
Remove the following line from the debian/linux-image-5.10-rpi.install file:
./lib/firmware/*
Update the source format:
$ echo "1.0" > debian/source/format
The Linux kernel sources are now ready, we can run elbe pbuilder to compile them:
$ mkdir ../out
$ elbe pbuilder build --project $PRJ --cross --out ../out
According to how fast your system is, this can run for hours!
If everything ends well without error the out/ directory has been filled with output files:
$ ls ../out
linux-5.10-rpi_1.0_armhf.buildinfo
linux-5.10-rpi_1.0_armhf.changes
linux-5.10-rpi_1.0.dsc
linux-5.10-rpi_1.0.tar.gz
linux-headers-5.10-rpi_1.0_armhf.deb
linux-image-5.10-rpi_1.0_armhf.deb
linux-libc-dev-5.10-rpi_1.0_armhf.deb
Update the Ubuntu XML image description
Now we have our Linux kernel packaged we can move on to the image generation. Since we started from examples/armhf-ubuntu.xml, we will modify this file to fit our needs.
We begin by adding the Linux kernel package to the XML image description in the pkg-list node:
<pkg-list>
...
	<pkg>linux-image-5.10-rpi</pkg>
...
</pkg-list>
We also have to add the Device Tree to the boot/ directory because the Linux kernel package installs all the Device Trees into the /usr/lib directory.
This change is part of the rootfs modifications, therefore it is described under the finetuning XML node. We also rename the kernel image to kernel.img:
<finetuning>
...
	<cp path="/usr/lib/linux-image-5.10-rpi/bcm2710-rpi-3-b.dtb">/boot/bcm2710-rpi-3-b.dtb</cp>
	<cp path="/usr/lib/linux-image-5.10-rpi/overlays">/boot/overlays</cp>
	<mv path="/boot/vmlinuz-5.10-rpi">/boot/kernel.img</mv>
...
</finetuning>
We want to use an SD card on our Raspberry Pi, so we have to describe the partitioning of our image. For this purpose, we add the images and the fstab XML nodes to the target XML node:
<target>
...
	<images>
		<msdoshd>
			<name>sdcard.img</name>
			<size>1500MiB</size>
				<partition>
					<size>50MiB</size>
					<label>boot</label>
					<bootable/>
				</partition>
				<partition>
					<size>remain</size>
					<label>rfs</label>
				</partition>
		</msdoshd>
	</images>
	<fstab>
		<bylabel>
			<label>rfs</label>
			<mountpoint>/</mountpoint>
			<fs>
				<type>ext2</type>
			</fs>
		</bylabel>
		<bylabel>
			<label>boot</label>
			<mountpoint>/boot</mountpoint>
			<fs>
				<type>vfat</type>
			</fs>
		</bylabel>
	</fstab>
...
</target>
The Raspberry Pi board also needs firmware binaries and configurations file to boot properly. We will use the overlay directory to add these Raspberry firmware files to the image:
$ mkdir -p overlay/boot
$ cd overlay/boot
$ wget https://github.com/raspberrypi/firmware/raw/1.20210201/boot/bootcode.bin
$ wget https://github.com/raspberrypi/firmware/raw/1.20210201/boot/start.elf
$ wget https://github.com/raspberrypi/firmware/raw/1.20210201/boot/fixup.dat
$ echo "console=ttyAMA0,115200 console=tty1 root=/dev/mmcblk0p2 rootwait" > cmdline.txt
$ echo "dtoverlay=miniuart-bt" > config.txt
ELBE stores the overlay uuencoded in the XML file using the chg_archive command:
$ elbe chg_archive examples/armhf-ubuntu.xml overlay
The archive node got created in the XML file.
To tell ELBE that the XML file has changed, you need to send it to the initvm:
$ elbe control set_xml $PRJ examples/armhf-ubuntu.xml
Then build the image with ELBE:
$ elbe control build $PRJ
$ elbe control wait_busy $PRJ
Finally, if the build completes successfully, you can retrieve the image file from the initvm:
$ elbe control get_files $PRJ
$ elbe control get_file $PRJ sdcard.img.tar.gz
Now you can flash the SD card image:
$ tar xf sdcard.img.tar.gz
$ dd if=sdcard.img of=/dev/sdX bs=1M
And boot the board with root and foo as login and password:
Ubuntu 18.04.1 LTS myUbuntu ttyAMA0

myUbuntu login: root
Password:
Welcome to Ubuntu 18.04.1 LTS (GNU/Linux 5.10-rpi armv7l)

 * Documentation:  https://help.ubuntu.com
 * Management:     https://landscape.canonical.com
 * Support:        https://ubuntu.com/advantage

The programs included with the Ubuntu system are free software;
the exact distribution terms for each program are described in the
individual files in /usr/share/doc/*/copyright.

Ubuntu comes with ABSOLUTELY NO WARRANTY, to the extent permitted by
applicable law.

root@myUbuntu:~#
Note: Ubuntu cannot be built for Raspberry A, B, B+, 0 and 0W according to https://wiki.ubuntu.com/ARM/RaspberryPi, as Ubuntu targets the ARMv7-A architecture, while the older RaspberryPi use an ARMv6 processor.
Further details
- You can find our talk about ELBE at the ELCE 2020 conference: PDF slides, video.
- See also ELBE’s official documentation


 Bootlin is not in the system administration business (we offer free and open-source solutions for embedded systems), but we do our best to share whatever experience we acquire, and whatever code we produce.
 No
No