![]() This post is the fifth blog post in our series of blog posts about Zephyr. You can find the previous episodes below:
This post is the fifth blog post in our series of blog posts about Zephyr. You can find the previous episodes below:
- Getting started with Zephyr
- Understanding Zephyr’s Blinky example
- Zephyr: Implementing a Device Driver for a sensor
- Integrating ST7789H2 Display Support on STM32L562E-DK with Zephyr: A Step-by-Step Guide
In this 5th blog post, we are going to implement a driver for the Nunchuk joystick from Nintendo. The Nunchuk is a simple joystick, which has the advantage of having a very simple interface that relies on the I²C bus.
Connecting and testing the Nunchuk
As shown in its brief “datasheet”, the Nunchuk uses a specific connector with six pins:
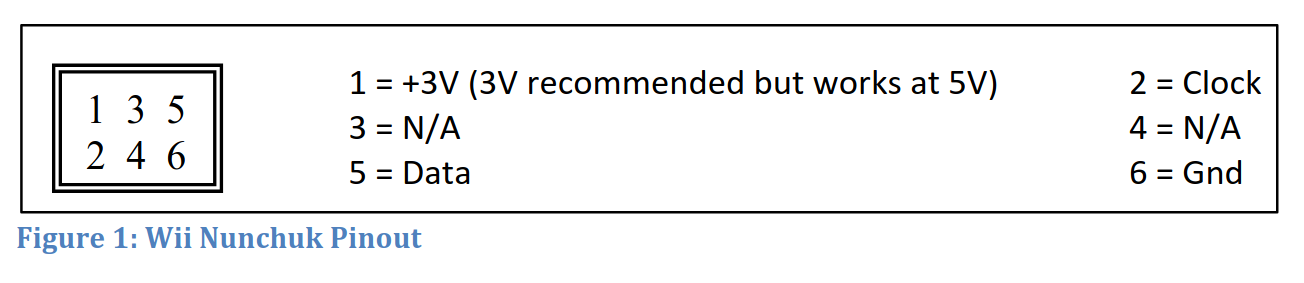
To use them, we use this small adapter from Olimex, which makes it easy to connect the Nunchuk signals to any development board. Once we have connected everything, we can communicate with the Nunchuk using the I²C bus.
We are first going to test the Nunchuk with a simple application before writing a real driver implementing the input API.
To communicate with the Nunchuk, we have to get the struct device of the I²C bus we are using. For this development, we are using the STM32M562E Discovery Kit from ST. On this board, we will connect the Nunchuk to the I2C1 bus, described as i2c1 in this board’s Device Tree. Of course, for a different hardware platform, the I2C bus may be different, so check your board’s datasheet. Once the I2C bus number is identified, we can retrieve the corresponding Zephyr’s struct device using the following snippet of C code:
const struct device *i2c_bus = DEVICE_DT_GET(DT_NODELABEL(i2c1));
Note the the struct device returned here represents the I2C bus, not the Nunchuk itself. In order to address the Nunchuk, we need to know its I²C address: according to the Nunchuk datasheet referenced previously, its address is 0x52, so we can define:
#define NUNCHUK_ADRESS 0x52
In order to communicate with the Nunchuk, and even before reading the states of the buttons or the joystick, we need to initialize it. For this, we must send two initialization sequences to the Nunchuk: first, 0xf0 0x55, followed by 0xfb 0x00.
uint8_t init_seq_1[2] = {0xf0, 0x55};
uint8_t init_seq_2[2] = {0xfb, 0x00};
int ret;


ret = i2c_write(i2c_bus, init_seq_1, sizeof(init_seq_1), NUNCHUK_ADRESS);
if (ret < 0) {
    printf("I2C write failed.\n");
}

k_msleep(1);

ret = i2c_write(i2c_bus, init_seq_2, sizeof(init_seq_2), NUNCHUK_ADRESS);
if (ret < 0) {
    printf("I2C write failed.\n");
}
The Nunchuk datasheet also describes how to retrieve the state of the Nunchuk buttons and joystick: sending a 0x0 byte over I2C will allow us to read back a data structure of 6 bytes from the Nunchuk. Here is a small snippet of code that does exactly this, and logs the state of the Z and C buttons, as well as the X and Y coordinates of the joystick:
uint8_t value = 0;
uint8_t buffer[6];
bool z_pressed;
bool c_pressed;

while (1) {
    i2c_write(i2c_bus, &value, 1, NUNCHUK_ADRESS);

    k_msleep(10);

    i2c_read(i2c_bus, buffer, 6, NUNCHUK_ADRESS);

    z_pressed = buffer[5] & 1;
    c_pressed = buffer[5] & 2;

    printf("Z : %d\n", z_pressed);
    printf("C : %d\n", c_pressed);
    printf("X joystick: %d\n",buffer[0]);
    printf("Y joystick: %d\n\n",buffer[1]);

    k_msleep(100);
}
If you run this program, you will see the state of the buttons and joystick displayed in your terminal. Moving the joystick will update the numbers, while the buttons will show as 0 when pressed and 1 when released.
Z : 1
C : 1
X joystick: 132
Y joystick: 126

Z : 1
C : 1
X joystick: 132
Y joystick: 255

Z : 1
C : 1
X joystick: 114
Y joystick: 255

Z : 1
C : 1
X joystick: 77
Y joystick: 255

Z : 1
C : 1
X joystick: 132
Y joystick: 126
Writing the driver
Now that we understand how to use the Nunchuk, we need to create a proper Zephyr driver for it. Considering the type of device that the Nunchuk is, we will use the input subsystem from Zephyr to report events to the users.
First, we need to add the Nunchuk to the Device Tree hardware description. To do this, we must create a Device Tree binding (in dts/bindings/input/nintendo,nunchuk.yaml):
description: Nintendo Nunchuk joystick through I2C

compatible: "nintendo,nunchuk"

include: i2c-device.yaml

properties:
  polling-interval-ms:
    type: int
    default: 50
    description: |
      Interval between two reads, in ms. The interval must be greater than 21 ms. Default to 50 ms.
We have only one property, polling-interval-ms, which is used to tell the driver how often it needs to read the registers of the Nunchuk. Indeed, the Nunchuk does not have an interrupt signal, so polling is the only option to retrieve the state of the buttons and joystick. We will discuss the reason for the 21ms minimum polling interval later in this blog post.
Next, we can add the Nunchuk to our Device Tree by including the following code in our app.overlay file:
&i2c1 {
    nunchuk: nunchuk@52 {
        reg = <0x52>;
        compatible = "nintendo,nunchuk";
    };
};
Before writing any code, we need to integrate our future driver into Zephyr’s configuration system (based on Kconfig) and build system (based on CMake). In the drivers/input folder, we first need to create Kconfig.nunchuk:
config INPUT_NUNCHUK
    bool "Nintendo Nunchuk joystick"
    default y
    depends on DT_HAS_NINTENDO_NUNCHUK_ENABLED
    select I2C
    help
      This option enable the driver for the Nintendo Nunchuk joystick.
Then, in drivers/input/Kconfig we include this newly created Kconfig.nunchuk:
source "drivers/input/Kconfig.nunchuk"
And in drivers/input/CMakeLists.txt, we tell the Zephyr build system to build input_nunchuk.c when the CONFIG_INPUT_NUNCHUK option is enabled:
zephyr_library_sources_ifdef(CONFIG_INPUT_NUNCHUK input_nunchuk.c)
We can finally start writing our driver.
First, we need to write the standard boilerplate driver code that allows Zephyr to correctly initialize our driver:
#define DT_DRV_COMPAT nintendo_nunchuk

#include <zephyr/device.h>
#include <zephyr/drivers/i2c.h>
#include <zephyr/logging/log.h>
#include <zephyr/input/input.h>
#include <zephyr/kernel.h>
#include <zephyr/timing/timing.h>

LOG_MODULE_REGISTER(input_nunchuk, CONFIG_INPUT_LOG_LEVEL);

struct nunchuk_config {
    struct i2c_dt_spec i2c_bus;
    int polling_interval_ms;
};

struct nunchuk_data {

};


static int nunchuk_init(const struct device *dev)
{

}

#define NUNCHUK_INIT(inst)                                                                         \
        static const struct nunchuk_config nunchuk_config_##inst = {                               \
                .i2c_bus = I2C_DT_SPEC_INST_GET(inst),                                             \
                .polling_interval_ms = DT_INST_PROP(inst, polling_interval_ms),                    \
        };                                                                                         \
        BUILD_ASSERT(DT_INST_PROP(inst, polling_interval_ms) > 20);                                \
                                                                                                   \
        static struct nunchuk_data nunchuk_data_##inst;                                            \
                                                                                                   \
        DEVICE_DT_INST_DEFINE(inst, &nunchuk_init, NULL, &nunchuk_data_##inst,                     \
                      &nunchuk_config_##inst, POST_KERNEL, CONFIG_INPUT_INIT_PRIORITY,             \
                      NULL);

DT_INST_FOREACH_STATUS_OKAY(NUNCHUK_INIT)
If you don’t understand this code, don’t hesitate to read our previous blog post, which explains in detail what each of these lines does.
This line: BUILD_ASSERT(DT_INST_PROP(inst, polling_interval_ms) > 20); ensures that the value passed in the device tree is valid.
In the nunchuk_init() function, we will include the code needed to initialize the Nunchuk. We will also store the result of an initial read to later compare it to subsequent reads and detect any changes. To avoid repetition, we will create a function named nunchuk_read_registers().
#define NUNCHUK_DELAY_MS     10
#define NUNCHUK_READ_SIZE 6

struct nunchuk_data {
    uint8_t joystick_x;
    uint8_t joystick_y;
    bool button_c;
    bool button_z;
};

static int nunchuk_read_registers(const struct device *dev, uint8_t *buffer)
{
    const struct nunchuk_config *cfg = dev->config;
    int ret;
    uint8_t value = 0;

    ret = i2c_write_dt(&cfg->i2c_bus, &value, sizeof(value));
    if (ret < 0) {
        return ret;
    }

    k_msleep(NUNCHUK_DELAY_MS);
    ret = i2c_read_dt(&cfg->i2c_bus, buffer, NUNCHUK_READ_SIZE);
    if (ret < 0) {
        return ret;
    }

    return 0;
}

static int nunchuk_init(const struct device *dev)
{
    const struct nunchuk_config *cfg = dev->config;
    struct nunchuk_data *data = dev->data;
    int ret;

    uint8_t init_seq_1[2] = {0xf0, 0x55};
    uint8_t init_seq_2[2] = {0xfb, 0x00};
    uint8_t buffer[NUNCHUK_READ_SIZE];

    if (!i2c_is_ready_dt(&cfg->i2c_bus)) {
        LOG_ERR("Bus device is not ready");
        return -ENODEV;
    }

    /* Send the unencrypted init sequence */
    ret = i2c_write_dt(&cfg->i2c_bus, init_seq_1, sizeof(init_seq_1));
    if (ret < 0) {
        LOG_ERR("I2C write failed (%d).", ret);
        return ret;
    }

    k_msleep(1);
    ret = i2c_write_dt(&cfg->i2c_bus, init_seq_2, sizeof(init_seq_2));
    if (ret < 0) {
        return ret;
    }

    k_msleep(1);
    ret = nunchuk_read_registers(dev, buffer);
    if (ret < 0) {
        return ret;
    }

    /* Sometimes, the first read gives unexpected results, so we make another one. */
    k_msleep(1);
    ret = nunchuk_read_registers(dev, buffer);
    if (ret < 0) {
        return ret;
    }

    data->joystick_x = buffer[0];
    data->joystick_y = buffer[1];
    data->button_z = buffer[5] & BIT(0);
    data->button_c = buffer[5] & BIT(1);
}
This code goes through the same steps as the applications we made before, but it handles errors and uses slightly different functions for the I²C access to take advantage of the struct i2c_dt_spec which we created in the NUNCHUK_INIT macro using the Device Tree.
Using work queues
Now, we have to set up the polling. To do this, we will use a Zephyr mechanism called work queues. Our goal is to periodically call a function (that we will call nunchuk_poll()) every polling_interval_ms milliseconds.
We will use a struct k_work_delayable, which we will add to our struct nunchuk_data:
struct nunchuk_data {
    ...
    struct k_work_delayable work;
}
We will now declare our handler. The prototype is void nunchuk_poll(struct k_work *work). To access our device, we need to retrieve the struct k_work_delayable, and we can then use the macro CONTAINER_OF to get the struct nunchuk_data. In order to get our struct device, we will add a pointer to it into nunchuk_data.
struct nunchuk_data {
    ...
    const struct device *dev;
    struct k_work_delayable work;
}


static void nunchuk_poll(struct k_work *work)
{
    struct k_work_delayable *dwork = k_work_delayable_from_work(work);
    struct nunchuk_data *data = CONTAINER_OF(dwork, struct nunchuk_data, work);
    const struct device *dev = data->dev;

    ...
}
Once our handler is finished, we need to reschedule it using k_work_reschedule. Ideally, Zephyr would have a mechanism to schedule a given function at a regular interval. Unfortunately, the work queue mechanism doesn’t allow that, and we can only reschedule a function relatively to the current timestamp. In order to approximate calling our nunchuk_poll() handler every poll-intervall milliseconds as defined in the Device Tree, we are going to schedule the next iteration at the end of nunchuk_poll(), taking into account an approximation of the function’s execution time. Since it has a delay of 10ms included, and some code, we’re approximating this to 11ms, which is why we are rescheduling the next iteration poll-intervall-ms – 11 milliseconds later. As the Nunchuk tells us we should wait at least 10 ms between two communications on the I2C bus, we need at least 21 milliseconds as the value of poll-interval milliseconds. While this all approximation isn’t ideal, it works and has been accepted by the upstream Zephyr community. In the nunchuk_init() function, we will do this computation, and initialize then schedule our work for the first time.
struct nunchuk_data {
    ...
    const struct device *dev;
    struct k_work_delayable work;
    k_timeout_t interval_ms;
}

static void nunchuk_poll(struct k_work *work)
{
    struct k_work_delayable *dwork = k_work_delayable_from_work(work);
    struct nunchuk_data *data = CONTAINER_OF(dwork, struct nunchuk_data, work);
    const struct device *dev = data->dev;

    ...

    k_work_reschedule(dwork, data->interval_ms);
}


static int nunchuk_init(const struct device *dev)
{
    ...

    data->dev = dev;
    data->interval_ms = K_MSEC(cfg->polling_interval_ms - 11);

    k_work_init_delayable(&data->work, nunchuk_poll);
    ret = k_work_reschedule(&data->work, data->interval_ms);

    return ret;
}
The remaining tasks are now straightforward: in the work queue handler, we need to read the registers of the Nunchuk, compare the current read to the previous one, and if there is a difference, report an event to the input subsystem. There are multiple types of events supported by the input subsystem: for the Nunchuk, we will use INPUT_EV_KEY for the buttons and INPUT_EV_ABS for the joystick. There is one subtlety: the sync flag. This flag must be set when the device has reached a stable state. For the buttons, we can simply set it to true every time, but for the joystick, it’s a bit more complex: if both the y and x axes change, we must not set sync to true until both events have been sent.
The final nunchuk_poll function looks like this:
static void nunchuk_poll(struct k_work *work)
{
    struct k_work_delayable *dwork = k_work_delayable_from_work(work);
    struct nunchuk_data *data = CONTAINER_OF(dwork, struct nunchuk_data, work);
    const struct device *dev = data->dev;
    uint8_t buffer[NUNCHUK_READ_SIZE];
    uint8_t joystick_x, joystick_y;
    bool button_c, button_z;
    bool y_changed;
    bool sync_flag;
    int ret;

    nunchuk_read_registers(dev, buffer);

    joystick_x = buffer[0];
    joystick_y = buffer[1];
    y_changed = (joystick_y != data->joystick_y);

    if (joystick_x != data->joystick_x) {
        data->joystick_x = joystick_x;
        sync_flag = !y_changed;
        ret = input_report_abs(dev, INPUT_ABS_X, data->joystick_x, sync_flag, K_FOREVER);
    }

    if (y_changed) {
        data->joystick_y = joystick_y;
        ret = input_report_abs(dev, INPUT_ABS_Y, data->joystick_y, true, K_FOREVER);
    }

    button_z = buffer[5] & BIT(0);
    if (button_z != data->button_z) {
        data->button_z = button_z;
        ret = input_report_key(dev, INPUT_KEY_Z, !data->button_z, true, K_FOREVER);
    }

    button_c = buffer[5] & BIT(1);
    if (button_c != data->button_c) {
        data->button_c = button_c;
        ret = input_report_key(dev, INPUT_KEY_C, !data->button_c, true, K_FOREVER);
    }

    k_work_reschedule(dwork, data->interval_ms);
}
The driver should now work. To test it, we can use the sample Input dump:
*** Booting Zephyr OS build v4.0.0-2760-g5a8671e7edb6 ***
Input sample started
I: input event: dev=nunchuk@52       SYN type= 1 code= 44 value=1
I: input event: dev=nunchuk@52       SYN type= 1 code= 44 value=0
I: input event: dev=nunchuk@52       SYN type= 1 code= 46 value=1
I: input event: dev=nunchuk@52       SYN type= 1 code= 46 value=0
I: input event: dev=nunchuk@52       SYN type= 3 code=  1 value=156
I: input event: dev=nunchuk@52           type= 3 code=  0 value=100
I: input event: dev=nunchuk@52       SYN type= 3 code=  1 value=221
I: input event: dev=nunchuk@52           type= 3 code=  0 value=78
I: input event: dev=nunchuk@52       SYN type= 3 code=  1 value=255
You can see on the terminal the events sent by the driver when we press the buttons (type= 1) or move the joystick type= 3.
The code was submitted to Zephyr and, after some reviews, was merged. You can find the final version in drivers/input/input_nunchuk.c. It is part of the recently published 4.1 release. This means you’re now able to use a Nunchuk in any project you may have with Zephyr!
We hope this post helped you better understand how to write a driver for Zephyr with the input subsystem and maybe even inspired you to write one yourself. Stay tuned for our next blog posts related to Zephyr!
Nice! Keep them coming!